Lighting / Fixtures
Installation Guide for Maxxima 16-inch 30W Ceiling Light
Quick installation guide for the Maxxima 16-inch 30W Ceiling Light (MCL-6163005, MCL-6163005B). Includes step-by-step wiring instructions, CCT color temperature selection, and safety precautions.
Table of contents
Manual images
Click an image to enlargeQuick guide from the manual
This document provides installation instructions for the Maxxima 16-inch 30W Ceiling Light. The fixture is suitable for damp locations and operates on 120 VAC, 60 Hz power. Before installation, ensure you have selected your preferred color temperature using the built-in CCT switch.
Installation Instructions
- Ensure that power has been turned off by switching the circuit breaker or by removing the fuse from the fuse panel.
- If you are replacing an existing fixture, remove and disconnect the old fixture first.
- Remove the orange E26 connector.
- Using the CCT switch on the fixture, preview and select the desired color temperature.
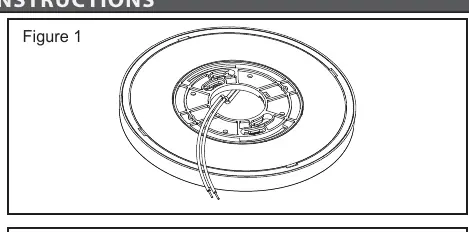
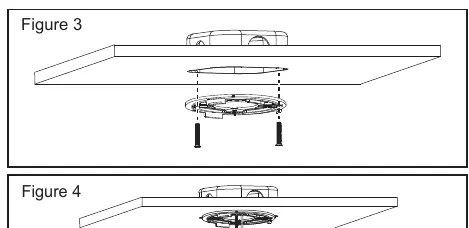
- Attach the mounting bracket to the junction box using the supplied mounting screws. Ensure that the supply wires go through the center hole of the bracket.
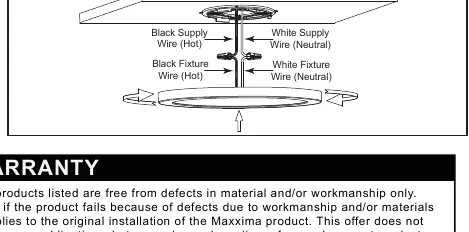
- Connect the hot (black) wire to the black supply wire, the neutral (white) wire to the white supply wire, and the ground (green/bare copper) wire to the green using the supplied wire connectors.
- Ensure that the wires are safely tucked into the junction box and no wires are pinched.
- Push the light up, while aligning the grooves in the body of the light with the mounting bracket. Turn the light clockwise to secure. Ensure the light has been locked into position.
- Installation is now complete. Restore power and check operation of the light fixture.
Wiring and Connections
Proper wiring is essential for safety. Connect the black fixture wire to the black supply wire (Hot) and the white fixture wire to the white supply wire (Neutral). Ensure the ground wire is connected to the green/bare copper supply wire. Use the provided wire connectors to secure all connections.
Color Temperature Selection
The fixture features a CCT switch allowing you to select between different color temperatures: 27K, 30K, 35K, 40K, and 50K. Select your preferred setting before mounting the fixture to the ceiling.
Safety Warnings
- Risk of fire or electric shock.
- If you are unfamiliar with electrical installations, consult a qualified electrician before proceeding.
- Do not make or alter any holes in the wiring enclosure or modify any electrical componentry.
- To prevent wiring damage or abrasion, do not expose wiring to edges of sheet metal or other sharp objects.
- To ensure personal safety, proper grounding of the electrical fixture is required.
- The fixture must be wired in accordance with the National Electric Code (N.E.C.) and applicable local codes or ordinances.
Practical help
Common problems
Light does not turn on after installation
Verify that power has been restored at the circuit breaker or fuse panel.
Fixture is loose or not sitting flush
Ensure the light is aligned with the mounting bracket grooves and turned clockwise until it is locked into position.
Wires are pinched during installation
Ensure all wires are safely tucked into the junction box before pushing the light up to the bracket.
Before use
- Turn off power at the circuit breaker or fuse panel.
- Remove the old fixture if replacing an existing one.
- Select the desired color temperature using the CCT switch.
- Ensure proper grounding is available.
- Verify the junction box is compatible.
Images and diagrams
- Figure 1: Mounting bracket installation.
- Figure 2: CCT switch location for color temperature selection.
- Figure 3: Wire connector usage.
- Figure 4: Wiring connection diagram (Black to Black, White to White).
Model compatibility
- Suitable for damp locations.
- Must be wired in accordance with National Electric Code (N.E.C.).

Manual page author
Emily Carter
User documentation editor
Prepares concise manual descriptions and highlights the most useful setup, operation, and maintenance information for readers.