Health / Personal Care
User Manual for Sunny Health & Fitness 012-S Mini Stepper with Exercise Bands
Quick guide for the Sunny Health & Fitness 012-S Mini Stepper. Includes assembly steps, maintenance, adjustment instructions for stepping height and exercise bands, and meter operation.
Table of contents
Manual images
Jump to the sectionQuick guide from the manual
This document provides essential instructions for the assembly, safe operation, and maintenance of the 012-S Mini Stepper. Key requirements include using the equipment on a flat, solid surface with at least 120 cm (4 ft) of free space around it. The maximum weight capacity is 100 kg (220 lbs). Users should consult a physician before starting any exercise program.
Assembly Instructions
- Remove the Main Frame (No. 10) from the box.
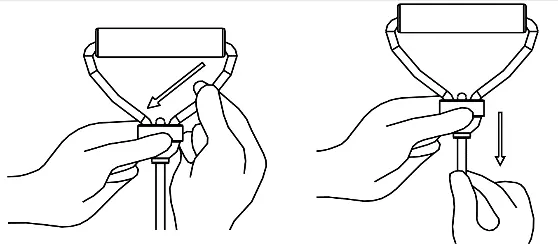
- Lift one Pedal (No. 5) and ensure the Cable (No. 22) is correctly seated in the slot of the Pulley (No. 9).
- Turn the Adjustment Knob (No. 11) clockwise until it reaches its end point.
- Connect the 2 Exercise Bands (No. 20) to the Exercise Band Buckles (No. 19) at the front of the pedals.
Operation and Adjustments
Stepping Height: Turn the Adjustment Knob (No. 11) clockwise to increase the stepping height, or counter-clockwise to decrease it.
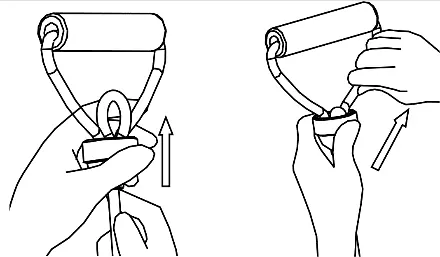
Exercise Bands: To adjust the rope length, push one side of the rope down and pull the bottom (to lengthen) or push the rope upward from the bottom and pull the top (to shorten). Ensure the hook nut is securely tightened after attaching the bands to the pedal hooks.
Exercise Meter
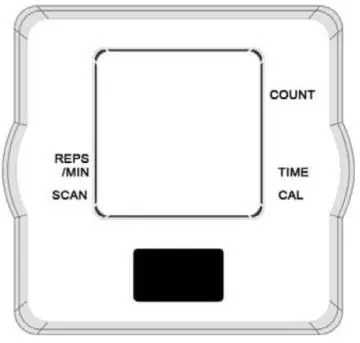
The meter is auto-powered and activates when exercise begins or the MODE button is pressed. It turns off automatically after 4-5 minutes of inactivity. Use the MODE button to cycle through functions: Time, Reps/Min, Count, Calories, and Scan. To reset, hold the MODE button for three seconds or remove the battery. The meter uses one LR44 1.5V battery.
Maintenance and Care
- Cleaning: Wipe with a soft, clean, damp cloth after each use. Avoid excessive moisture on the computer display.
- Lubrication: If the stepper screeches, loosen the screw on the U-shaped iron and the cable, lubricate both, then re-tighten.
- Inspection: Check all bolts and pedals weekly for proper tightness.
- Storage: Store in a clean, dry, indoor environment away from children.
For technical support, contact [email protected] or 1-877-90SUNNY (877-907-8669).
Practical help
Common problems
Stepper screeches during exercise
Loosen the screw on the U-shaped iron and the cable, lubricate both, then re-tighten and secure.
Inaccurate meter reading
Replace the LR44 1.5V battery immediately.
Hydraulic cylinders making noise
This is normal if they become hot during exercise; do not touch them during or immediately after use.
Before use
- Ensure all nuts and bolts are securely tightened.
- Place on a solid, flat, level surface with a protective cover.
- Ensure at least 120 cm (4 ft) of free space around the unit.
- Inspect all moving parts for proper condition.
- Wear suitable, non-loose clothing.
Specs in practice
- Maximum Weight Capacity
- 100 kg (220 lbs) - do not exceed this limit.
- Battery Type
- Uses one (1) LR44 1.5V battery for the exercise meter.
Images and diagrams
- The exploded diagram (page 5) identifies all 31 components for replacement part ordering.
- The meter display shows Time, Reps/Min, Count, Calories, and Scan functions.
- The U-shaped iron and cable adjustment points are critical for maintenance if noise occurs.
Model compatibility
- Designed for indoor and home use only; not for commercial or therapeutic use.

Manual page author
David Miller
Documentation analyst
Organizes user manual content into clear summaries, with attention to model details, product context, and everyday usability.