HVAC / Towel Warmers
User Manual for Neomitis Danaïs Electric Towel Rail
Comprehensive user guide for the Neomitis Danaïs electric towel rail. Includes installation instructions, wall-mounting procedures, operating modes, programming, settings, maintenance, and troubleshooting.
Table of contents
Manual images
Click an image to enlargeQuick guide from the manual
The Neomitis Danaïs is an electric towel rail with a patented blower for rapid heating. Before use, ensure the device is installed by a qualified professional in accordance with local regulations. The device features multiple operating modes (Auto, Comfort, Eco, Frost), a Boost function for rapid heating, and open window detection. The control panel allows for programming and temperature adjustments. Always ensure the dust filter is clean to prevent performance issues.
Installation and mounting
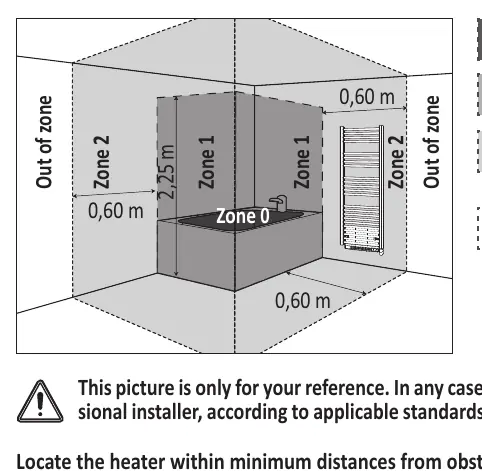
The device is a Class II IP24 appliance, suitable for installation in bathroom zones 2 and Out of Zone. It must be installed at least 15 cm from obstacles like shelving or curtains. The installation must be performed by a qualified electrician. The device requires a 230V +/- 10% 50Hz power supply. The three wires (Blue: Neutral, Brown: Phase, Black: Pilot wire) must be connected in an electrical connection box; connection to earth is prohibited.
Operating modes
- Auto Mode: Follows the programmed schedule (Comfort/Eco).
- Comfort Mode: Maintains the set comfort temperature 24/7.
- Eco Mode: Maintains a lower temperature (Comfort - 3.5°C) for energy savings.
- Frost Protection: Maintains a minimum temperature of 7°C.
- Boost: Rapid heating mode, adjustable up to 90 minutes.
Programming and settings
The device supports 7-day and daily programming. You can assign different programs (P1, P2, P3) to each day. The control panel can be locked using the keypad lock function to prevent unauthorized changes. Installer and expert settings allow for advanced configurations like open window detection, dual optimization, and ambient temperature sensor adjustment.
Maintenance
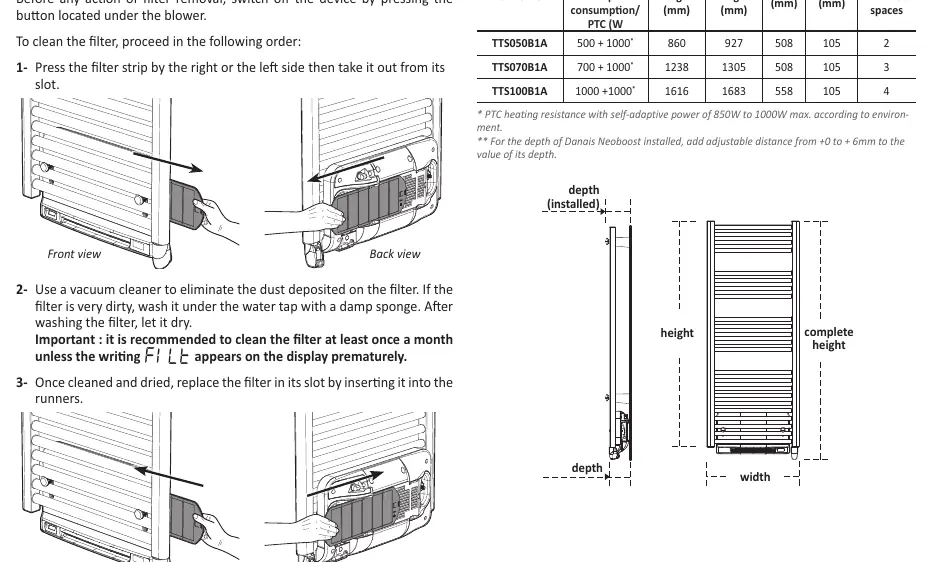
The device requires minimal maintenance. Clean the exterior with a damp cloth; never use abrasives or solvents. The blower is equipped with a removable dust filter. If the display shows 'FILE', the filter is saturated and must be cleaned or replaced. Remove the filter by pulling it from its slot, vacuum it, and reinsert it.
Troubleshooting
If the device does not heat, check the fuse, ensure it is not in standby mode, and verify the temperature setting. If the 'FILE' error appears, clean the dust filter. If the keypad is locked, unlock it by holding the '-' and '+' buttons simultaneously. For persistent issues, contact your installer.
Practical help
Common problems
Device does not heat
Check the fuse/circuit breaker, ensure the device is not in 'Heating standby' mode, and verify the temperature setting is higher than the current room temperature.
Display shows 'FILE'
The dust filter is saturated. Remove the filter from the blower, clean it with a vacuum, and reinsert it.
Keypad is locked
Hold the '-' and '+' buttons simultaneously for 5 seconds to unlock.
Device is in Frost protection mode unexpectedly
Check if the open window detection has been triggered by a sudden temperature drop.
Before use
- Ensure the power supply is disconnected before installation.
- Verify the wall is suitable for the mounting brackets.
- Check that the installation location complies with IP24 zone requirements.
- Remove protective caps from the ends of the towel rail before heating.
- Ensure the dust filter is clean and properly inserted.
Images and diagrams
- Wall-mounting brackets: Shows the assembly of the 4 brackets and how to adjust the depth.
- Control panel: Identifies buttons for mode selection, temperature adjustment, and the Boost function.
- Installation zones: Illustrates where the device can be safely installed in a bathroom.
Model compatibility
- The device is designed for monophase power supply 230V +/- 10% 50Hz.
- The pilot wire must be insulated if not connected to a central programmer.

Manual page author
Emily Carter
User documentation editor
Prepares concise manual descriptions and highlights the most useful setup, operation, and maintenance information for readers.