HVAC / Towel Warmers
User Manual for Towelrads Eyebeam Radiating Panel
Quick guide for the Towelrads Eyebeam radiating panel. Learn about installation, safety zones, touch screen controls, remote control settings, and maintenance.
Table of contents
Manual images
Click an image to enlargeImportant Information
The Towelrads Eyebeam is an infrared radiating panel designed for domestic room heating. This manual provides essential instructions for safe installation, operation, and maintenance. Always ensure the appliance is installed according to local electrical regulations and safety standards.
Positioning and Installation
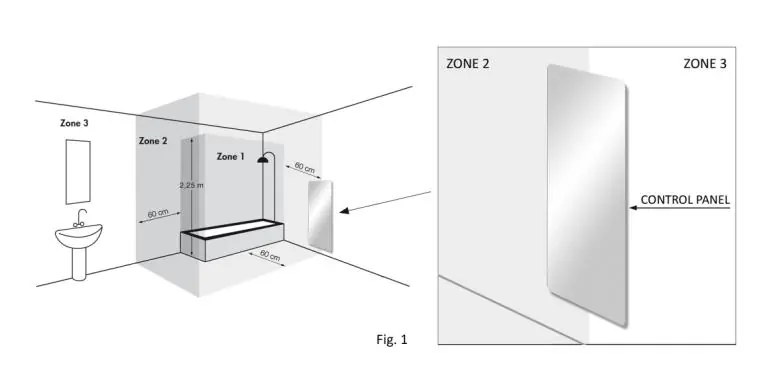
The appliance must be fixed to a wall. When installing in a bathroom or shower, it must be placed outside the safety zone (Zone 3). Ensure the following:
- Do not install directly below a power socket.
- Maintain minimum distances from walls and floors.
- Keep flammable materials and pressurized containers at least 50cm away.
- Ensure no electrical cables or pipes are in the wall where you intend to drill.
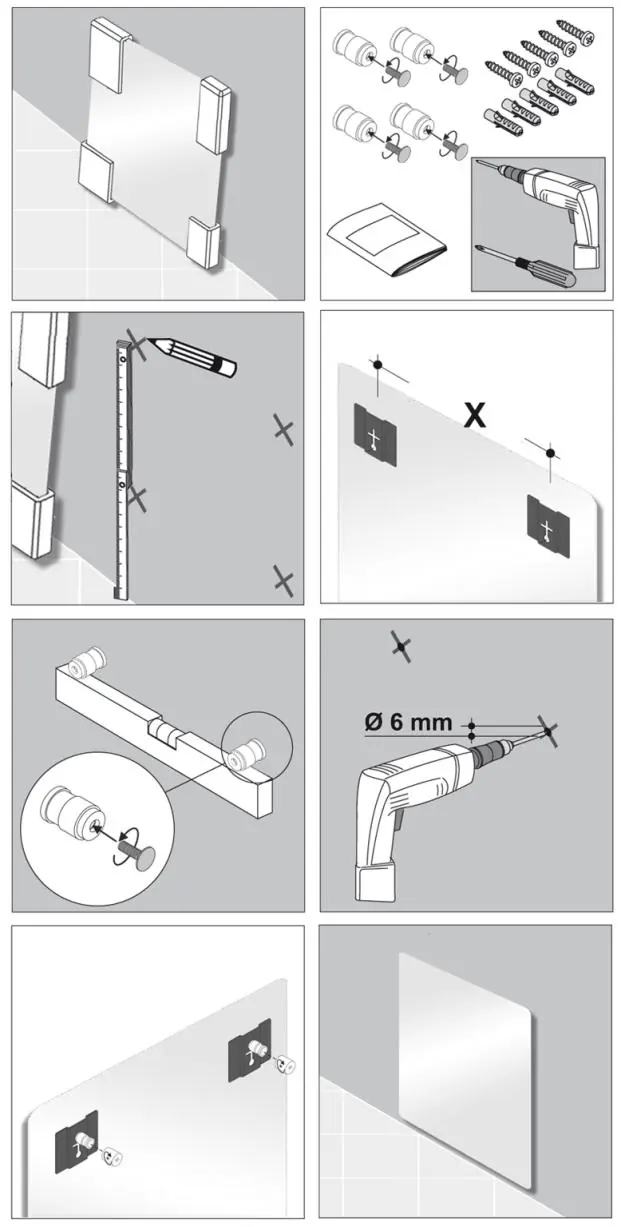
Wall Mounting: Use the provided plugs and screws. Secure the appliance using the upper screws (A) and leave the lower screws slightly loosened to allow for thermal expansion of the panel during heating.
Electrical Connection
The electrical connection must be performed by a qualified technician in compliance with national regulations. Ensure the power is off before connecting. The power line must include an omnipolar cut-off device with a contact gap of at least 3mm. In humid environments, the connection must be at least 25cm from the floor.
Control Panel Operation
The radiator features a touch screen control panel:
- T1 (Stand-by): Turns the appliance on/off.
- T2 (Low): 50°C heating.
- T3 (Medium): 70°C heating.
- T4 (Maximum): 90°C heating.
- T5 (Boost): Maximum temperature for 2 hours.
- T6 (Lock): Press for 5 seconds to lock/unlock the keypad.
LED indicators (L1-L8) provide status updates, such as heating activity and power status.
Remote Control and Programming
The remote control allows for advanced settings, including date/time, daily programs, and specific modes (Comfort, Night, Antifreeze, Pilot-wire, Eco, Window open, and Radar). Point the remote towards the receiver on the appliance (max distance 7m).
- Setting Modes: Use the 'Mode' button to cycle through settings.
- Temperature Adjustment: In Comfort or Night mode, use '+' or '-' to adjust temperature (7°C to 32°C).
- Eco Mode: Reduces power consumption when the room is empty.
- Keypad Lock: Press 'Mode' and '-' simultaneously for 3 seconds.
Cleaning and Maintenance
Before cleaning, ensure the appliance is disconnected from the mains and completely cold. Use a soft, damp cloth with a mild detergent to clean the crystal surface. Do not use abrasive cleaners or corrosive solvents.
Practical help
Common problems
Radiator not heating
Check if the appliance is in Stand-by mode (T1). Ensure the power supply is active and the unit is correctly connected.
Remote control not responding
Check batteries (2x 1.5V AAA). Ensure you are within 7m of the receiver and pointing directly at it.
Keypad is locked
Press the 'Mode' and 'Minus' buttons simultaneously for 3 seconds to unlock.
Temperature not rising
Ensure you are not in 'Night' mode with a temperature limit set lower than the 'Comfort' mode.
Before use
- Ensure the wall is suitable for the weight of the radiator.
- Verify the power supply is 230V 50Hz.
- Confirm installation is outside bathroom safety zones.
- Check that no flammable materials are within 50cm.
- Ensure the appliance is not installed directly below a power socket.
- Verify that the pilot-wire is isolated if not used (France only).
Images and diagrams
- Fig 1 (Page 4): Illustrates safety zones for bathroom installation.
- Fig 5 (Page 8): Wiring diagram for electrical connection.
- Fig 6 (Page 17): Daily program setting interface.
Model compatibility
- For France only: If the pilot-wire is not connected to a programming device, it must be isolated and never connected to a ground terminal.

Manual page author
David Miller
Documentation analyst
Organizes user manual content into clear summaries, with attention to model details, product context, and everyday usability.