Lighting / Fixtures
Origin 21 17.5-in 5 Peg Rail Installation Guide
Installation guide for the Origin 21 17.5-inch 5-peg rail. Includes mounting instructions for wood and drywall, tool requirements, and maintenance tips.
Quick answers from the manual
Quick answer
- To install the Origin 21 5-peg rail, mark the hole locations with a level, drill pilot holes (3/32 in. for wood, 5/16 in. for drywall), insert anchors if using drywall, and secure the rail with the provided screws. p. 2
Key actions
- Check for hidden wiring or plumbing before drilling. p. 1
- Perform annual maintenance. p. 1
Problems and fixes
Rail not level
Re-install starting with level marks.
p. 1Maintenance and reset
- Clean with a lightly damp cloth or towel using water only. p. 1
Technical specifications
| Parameter | Value | Meaning | Pages |
|---|---|---|---|
| Maximum Load | 35 lbs (15.88 kg) | Maximum weight capacity for the rail. | p. 1 |
Where to find it in the PDF
- Preparation and Safety p. 1
- Installation Steps p. 2
Table of contents
Manual images
Click an image to enlargeQuick guide from the manual
The Origin 21 17.5-inch 5-peg rail is designed for wall mounting. The maximum load capacity for this rail is 35 lbs (15.88 kg). Installation requires basic tools including a drill, drill bits, a screwdriver, a level, and a pencil. Ensure you check for hidden electrical wiring or plumbing before drilling into the wall.
Preparation and tools
Before beginning installation, verify that all parts are present. The package includes the rail, screws, anchors, and hole covers. The following tools are required but not included:
- Drill
- Drill bits (3/32 in. for wood, 5/16 in. for drywall)
- Phillips screwdriver
- Level
- Pencil
Installation instructions
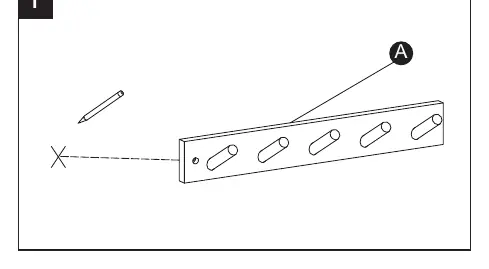
Step 1: Marking
Temporarily place the rail in the desired location on the wall. Use a level to ensure it is straight and mark the mounting hole locations with a pencil.
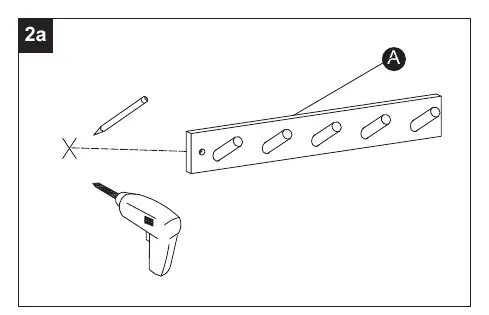
Step 2a: Solid wood or wood stud installation
Remove the rail from the wall. Drill 3/32 in. pilot holes at the marked locations. Secure the rail to the surface using the provided screws.
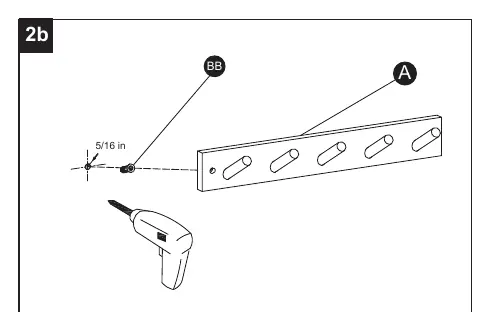
Step 2b: Drywall installation
Remove the rail from the wall. Drill 5/16 in. pilot holes at the marked locations. Insert the provided anchors into the holes, then secure the rail using the screws.
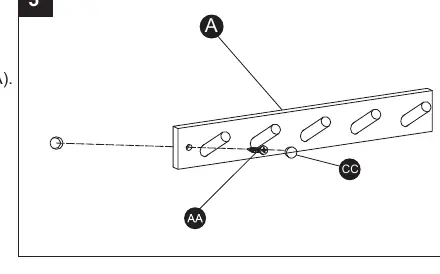
Step 3: Finishing
Once the rail is secured to the mounting surface, you may optionally place the hole covers into the screw holes on the rail to conceal the screw heads.
Safety and maintenance
To maintain the durability of the finish on the hooks and the rail, clean it annually with a lightly damp cloth or towel using water only. It is also recommended to double-check all connections and re-tighten all screws and anchors on an annual basis.
Practical help
Common problems
Rail is not level
Re-install the rail, ensuring you start by marking the wall with a level.
Before use
- Verify all parts are present (Rail, Screws, Anchors, Hole covers).
- Ensure you have the correct drill bits (3/32 in. for wood, 5/16 in. for drywall).
- Check the wall for hidden electrical wiring or plumbing before drilling.
- Use a level to mark accurate mounting positions.
Specs in practice
- Maximum Load
- 35 lbs (15.88 kg). Do not exceed this weight regardless of the mounting application.
Images and diagrams
- The manual provides visual steps for marking the wall, drilling pilot holes for different wall types (wood vs. drywall), and securing the rail with screws and hole covers.
Model compatibility
- The included hardware is for standard wood or drywall installations. Other installation types may require different hardware not included in the package.

Manual page author
Michael Turner
Technical manual editor
Reviews PDF manuals for structure, safety notes, and practical product details so readers can find the right information quickly.