Lighting / Fixtures
User Manual for Origin 21 1-Light Pendant 43017
Quick guide for the Origin 21 1-Light Pendant (Model 43017). Includes assembly instructions, wiring diagrams, safety warnings, and troubleshooting steps.
Table of contents
Manual images
Click an image to enlargeQuick guide from the manual
This document provides instructions for the assembly and installation of the Origin 21 1-Light Pendant (Model 43017). Before beginning, ensure the power is disconnected at the circuit breaker. This fixture is designed for indoor use only and is not suitable for outdoor or damp locations. The net weight of the fixture is 3.44 lbs.
Package Contents
- Mounting Bracket
- Mounting Bracket Screws
- Canopy
- Chain Loop
- Chain
- Fixture Wire
- Connecting Links
- Finial
- Fixture
- LED (preassembled)
- Glass Bowl
Safety Information
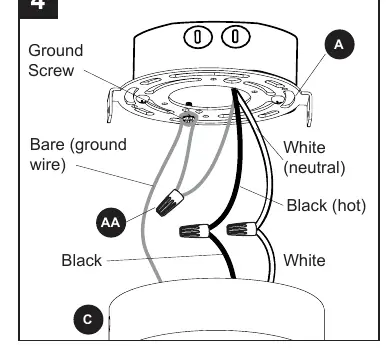
DANGER: Do not connect this fixture to an electrical system that does not provide a means for equipment grounding. Never use a fixture in a two-wire system that is not grounded. Do not connect the bare or green insulation fixture ground wire to the black (hot) or white (neutral) house wires.
WARNING: All electrical connections must comply with local codes, ordinances, and the National Electric Code (NEC). If you are unfamiliar with electrical wiring, consult a qualified electrician. Do not suspend the fixture by the house wires; it must be mounted directly to an outlet box.
Assembly Instructions
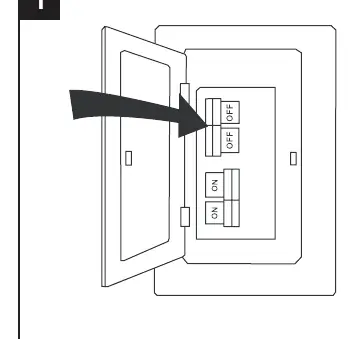
- Power Off: Turn off the circuit breakers and the wall switch to the supply line leads.
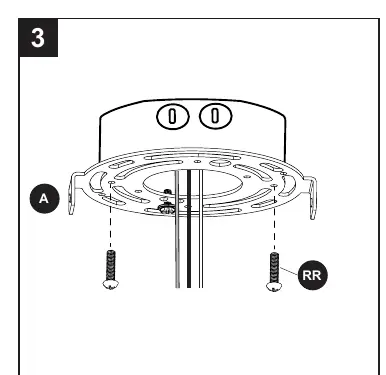
- Bracket Preparation: Remove the two mounting bracket screws from the sides of the canopy and remove the mounting bracket.
- Mounting: Attach the mounting bracket to the outlet box using the provided mounting screws.
- Wiring: Loosen the ground screw on the mounting bracket and wrap the bare/green supply wire around it. Connect the fixture wires to the supply wires:
- Bare fixture wire to Bare/Green (ground) supply wire.
- White fixture wire to White (neutral) supply wire.
- Black fixture wire to Black (hot) supply wire.
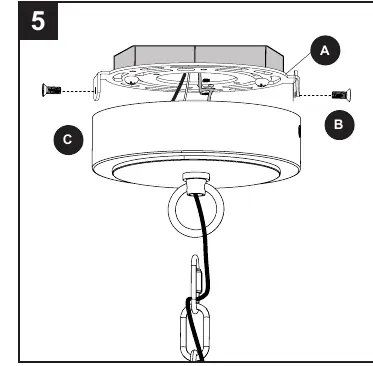
- Canopy Installation: Lift the canopy to the mounting bracket, align the holes, and secure it using the previously removed mounting bracket screws.
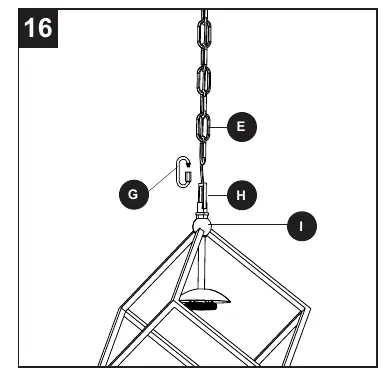
- Chain Adjustment: Use pliers to open chain links if you need to shorten the chain. Use the connecting links to attach the chain to the chain loop at the canopy.
- Final Assembly: Twist the finial onto the threaded rod at the top of the fixture. Attach the connecting link at the bottom of the chain to the finial.
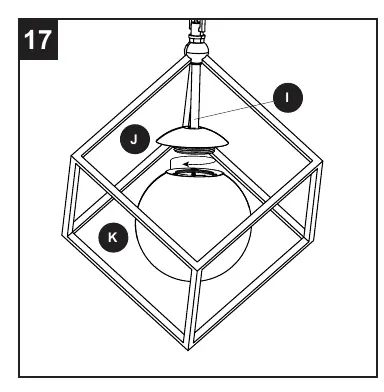
- Glass Bowl: Lift the glass bowl onto the preassembled LED and turn it clockwise to secure. Avoid cross-threading.
- Power On: Restore power at the circuit breaker.
Troubleshooting
If the LED will not light, check the wiring connections to ensure they are correct.
Warranty
The manufacturer provides a three-year limited warranty against defects in materials and workmanship from the date of purchase.
Practical help
Common problems
LED will not light
Check wiring connections to ensure they are secure and correctly matched.
Before use
- Turn off power at the circuit breaker
- Ensure the outlet box is properly grounded
- Verify all wire connections are secure
- Use gloves if handling parts with sharp edges
- Confirm indoor installation location
Images and diagrams
- The wiring diagram illustrates connecting the bare/green ground wire to the ground screw, the white neutral wire to the white supply wire, and the black hot wire to the black supply wire using wire connectors.
Model compatibility
- Indoor use only
- Not suitable for outdoor or damp locations
- Must be mounted directly to an outlet box

Manual page author
David Miller
Documentation analyst
Organizes user manual content into clear summaries, with attention to model details, product context, and everyday usability.