Lighting / Fixtures
User Manual for Origin 21 12-Light Round Chandelier
Get started with your Origin 21 12-Light Round Chandelier. This guide covers installation steps, wiring instructions, safety warnings, and troubleshooting tips for model LWS38500A.
Table of contents
Manual images
Click an image to enlargeQuick guide from the manual
This chandelier requires assembly and installation by a qualified individual. Before starting, ensure you have all parts and the necessary tools. The estimated assembly time is 20-30 minutes. Crucial: Always turn off electricity at the circuit breaker or main fuse box before beginning installation or replacing bulbs.
Safety Information
- Risk of Electric Shock: Turn off power at the circuit breaker or main fuse box before installation.
- Risk of Fire: Use only bulbs specified by the markings or labels on the fixture.
- If you are in doubt about the electrical installation, consult a licensed electrician.
Preparation and Tools
Before beginning assembly, verify all parts are present by comparing them with the package contents list. If any parts are missing or damaged, do not attempt to assemble the product. Contact customer support at 888-251-1026 or [email protected].
Tools required (not included): Pliers, soft cloth, and standard electrical tools.
Installation Overview
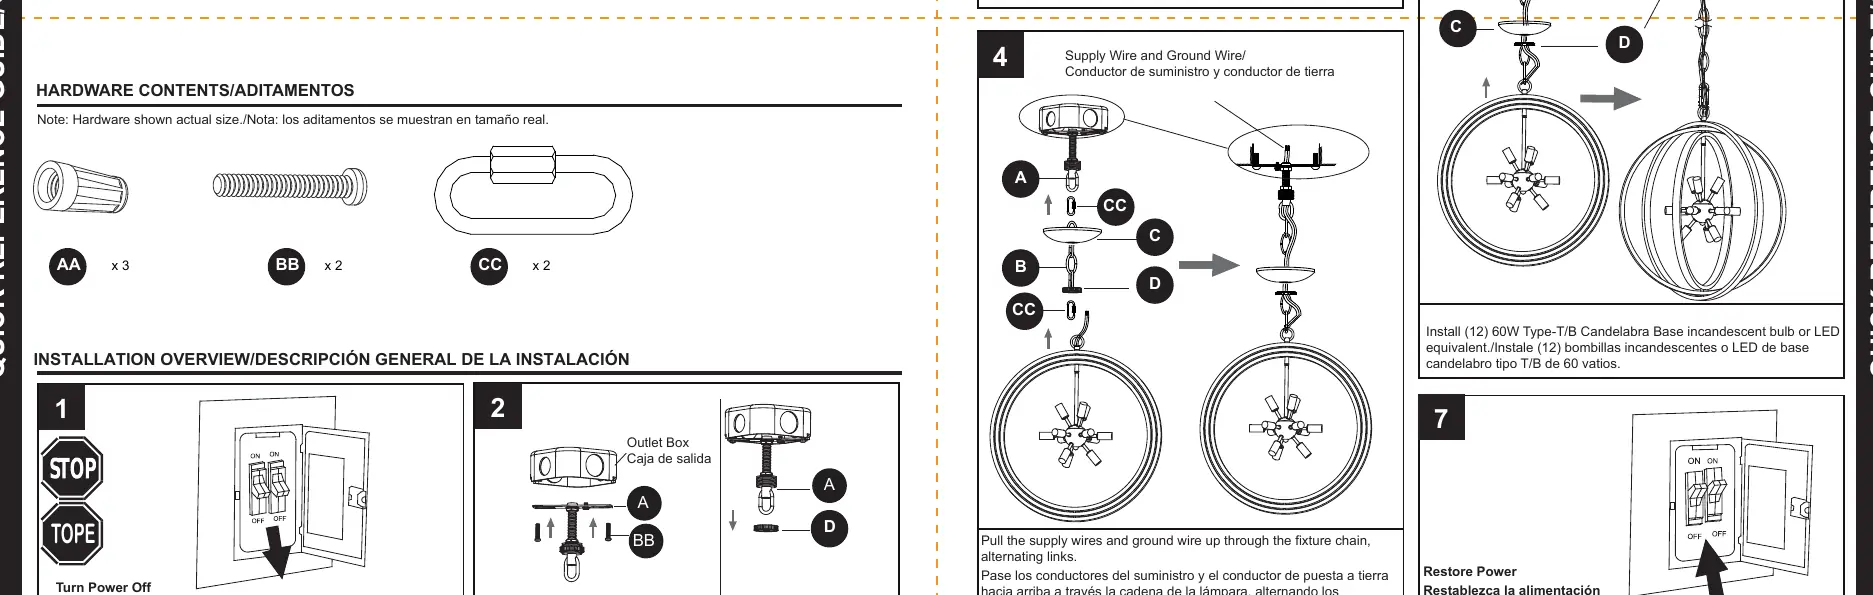
- Turn Power Off: Ensure the power is completely disconnected at the source.
- Prepare Fixture: Attach the mounting hardware to the outlet box.
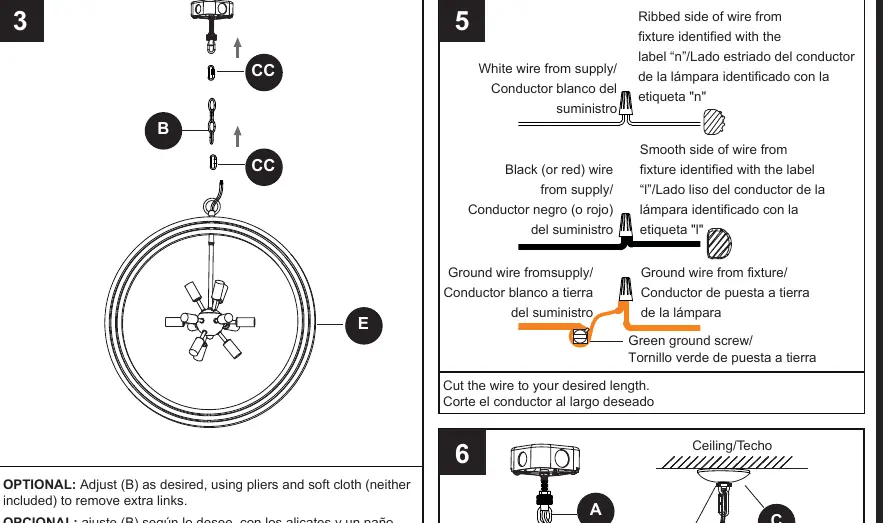
- Adjust Chain: If necessary, use pliers and a soft cloth to remove extra links from the chain to achieve the desired length.
- Wiring: Pull the supply wires and ground wire up through the fixture chain, alternating links.
- Connect Wires: Connect the fixture wires to the supply wires as follows:
- Ribbed side of wire (labeled 'n'): Connect to the white wire from the supply.
- Smooth side of wire (labeled 'l'): Connect to the black (or red) wire from the supply.
- Ground wire: Connect the fixture ground wire and supply ground wire to the green ground screw.
- Final Assembly: Secure the fixture to the ceiling.
- Install Bulbs: Install (12) 60W Type-T/B Candelabra Base incandescent bulbs or LED equivalents.
- Restore Power: Turn the power back on at the circuit breaker.
Care and Maintenance
Clean the fixture using a soft, dry cloth or a static duster. Avoid using harsh chemicals or abrasives, as these may damage the finish.
Troubleshooting
- Bulbs will not light: Check if the bulb is burned out, ensure power is on, check for faulty wire connections, or test/replace the switch.
- Fuse blows or circuit breaker trips: This is typically caused by crossed wires or a power wire grounding out. Check all wire connections.
Warranty
The manufacturer warrants this lighting fixture against defects in materials and workmanship for three (3) years from the date of purchase. If the product is found to be defective, it must be returned with the original sales receipt to the place of purchase for repair, replacement, or refund.
Practical help
Common problems
Bulbs will not light
Check if the bulb is burned out, ensure power supply is on, inspect wire connections, or test/replace the wall switch.
Fuse blows or circuit breaker trips when light is turned on
This indicates crossed wires or a power wire grounding out. Inspect all wire connections for shorts.
Before use
- Turn off electricity at the circuit breaker or main fuse box.
- Verify all parts are present against the package contents list.
- Ensure you have necessary tools like pliers and a soft cloth.
- Consult a licensed electrician if you are unsure about electrical installation.
- Check that the chosen bulbs match the specifications on the fixture label.
Specs in practice
- Assembly Time
- Estimated 20-30 minutes.
Images and diagrams
- The wiring diagram illustrates connecting the fixture's ribbed wire (labeled 'n') to the supply's white wire and the smooth wire (labeled 'l') to the supply's black/red wire.
- The diagram shows how to route supply wires through the chain links.
Model compatibility
- Use only bulbs specified by the markings or labels on the fixture.

Manual page author
David Miller
Documentation analyst
Organizes user manual content into clear summaries, with attention to model details, product context, and everyday usability.