Lighting / Fixtures
Ozarke 1587W20-2 Lava Wall Light Assembly Instructions
A comprehensive assembly and installation guide for the Ozarke 1587W20-2 Lava Wall Light. Includes step-by-step wiring instructions, safety precautions, and hardware requirements.
Table of contents
Manual images
Click an image to enlargeQuick guide from the manual
This document provides assembly and installation instructions for the Ozarke 1587W20-2 Lava Wall Light. Before beginning, ensure you have all necessary tools and that the power is turned off at the circuit breaker. It is strongly recommended that a licensed, professional electrician performs the installation.
Safety Warnings
- Turn off electricity at the circuit breaker or main fuse box before installation.
- Consult a licensed electrician if you are in doubt.
- Disconnect the fixture from the power source before replacing bulbs.
- Ensure bulbs have cooled sufficiently before removal.
- Do not attempt to assemble or install if any parts are missing or damaged.
Tools Required
- Flathead screwdriver
- Philips screwdriver
- Pliers
- Wire cutter
- Wire stripper
- Electrical tape
- Safety glasses
Installation Steps
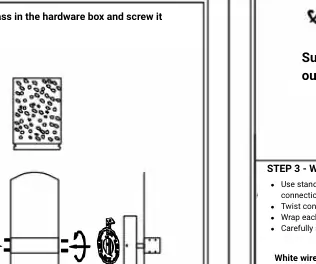
Step 1: Glass Assembly
Place the glass into the hardware box and screw it into place as indicated in the diagram.
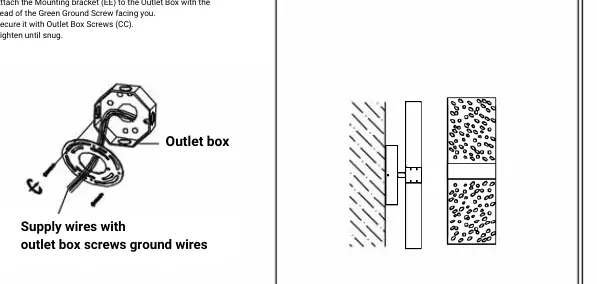
Step 2: Mounting Bracket
Pass the supply wires through the mounting bracket. Attach the mounting bracket to the outlet box with the head of the green ground screw facing you. Secure it using the provided outlet box screws and tighten until snug.
Step 3: Wire Connections
Use standard wire connectors (wire nuts) to make all connections. Twist connectors until wires are tightly joined, then wrap each connection with approved electrical tape. Carefully stuff all connected wires into the outlet box.
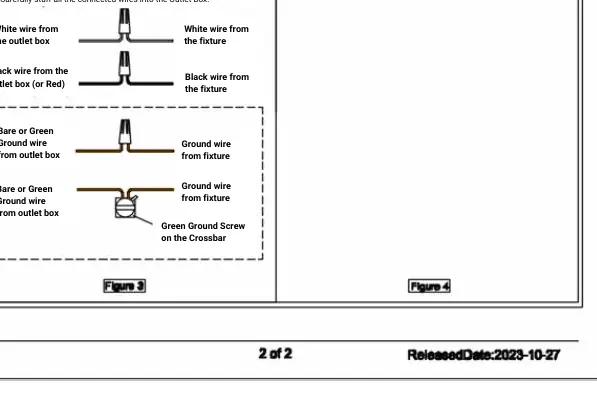
- White wire from the outlet box to the white wire from the fixture.
- Black wire (or red) from the outlet box to the black wire from the fixture.
- Bare or Green ground wire from the outlet box to the ground wire from the fixture and the green ground screw on the crossbar.
Practical help
Common problems
Fixture does not light up
Check wire connections to ensure they are tightly joined and properly secured with wire nuts.
Missing or damaged parts
Do not attempt to install; contact customer service for replacement parts.
Bulb replacement difficulty
Ensure the fixture is disconnected from the power source and the bulbs have cooled down before attempting removal.
Before use
- Turn off electricity at the circuit breaker.
- Inspect all parts against the package content list.
- Gather all required tools (screwdriver, pliers, wire stripper, etc.).
- Verify the supply voltage is 120V.
- Wear safety glasses during installation.
Images and diagrams
- Figure 1 illustrates the glass installation process.
- Figure 2 shows the mounting bracket attachment to the outlet box.
- Figure 3 provides a detailed wiring diagram for connecting white, black, and ground wires.
- Figure 4 shows the final assembly orientation.
Model compatibility
- Designed for 120V electrical systems.
- Compatible with dimmable circuits.

Manual page author
Emily Carter
User documentation editor
Prepares concise manual descriptions and highlights the most useful setup, operation, and maintenance information for readers.