Lighting / Fixtures
Installation Guide for Parmida 12V LED Step Light
Quick installation guide for the Parmida 12V LED Step Light. Includes wiring instructions, color temperature selection, dimming compatibility, and safety warnings.
Table of contents
Important Information
This guide covers the installation and operation of the Parmida 12V LED Step Light. The fixture is designed for both indoor and outdoor use. It features a selectable color temperature (3CCT) and is compatible with PWM dimmers when operating at 12V.
Safety Instructions
- All electrical connections and wiring must be performed by a qualified electrician in accordance with local and National Electrical Code (N.E.C).
- Turn off the power at the fuse box or circuit breaker before installing or servicing the light.
- This product requires a power input in the range of DC/AC 12-24V. Confirm source voltage is compatible prior to installation.
- Do not take the product apart; it contains no serviceable parts.
- Do not look directly into the LEDs.
- Ensure ambient temperatures do not exceed 104°F (40°C) during operation.
Selecting Color Temperature
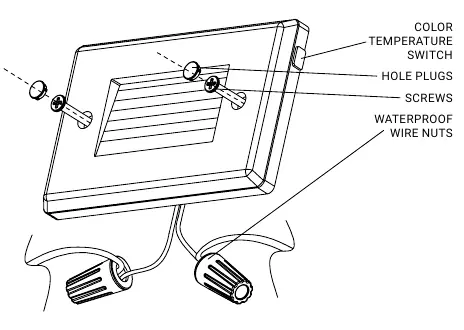
To change the color temperature, ensure the power is disconnected. Use the CCT selector switch located on the side of the light to choose between:
- 3000K Soft White
- 4000K Cool White
- 5000K Day Light
Dimming
This light is compatible with a PWM dimmer only when the output voltage is 12 volts. Note that the light cannot be dimmed when the output voltage is 24 volts. For best results, install a minimum of four LED modules on one dimmer. Always set the dimmer to maximum before adjusting to a lower light level.
Installation Steps
- Turn off the power at the source.
- Choose the installation location and mark the position of the two mounting holes. Drill the holes.
- Use the switch on the side of the fixture to select the preferred color temperature.
- Connect the fixture wires to the supply wires using wire nuts.
- Attach the fixture to the wall using the mounting screws.
- Cover the holes on the fixture using the provided hole plugs.
- Fill the gap between the fixture and the wall with a sealant (not included).
- Turn on the power.
Practical help
Common problems
Light does not dim
Ensure the output voltage is 12V. This light is not dimmable at 24V.
Fixture fails to operate
Consult a local licensed electrician to verify wiring and installation.
Freight damage
Inspect the light thoroughly upon unpacking and report any damage to the delivery carrier.
Before use
- Confirm source voltage is 12-24V DC/AC.
- Ensure power is turned off at the fuse box or circuit breaker.
- Verify ambient temperature is below 104°F (40°C).
- Have a sealant ready for the gap between the fixture and the wall.
- Ensure you have a PWM dimmer if dimming is required.
Images and diagrams
- The installation diagram illustrates the fixture, mounting screws, wire nuts, and the location of the CCT switch and hole plugs.
Model compatibility
- Compatible with PWM dimmers only at 12V output.
- Not dimmable at 24V output.
- Suitable for indoor and outdoor use.

Manual page author
Emily Carter
User documentation editor
Prepares concise manual descriptions and highlights the most useful setup, operation, and maintenance information for readers.