Lighting / Fixtures
Installation Guide for Parrot Uncle 8803-6 6-Light Chandelier
A comprehensive installation and operating guide for the Parrot Uncle 8803-6 6-Light Chandelier. Includes step-by-step assembly instructions, wiring diagrams, safety precautions, and maintenance tips.
Table of contents
Manual images
Click an image to enlargeQuick Guide
This document provides instructions for the installation and operation of the Parrot Uncle 8803-6 6-Light Chandelier. Estimated assembly time is 30 minutes to 1 hour. Before starting, ensure power is shut off at the fuse or circuit breaker. Required tools include a Phillips screwdriver, flathead screwdriver, wire strippers, electrical tape, ladder, and safety glasses.
Package Contents
Ensure all parts are present before assembly:
- Canopy (A)
- Mounting Bracket (B)
- Threaded Nipple (C)
- Hex Nut (D) - 3 pieces
- Socket (E) - 6 pieces
- Coupling (F)
- Hardware circle (G)
- Screw Collar Ring (H)
- Screw Collar Loop (I)
- Fixture Loop (J)
- Chain (K)
- Wood bead pendant (L1) - 12 pieces
- Wood bead pendant (L2) - 12 pieces
- Wire Connector (AA) - 3 pieces
- Short Machine Screw (BB) - 2 pieces
Assembly Instructions
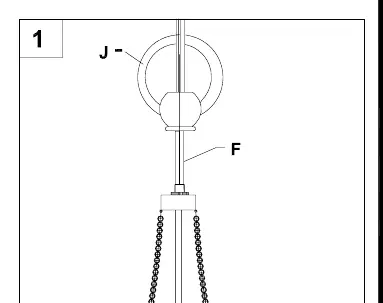
- Screw the fixture loop (J) onto the coupling (F). Ensure the electrical cable is pulled through the parts as they are installed.
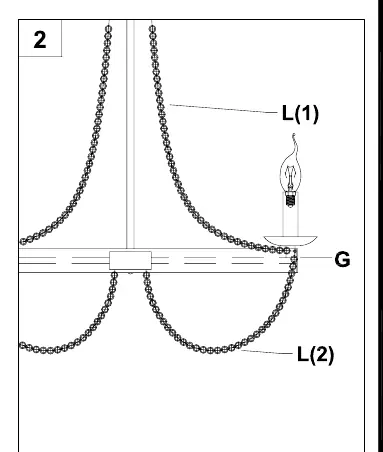
- Attach the hardware circle (G) and wood bead pendants (L).
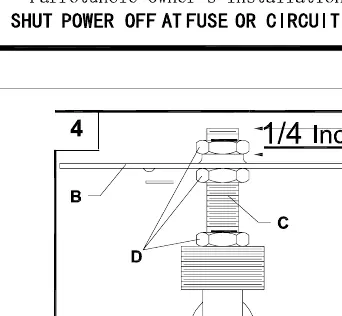
- Position the threaded nipple (C) in the mounting bracket (B) so it protrudes at least 1/4 inch beyond the raised center portion.
- Secure the threaded nipple (C) to the mounting bracket (B) using hex nuts (D).
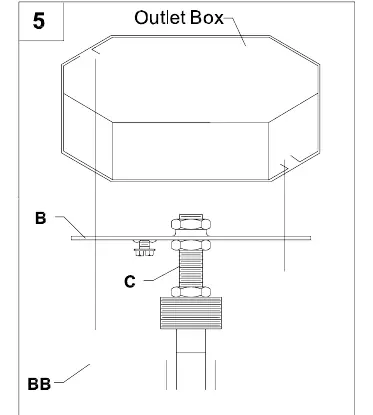
- Connect the mounting bracket (B) to the outlet box using the short machine screws (BB).
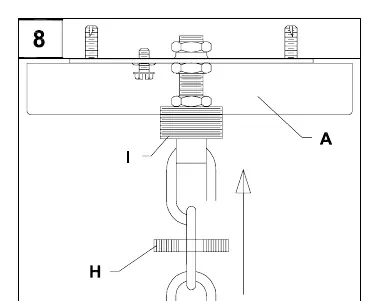
- Thread the chain (K) through the screw collar ring (H) and canopy (A). Attach one end to the screw collar loop (I) and the other to the upper fixture loop (J). Weave the electrical and ground wires through every other chain link and through the threaded nipple (C) into the outlet box.
- Follow the wiring connection guide to connect the fixture wires to the supply wires.
- Pass the canopy (A) over the screw collar loop (I) and attach the screw collar ring (H) to secure the canopy.
- Insert 40-watt max candelabra-base incandescent or CFL/LED equivalent bulbs (not included) into the sockets (E).
Wiring Guide
Ground Wire: Wrap the bare copper or green ground fixture wire around the ground screw on the mounting bracket (B) and tighten. Connect to the outlet ground wire using a wire connector (AA).
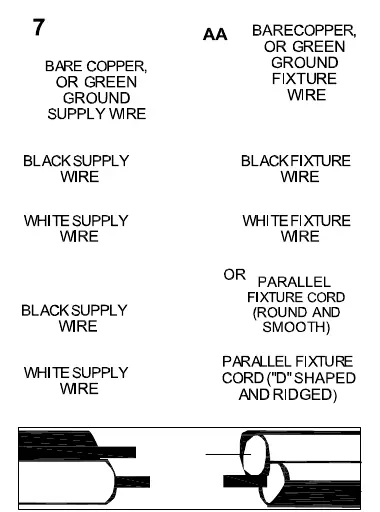
Supply Wires: Connect the Neutral (White) supply wire from the outlet box to the Neutral fixture wire (White or Parallel Cord "D" shaped and ribbed). Connect the Hot (Black) supply wire from the outlet box to the Hot fixture wire (Black or Parallel Cord round and smooth).
Care and Maintenance
Always ensure the electric current is turned off before cleaning. Use a soft, moist cloth with mild non-abrasive soap to clean the fixture. Never use glass cleaner on the fixture as it will damage the metal finish. Glass shades may be washed in a towel-lined sink with warm water and mild soap; do not wash in an automatic dishwasher.
Troubleshooting
If the fixture does not light, check the wiring connections. If the issue persists, check if the bulb is worn or broken and replace it if necessary.
Practical help
Common problems
Fixture does not light
Check wiring connections or replace the bulb.
Before use
- Shut off power at the fuse or circuit breaker.
- Verify all parts listed in the package contents are present.
- Gather required tools: Phillips screwdriver, flathead screwdriver, wire strippers, electrical tape, ladder, and safety glasses.
- Ensure the mounting surface can support the weight of the fixture.
Images and diagrams
- Step 1: Attaching the fixture loop to the coupling.
- Step 3-4: Adjusting the threaded nipple height in the mounting bracket.
- Step 6: Weaving wires through the chain links.
- Step 7: Wiring diagram for ground, neutral, and hot wires.
Model compatibility
- Designed for use in the United States and Canada.
- Fixture contains chemicals known to the state of California to cause cancer and birth defects (Prop 65).

Manual page author
Emily Carter
User documentation editor
Prepares concise manual descriptions and highlights the most useful setup, operation, and maintenance information for readers.