Home / Smoke Detectors
X-SENSE SD03/SD04 Photoelectric Smoke Alarm User Manual
Comprehensive user guide for the X-SENSE SD03/SD04 photoelectric smoke alarm. Includes installation instructions, LED indicator status, maintenance tips, and safety procedures.
Table of contents
Quick Guide
The X-SENSE SD03/SD04 is a photoelectric smoke alarm designed for indoor use. It features a 10-year sealed lithium battery and is designed to detect smoldering fires. Important: Never ignore a sounding alarm. Test the unit weekly. If the alarm fails to test correctly, replace it immediately.
Product Overview
The alarm includes a Test/Silence button, LED indicator, and an internal sounder. The unit is designed to be mounted on the ceiling or wall.
LED Indicators
- Standby mode: Flashes green once every 60 seconds.
- Alarm mode: Flashes red 3 times every 1.5 seconds with 3 long beeps.
- Low battery: Flashes yellow once every 60 seconds with one beep.
- Fault: Flashes yellow 1-4 times every 40 seconds with 2 beeps.
- End of life: Flashes yellow 2 times every 30 seconds with 2 beeps.
Installation Instructions
Placement: Install alarms on every level and in every bedroom. If installing on a ceiling, place in the middle. If wall-mounted, place 4-12 inches (10-30 cm) below the ceiling.
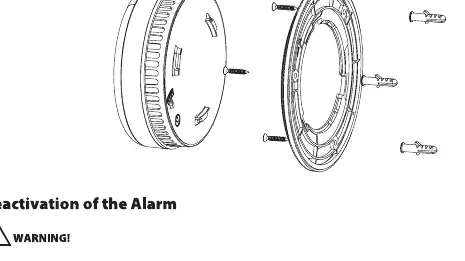
Mounting Steps:
- Drill three 6.0 mm holes in the wall or ceiling.
- Insert three plastic anchor plugs into the holes with a hammer.
- Attach the mounting bracket to the surface with three screws.
- Mount the alarm into the bracket by pushing them together and twisting clockwise.
- The unit will automatically activate when attached to the bracket for the first time.
Weekly Testing and Maintenance
Testing: Press the Test/Silence button weekly. The unit will sound and the LED will flash. Do not use an open flame to test the unit.
Maintenance:
- Clean the alarm cover and vents with a soft brush attachment once a month.
- Never use detergents or solvents.
- Do not paint the unit, as this will seal the vents and interfere with the sensor.
- Avoid spraying aerosols near the alarm.
Deactivation (End of Life)
After 10 years, the unit must be deactivated and replaced. To deactivate:
- Peel back the shaded label obstructing the "DIS" setting.
- Break the thin plastic guard.
- Twist the plastic pin upwards or insert a screwdriver into the slot and turn the dial clockwise to the "DIS" position.
- Dispose of the alarm.
Safety Tips
- Never ignore any alarm.
- Keep matches and lighters away from children.
- Store flammable materials in proper containers.
- Keep electrical appliances in good condition.
- Keep at least one working fire extinguisher on every floor.
Practical help
Common problems
Alarm chirps every 60 seconds
Low battery. The unit must be replaced.
Alarm chirps every 40 seconds
Fault detected. The unit must be replaced.
Alarm chirps every 30 seconds
End of life (10 years reached). Deactivate and replace the unit.
Before use
- Install on every level and in every bedroom.
- Ensure the alarm is 4-12 inches (10-30 cm) below the ceiling if wall-mounted.
- Do not install in a basement or furnace room.
- Test the unit after installation using the Test/Silence button.
- Ensure the unit is not painted or covered by aerosols.
Specs in practice
- Power supply
- 10-year sealed lithium battery (non-replaceable).
- Alarm loudness
- >= 85 dB at 3 meters.
Images and diagrams
- Placement diagram shows optimal ceiling and wall mounting distances to avoid dead air space.
- Mounting diagram illustrates the 3-screw bracket installation process.
- Deactivation diagram shows how to use a screwdriver to turn the dial to the 'DIS' position.
Model compatibility
- For indoor use only.
- Not designed to detect gas, heat, or flames.
- Conforms to EN 14604:2005 standard.

Manual page author
Michael Turner
Technical manual editor
Reviews PDF manuals for structure, safety notes, and practical product details so readers can find the right information quickly.