Home / Security
User Manual for First Alert SM210M Micro Smoke Alarm
Quick guide for the First Alert SM210M 10-Year Sealed Battery Smoke Alarm. Learn about installation, weekly testing, maintenance, troubleshooting, and safety features.
Table of contents
Quick Guide from the Manual
The First Alert SM210M is a 10-year sealed battery-operated photoelectric smoke alarm. It is designed to provide early warning of fire. This unit does not require battery replacements for the life of the alarm. It is intended for use in single-family homes and should be installed on every level of the home, in every bedroom, and in every bedroom hallway.
Installation
The alarm is designed to be mounted on the ceiling or wall. Before installing, read the recommended locations and areas to avoid.
- Tools needed: Pencil, drill with 3/16" (5 mm) drill bit, standard Phillips head screwdriver, hammer.
- Mounting: Use the two fixing slots on the mounting ring to mark drill holes. Drill holes and insert plastic fixing anchors if needed. Secure the mounting bracket to the ceiling or wall using the provided screws.
- Activation: Position the smoke alarm over the mounting bracket and turn clockwise until it clicks into place. The alarm will self-activate once mounted.
- Verification: Press and hold the test button to ensure the alarm is activated. You should hear a loud, repeating horn pattern (3 beeps, pause, 3 beeps, pause).
Operation and Testing
It is important to test the unit every week to ensure it is working properly.
- Weekly Testing: Press and hold the Test/Silence button on the cover until the alarm sounds. The unit may continue to alarm for a few seconds after releasing the button.
- Silence Feature: If an unwanted alarm occurs (e.g., cooking smoke), press the Test/Silence button to temporarily quiet the alarm for up to 9 minutes.
- Low Battery Silence: The silence feature can also quiet the low battery warning chirp for up to 8 hours.
Maintenance and Cleaning
This unit is designed to be maintenance-free, but requires regular care:
- Cleaning: Gently vacuum off any dust using your household vacuum's soft brush attachment at least once a month. Never use water, cleaners, or solvents.
- Deactivation: After 10 years of operation or when the end-of-life warning sounds, the alarm must be permanently deactivated before disposal. Insert a Phillips head screwdriver into the deactivation slot and turn 90 degrees clockwise until you hear a click.
Troubleshooting
If the alarm is not operating correctly, check the following indicators:
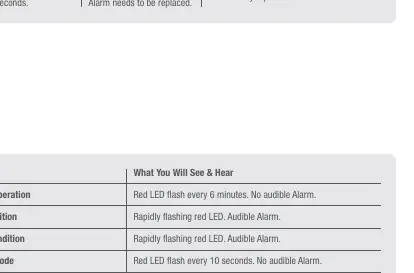
- 3 chirps every 43 seconds: Malfunction signal. The device is not working properly and needs to be replaced.
- 5 chirps every 43 seconds: End-of-life signal. The alarm needs to be replaced immediately.
- Green LED flashes 2 times every minute: Alarm requires cleaning. Clean the alarm and press the test button.
- Unwanted alarms: If frequent, relocate the alarm away from kitchens, bathrooms, or air vents.
Safety Tips
Follow these safety rules to prevent hazardous situations:
- Never smoke in bed.
- Keep matches and lighters away from children.
- Store flammable materials in proper containers.
- Keep electrical appliances in good condition and do not overload circuits.
- Keep stoves, barbecue grills, and chimneys free of grease and debris.
- Never leave cooking unattended.
- Have an escape plan and practice it regularly.
Manufacturer information
First Alert
Practical help
Common problems
Horn sounds 3 chirps every 43 seconds
Malfunction signal; the device is not working properly and needs to be replaced.
Horn sounds 5 chirps every 43 seconds
End-of-life signal; the alarm needs to be replaced immediately.
Power LED flashes Green 2 times every minute
Alarm requires cleaning. Vacuum the unit with a soft brush and press the test button.
Unwanted alarms
Silence using the manual button; clean the cover; if the problem persists, relocate the alarm away from kitchens, bathrooms, or drafty areas.
Before use
- Read all instructions carefully.
- Identify the best location (every level, every bedroom).
- Ensure you have a pencil, drill, and screwdriver.
- Do not install near air vents, fans, or in dead air spaces.
- Verify the unit is activated by mounting it to the bracket.
Specs in practice
- 10-Year Sealed Battery
- The battery is designed to last for the life of the alarm; no replacements are needed.
- Photoelectric Sensor
- Technology generally more sensitive to large smoke particles, often produced by smoldering fires.
Images and diagrams
- Mounting Bracket: Attach to wall or ceiling using provided screws and anchors.
- Deactivation Tab: Use a screwdriver to turn 90 degrees clockwise to permanently deactivate the unit at end of life.
Model compatibility
- Not for use with detector guards unless evaluated.
- Not intended for boarding houses, hotels, or motels.
- AC powered units are intended for installation over junction boxes; this unit is battery-operated.

Manual page author
David Miller
Documentation analyst
Organizes user manual content into clear summaries, with attention to model details, product context, and everyday usability.