Power / Batteries & Chargers
User Manual for Qoltec 12V 10A Battery Charger
Quick guide for the Qoltec 12V 10A battery charger. Learn how to connect, select charging modes, use the repair function, and troubleshoot common issues.
Table of contents
Manual images
Click an image to enlargeQuick guide from the manual
This manual provides instructions for the Qoltec 12V 10A smart battery charger. It is designed for safe and efficient charging of 12V car and deep cycle batteries. The device features automatic temperature detection, a repair mode for sulphated batteries, and a nine-stage charging process.
Safety Instructions
- Ventilation: Always use the charger in well-ventilated areas as batteries produce explosive gases.
- Sparks: Do not smoke, light matches, or cause sparks near the battery.
- Jewelry: Remove all jewelry (rings, bracelets, necklaces, watches) to prevent short circuits.
- Connection: When removing a battery from a vehicle, disconnect the grounded terminal first.
- Prohibited: Do not charge dry cell batteries, lithium-ion batteries, or batteries that are frozen, damaged, leaking, or without voltage.
- Placement: Never place the charger directly above the battery being charged.
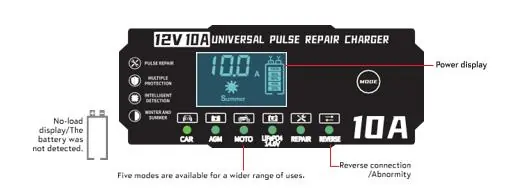
Description of Display Functions
The display provides real-time information on charging parameters, including voltage, current, and charge level. It indicates the selected mode (CAR, AGM, MOTO, LiFePO4, REPAIR) and warns of reverse connections or abnormalities.
Operating Instructions
Connection
- Connect the red clamp to the positive (+) terminal of the battery.
- Connect the black clamp to the negative (-) terminal of the battery.
- Ensure both clamps are securely attached.
Turning on and Selecting Mode
- Plug the charger into a mains socket. The display will activate automatically.
- Use the MODE button to select the appropriate setting:
- CAR: For AGM/STD car batteries.
- MOTO: For small batteries (e.g., motorcycle batteries).
- REPAIR: Pulse repair mode for partially damaged batteries.
Charging Process
The display shows current charging parameters. When charging is complete, the display will show 100% or FULL. To disconnect, unplug the charger from the power socket first, then remove the black clamp (-), followed by the red clamp (+).
Advanced Features
Winter and Summer Modes
The charger automatically adjusts for optimal performance based on ambient temperature (Winter <10°C, Summer >28°C).
Repair Mode
Used for sulphated or old batteries to restore capacity. Leave the charger in this mode for several hours. Note that this does not guarantee regeneration of severely damaged batteries. If the battery becomes very hot, stop the process immediately.
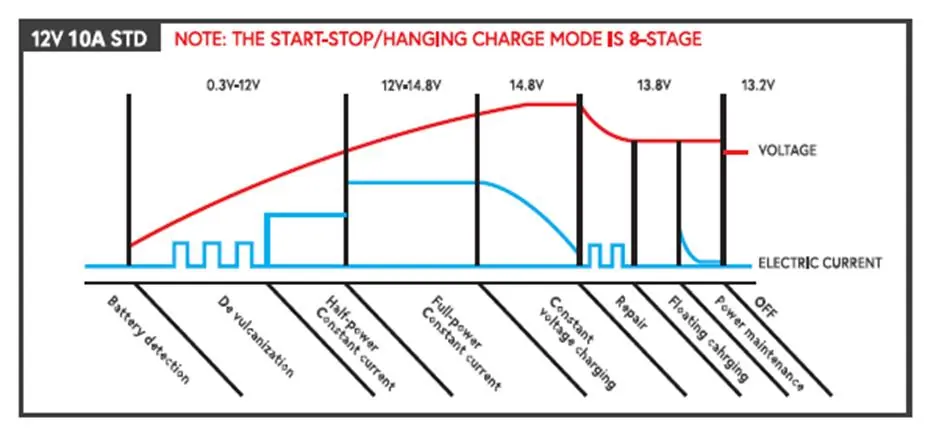
Nine-Stage Charging Function
The charging process includes: Battery detection, Desulphation, Half power (constant current), Full power (constant current), Constant voltage charging, Repair, Floating charging, Power maintenance, and Switch-off.
Smart Memory Function
After charging is complete and the device is restarted, the charger automatically returns to the last operating mode used (except for Repair mode, which must be selected manually).
Troubleshooting
If the charger does not turn on, check the power connection and the power cord for damage. If the battery is not charging, verify that the clamps are correctly connected and the correct mode is selected. If the charger overheats, ensure it is in a well-ventilated area and not covered.
Cleaning and Maintenance
Always disconnect the charger from the mains before cleaning. Use a soft, dry, or slightly damp cloth. Do not use aggressive cleaning agents, alcohol, or solvents. Regularly inspect the casing and power cord for mechanical damage.
Practical help
Common problems
Charger does not turn on
Check that the charger is properly connected to the power source. Test the power outlet with another device and check the power cord for damage.
Battery is not charging
Check that clamps are correctly connected (red to +, black to -). Ensure the battery is not damaged, sulphated, or too discharged. Verify the correct charging mode is selected.
Charger is overheating
Ensure the charger is in a well-ventilated area and is not covered. If the problem persists, switch off the device and contact service.
Terminals spark when connected
Ensure the battery and charger are switched off before connecting the terminals.
Before use
- Check that the battery is 12V.
- Ensure the battery is not frozen, damaged, or leaking.
- Remove all jewelry before working near the battery.
- Clean battery terminals before connecting.
- Ensure the area is well-ventilated.
- Verify the charger and power cord are not damaged.
Images and diagrams
- The display panel shows the current, voltage, battery level, and active mode (CAR, AGM, MOTO, LiFePO4, REPAIR).
- The charging curve illustrates the 9-stage charging process from battery detection to power maintenance.
Model compatibility
- Designed for 12V batteries only.
- Not suitable for dry cell batteries or low voltage systems.
- Lithium-ion batteries are prohibited.

Manual page author
David Miller
Documentation analyst
Organizes user manual content into clear summaries, with attention to model details, product context, and everyday usability.