Tools / Power Tools
User Guide for Ronix 12V Cordless Hammer Drill/Driver & Screwdriver
Quick start guide for Ronix 12V cordless tools (8105K/8101K). Includes setup, battery maintenance, operation modes, safety warnings, and technical specifications.
Table of contents
Manual images
Jump to the sectionQuick guide from the manual
This document provides operating instructions for the Ronix 12V cordless tool series (models 8105K and 8101K). It covers safety protocols, battery management, and operational modes for drilling and screwdriving. Always ensure the tool is switched off and the battery is removed before performing any adjustments or maintenance.
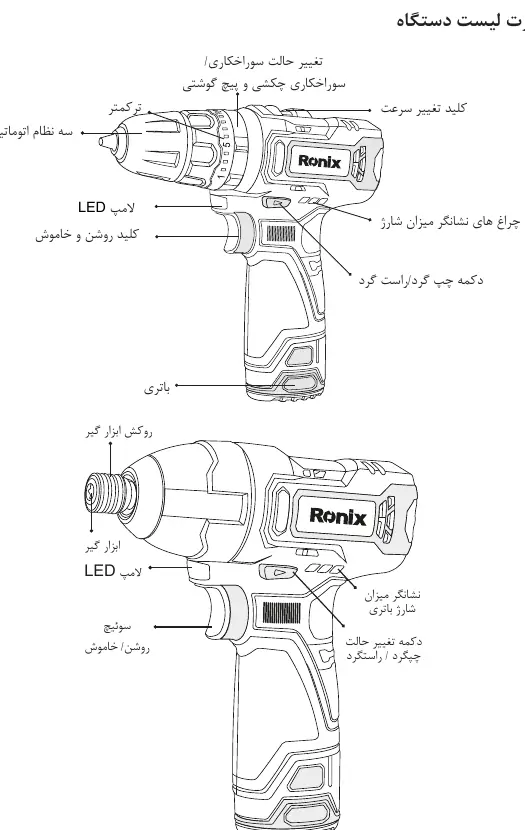
Device Overview
The tools feature an automatic chuck, torque adjustment ring, speed selector, LED work light, forward/reverse switch, and battery charge indicator. The hammer drill model includes a specific mode selector for drilling, hammer drilling, and screwdriving.
Battery and Charging
- Use only the charger and batteries specifically designed for this device.
- Charge batteries at room temperature (10-40°C).
- Do not short-circuit battery terminals with metal objects.
- If the tool loses power during continuous use, allow it to cool for 15 minutes before installing a fresh battery.
- Do not recharge a battery that is already fully charged.
Operation
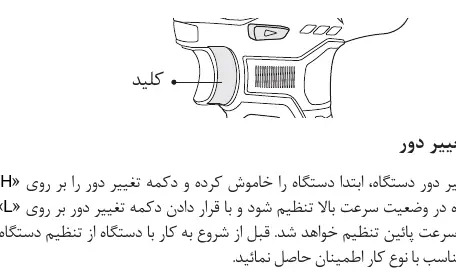
- Speed Selection: Use the H/L switch to toggle between high and low speeds. Never change speed while the tool is running.
- Torque Adjustment: The torque ring allows for 21 settings. Test on scrap material to find the appropriate setting for your screw size.
- Direction Control: The forward/reverse switch controls rotation. Placing it in the center position locks the trigger.
- Drilling: For wood and metal, use a pilot hole first. Do not use hammer mode for wood or metal.
- Hammer Drilling: Use the hammer setting specifically for masonry/wall drilling.
Maintenance
- Keep the tool clean using a dry cloth; do not use water or harsh chemicals.
- Ensure hands are free of oil and grease during operation.
- For repairs, contact Ronix Service centers. Official website: www.ronix.ir. Service phone: 021-6497.
Safety
- Always wear safety glasses, ear protection, and a dust mask.
- Keep work areas clean and well-lit.
- Do not operate the tool if you are tired or under the influence of medication.
- Ensure the tool is held firmly with both hands during operation.
Official resources from the manual
Manufacturer information
Ronix Tools
Practical help
Common problems
Tool stops or loses power quickly
Stop immediately and allow the tool to cool down. Check if the battery is fully charged.
Drill bit slips on metal or wood
Drill a pilot hole first to guide the bit accurately.
Battery does not fit or is hard to insert
Do not force the battery. Ensure it is aligned correctly with the housing grooves.
Before use
- Ensure the battery is fully charged.
- Check that the forward/reverse switch is set to the desired direction.
- Verify the speed selector (H/L) is fully engaged.
- Ensure the correct bit is securely tightened in the chuck.
- Wear appropriate personal protective equipment (glasses, gloves, mask).
Specs in practice
- Torque Settings
- 21 levels to control the force applied to screws, preventing damage to the workpiece.
Images and diagrams
- The manual includes diagrams identifying the chuck, torque ring, speed switch, LED light, and battery release buttons.
- The battery installation diagram shows the correct alignment of the battery tabs with the tool housing.
Model compatibility
- Use only original Ronix batteries and chargers.
- Hammer mode is strictly for masonry; do not use on wood or metal.

Manual page author
David Miller
Documentation analyst
Organizes user manual content into clear summaries, with attention to model details, product context, and everyday usability.