Electronics / Cameras
User Manual for RunCam Thumb Action Camera
Quick guide for the RunCam Thumb action camera. Learn how to install the microSD card, connect power, operate recording, update firmware, and enable gyroscope data.
Table of contents
Manual images
Click an image to enlargeQuick guide from the manual
The RunCam Thumb is a compact action camera designed for FPV and general use. This guide covers the essential setup, including microSD card installation, power connection, and basic operation. Ensure you use a high-speed microSD card (Class 10 or above) for optimal performance.
Function indication
The camera features the following components:
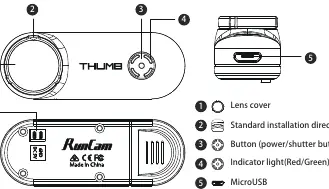
- Lens cover: Protects the lens.
- Button: Used for power and shutter control.
- Indicator light: Displays status via Red/Green lights.
- MicroUSB: For data transfer and computer connection.
- 1.25mm 2P: Power input connector.
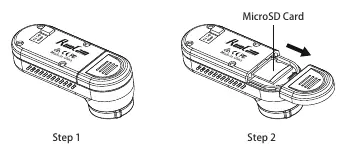
MicroSD Card installation
The camera supports microSD cards up to 128GB. It is recommended to use high-speed cards (Class 10 or above). To install, open the card slot cover and insert the card as shown in the manual.
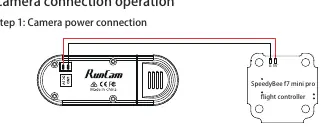
Camera connection and operation
Power connection: Connect the camera to a 5V power source. If using a flight controller (e.g., SpeedyBee F7 mini pro), connect the 5V and G (Ground) pins to the camera's 1.25mm 2P port.
Operation:
- Connect the power supply to turn the camera on directly.
- The camera will boot into recording mode.
- Short press the power/shutter button to start or stop video recording.
Connecting to the computer
After turning on the camera, connect it to your computer using a USB cable. It will be recognized as a removable disk. If the device is not recognized, ensure a microSD card is inserted. If files cannot be read, try replacing the USB cable or using a different USB port on your computer.
Firmware upgrade
To upgrade the firmware:
- Ensure the camera has a stable power supply.
- Download the firmware file (Thumb.bin) from https://runcam.com/download/Thumb.
- Copy the file to the root directory of the microSD card.
- The green light will flash slowly during the upgrade and quickly when completed.
Gyroscope Data Generated Function
To record gyroscope data alongside video:
- Create a file named csvopen.txt manually in the root directory of the microSD card.
- Restart the camera.
- The camera will now save 1080p50fps video and gyroscope data simultaneously.
Technical specifications
- Resolution: 1080P@60FPS
- Video Format: MP4
- Power Input: 5.0V
- Power Consumption: 280mA@5V
- Weight: 9.8g
Official resources from the manual
Practical help
Common problems
Camera not recognized by computer
Ensure a microSD card is inserted. Try a different USB cable or a different USB port on your computer.
Firmware upgrade not working
Ensure the power supply is stable. Verify the firmware file is named 'Thumb.bin' and placed in the root directory of the microSD card.
Before use
- Insert a high-speed microSD card (Class 10 or above).
- Ensure power supply is 5V.
- Check wiring connections if connecting to a flight controller.
- Verify the microSD card is formatted correctly.
Images and diagrams
- Function Indication: Identifies the lens cover, power/shutter button, indicator light, MicroUSB port, and 1.25mm 2P power connector.
- Wiring Diagram: Illustrates the connection between the camera's 1.25mm 2P port and a flight controller's 5V/G pins.
Model compatibility
- Supports microSD cards up to 128GB.
- Requires 5V power input.
- Compatible with standard flight controllers via 1.25mm 2P connector.

Manual page author
David Miller
Documentation analyst
Organizes user manual content into clear summaries, with attention to model details, product context, and everyday usability.