Electronics / AV Accessories
User Manual for Sanus 051WSSAFM1 Soundbar Mount
Quick guide for the Sanus 051WSSAFM1 soundbar mount for Sonos Ray. Includes installation steps, weight restrictions, compatibility checks, and adjustment instructions.
Table of contents
Manual images
Click an image to enlargeQuick guide from the manual
This document provides instructions for installing the Sanus 051WSSAFM1 soundbar mount, specifically designed for the Sonos Ray. Before starting, ensure your TV wall mount is UL certified and that the total weight of your TV, soundbar, mount, and accessories does not exceed the weight limit of your TV wall mount. This mount is designed to be installed only below the television.
Safety and weight restrictions
Weight Limit: The maximum weight capacity for this soundbar mount is 5 lbs (2.27 kg). Do not exceed this limit.
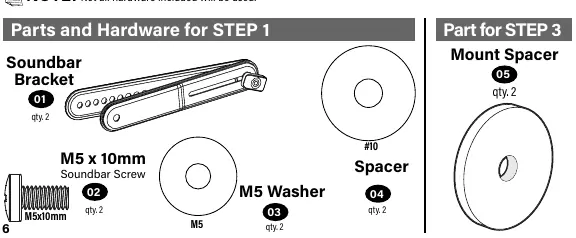
Compatibility Restrictions: You cannot use this product if your TV mount's interface bracket includes built-in/integrated spacers or if the mounting holes/slots are greater than 11mm (0.43 in.).
Tools and parts
Tools Needed: Phillips screwdriver, level, and the included 3/16 in. hex key.
Supplied Parts: The kit includes soundbar brackets, M5 screws, M5 washers, spacers, and various TV interface screws (M4, M6, M8) with corresponding washers and spacers.
Installation steps
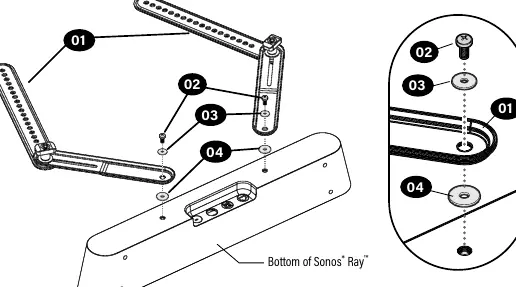
- Install Brackets on Sonos Ray: Attach the soundbar brackets to the bottom of the Sonos Ray using the provided M5 screws, washers, and spacers.
- Prep Your TV: If your TV is already mounted, follow your TV mount's manual to safely remove the TV and TV bracket.
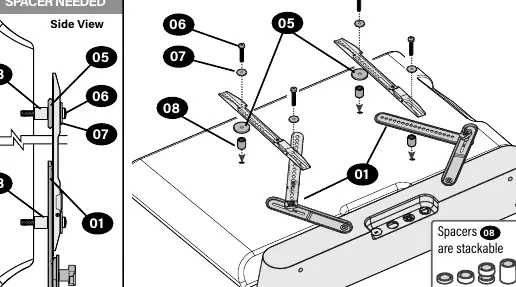
- Install Mount to TV: Determine the correct screw diameter (M4, M6, or M8) for your TV. Select the appropriate screw length based on whether your TV back is flat or requires spacers. Ensure adequate thread engagement.
- Adjust Soundbar Bracket: Position the soundbar brackets as vertically as possible to match your TV's hole pattern.
- Tighten Connections: Secure all connections using a Phillips screwdriver. Do not over-tighten, as this will deform the washers.
- Hang Assembly: Follow your TV wall mount installation manual to hang the combined TV and soundbar assembly.
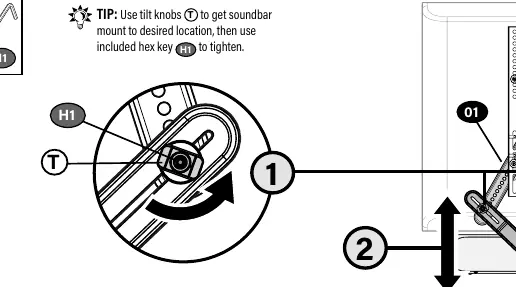
Adjustments
After installation, you can adjust the soundbar position. Use the tilt knobs to set the soundbar mount to the desired location, then use the included hex key to tighten the connection.
Practical help
Common problems
Mounting holes or slots are greater than 11mm (0.43 in.)
You cannot use this product with your current TV mount.
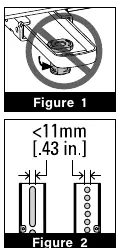
TV mount has built-in/integrated spacers
You cannot use this product with your current TV mount.
Screws are too short
Will not hold your TV securely; ensure you are using the correct length and spacers.
Screws are too long
Will damage your TV; ensure you are using the correct length and spacers.
Over-tightening screws
Do not over-tighten, as this will deform the washers.
Before use
- Verify TV mount meets third-party safety certifications (UL Certified).
- Ensure total weight (TV + Soundbar + Mount + Accessories) is within TV mount limit.
- Check that TV mount does not have built-in spacers.
- Verify mounting holes are not larger than 11mm.
- Have a Phillips screwdriver and level ready.
Specs in practice
- Weight Limit
- 5 lbs (2.27 kg) maximum for the soundbar mount.
- Compatibility
- Designed specifically for Sonos Ray.
Images and diagrams
- Figure 1: Do not use if TV mount has built-in spacers.
- Figure 2: Do not use if mounting holes are > 11mm.
- Figure 3: Mount must be installed below the television.
Model compatibility
- Only for use with TV wall mounts that meet third-party safety certifications (UL Certified).
- Designed to mount below the television only.

Manual page author
Michael Turner
Technical manual editor
Reviews PDF manuals for structure, safety notes, and practical product details so readers can find the right information quickly.