Lighting / Fixtures
Installation and User Manual for Satco Nuvo 0-10V BLINK Edge Lit LED Fixture
Quick installation and operation guide for the Satco Nuvo 0-10V BLINK Edge lit LED fixture. Includes wiring diagrams, dimming setup, and maintenance instructions.
Table of contents
Quick Guide
The Satco Nuvo 0-10V BLINK series is an edge-lit LED fixture designed for both damp and wet locations. Important Safety Warnings: Always disconnect power at the circuit breaker or fuse before installing or servicing. Installation must be performed by a person familiar with applicable electrical codes and hazards. Do not use abrasives for cleaning.
Installation Instructions
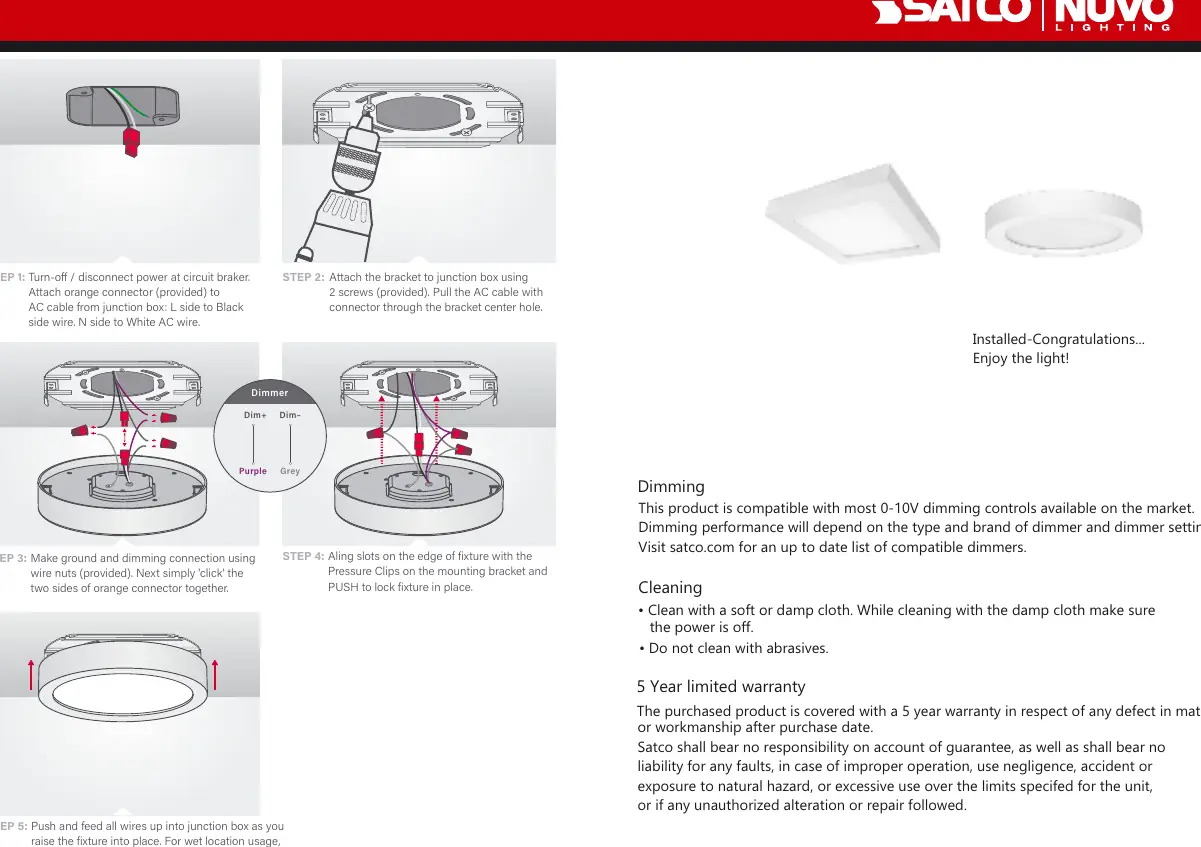
- Prepare Power: Turn off and disconnect power at the circuit breaker.
- Wiring: Attach the provided orange connector to the AC cable from the junction box. Connect the Line (L) side to the Black wire and the Neutral (N) side to the White wire.
- Mounting Bracket: Attach the bracket to the junction box using the two provided screws. Pull the AC cable with the connector through the center hole of the bracket.
- Connections: Make ground and dimming connections using the provided wire nuts. Connect the Purple wire to Dim+ and the Grey wire to Dim-. Click the two sides of the orange connector together.
- Final Assembly: Align the slots on the edge of the fixture with the pressure clips on the mounting bracket and push to lock the fixture in place. Push and feed all wires up into the junction box.
- Wet Location Note: For wet location usage, caulk the edge of the fixture to the ceiling.
Dimming
This product is compatible with most 0-10V dimming controls available on the market. Dimming performance depends on the specific type and brand of the dimmer used. Visit satco.com for an up-to-date list of compatible dimmers.
Cleaning and Maintenance
Clean the fixture with a soft or damp cloth. Ensure the power is turned off before cleaning. Do not use abrasive materials.
Warranty
The product is covered by a 5-year limited warranty against defects in material or workmanship. The warranty does not cover faults caused by improper operation, negligence, accidents, exposure to natural hazards, excessive use, or unauthorized alterations.
Official resources from the manual
Practical help
Common problems
Fixture not dimming correctly
Ensure the dimmer switch is compatible with 0-10V systems. Check the manufacturer's website for a list of compatible dimmers.
Wet location installation issues
Ensure the edge of the fixture is caulked to the ceiling to maintain the wet location rating.
Before use
- Ensure power is disconnected at the circuit breaker.
- Verify the junction box is compatible with the mounting bracket.
- Confirm you have all provided parts: bracket, orange connector, and screws.
- Identify the Dim+ (Purple) and Dim- (Grey) wires for dimming setup.
Specs in practice
- Operating Voltage
- 120VAC
Images and diagrams
- Wiring diagram illustrates connecting the orange connector to the AC cable (L to Black, N to White).
- Dimming diagram shows the specific connection for the 0-10V control wires (Purple for Dim+, Grey for Dim-).
Model compatibility
- Suitable for both damp and wet locations.
- Compatible with most 0-10V dimming controls.

Manual page author
Emily Carter
User documentation editor
Prepares concise manual descriptions and highlights the most useful setup, operation, and maintenance information for readers.