Lighting / Fixtures
Installation and Safety Instructions for Satco Overtop 10W LED Large Wall Lantern
Quick guide for installing the Satco Overtop 10W LED Large Wall Lantern. Includes wiring instructions, grounding steps, and maintenance tips for models 62-1607 and 62-1608.
Table of contents
Quick Guide from the Manual
This document provides installation and safety instructions for the Satco Overtop LED Wall Lantern. Before beginning, ensure the electricity is turned off at the circuit breaker or fuse box. Proper wiring is essential for safe operation. The fixture requires an existing outlet box for installation. Note that the fixture must be sealed with silicone sealant during final assembly to prevent moisture from entering the outlet box.
Installation Steps
- Preparation: Carefully remove the fixture from the carton and verify all parts are present.
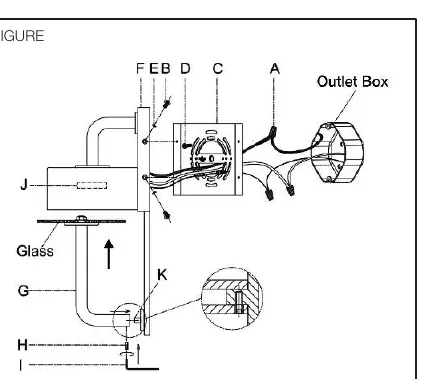
- Mounting Plate: Attach the mounting plate (C) to the outlet box (not supplied) using mounting screws (D). Ensure the ground wire faces outward.
- Fixture Assembly: Install the decorative arm (G) onto the fixture back plate (F) and secure it to the bottom nipple (K) using the provided hex screw (H) and Allen wrench (I).
Grounding Instructions
- Insert the green grounding screw into the hole with two raised dimples on the mounting bar.
- Wrap the fixture ground wire around the green grounding screw.
- Connect the fixture ground wire to the house ground wire from the outlet box using a wire connector.
- Warning: Never connect the ground wire to black or white power supply wires.
Wiring Instructions
Identify your fixture wires and connect them to the house wires as follows:
- Group A (Connect to Black House Wire): Black, Parallel wire (round & smooth), White or Grey with tracer, or Brown/Gold/Black without tracer.
- Group B (Connect to White House Wire): White, Parallel wire (square & ridged), White or Grey without tracer, or Brown/Gold/Black with tracer.
Connection Procedure:
- Place the fixture wire evenly against the house wire. Do not twist wires together before using connectors.
- Fit a wire connector over the wires and screw clockwise until firm.
- Gently pull the connector to ensure a firm connection. If it comes off, repeat the process.
Final Assembly and Sealing
- Align the fixture back plate (F) to the mounting plate (C) and secure it with washer (E) and screws (B).
- Moisture Protection: To prevent moisture from entering the outlet box and causing a short, apply clear silicone sealant around the outside of the fixture back plate where it meets the wall. Leave a small space at the bottom to allow moisture to escape.
Cleaning and Maintenance
To clean the fixture, wipe it with a soft cloth. Clean the glass with mild soap. Do not use abrasive materials such as scouring pads, powders, steel wool, or abrasive paper.
Technical Specifications
- Bulb: 1 x AC LED 6W (included).
- Models: 62-1607, 62-1608.
Practical help
Common problems
Fixture is loose after installation
Check that the mounting plate is securely attached to the outlet box and that the back plate is properly aligned and screwed in.
Moisture entering the outlet box
Apply clear silicone sealant around the outside of the fixture back plate where it meets the wall, leaving a gap at the bottom for drainage.
Wire connector feels loose
Remove the connector, ensure wires are placed evenly against each other, and screw the connector clockwise again until firm.
Before use
- Turn off electricity at the fuse or circuit breaker.
- Verify all parts are included in the carton.
- Ensure you have wire connectors (not supplied).
- Ensure you have clear silicone sealant for weatherproofing.
- Check that the outlet box is suitable for mounting.
Images and diagrams
- The figure illustrates the assembly of the mounting plate, back plate, and decorative arm.
- The diagram shows the correct wiring connection method using wire connectors.
Model compatibility
- Do not attach the fixture directly to the outlet box without the mounting plate.
- Do not install on ceilings with radiant heating systems.
- Do not hang the fixture on house electrical wires.

Manual page author
Emily Carter
User documentation editor
Prepares concise manual descriptions and highlights the most useful setup, operation, and maintenance information for readers.