Lighting / Outdoor Lighting
Sea Gull Lighting Greenwich Wall Sconce 4167101 Installation Instructions
Step-by-step installation guide for the Sea Gull Lighting Greenwich Wall Sconce (4167101). Includes wiring diagrams, mounting procedures, and safety requirements for damp locations.
Table of contents
Important Installation Information
This fixture is designed for installation using an NEC compliant junction box. It is safety listed for use in damp locations. Ensure that the installation is performed by a person familiar with the construction and operation of the product and the hazards involved.
Installation Steps
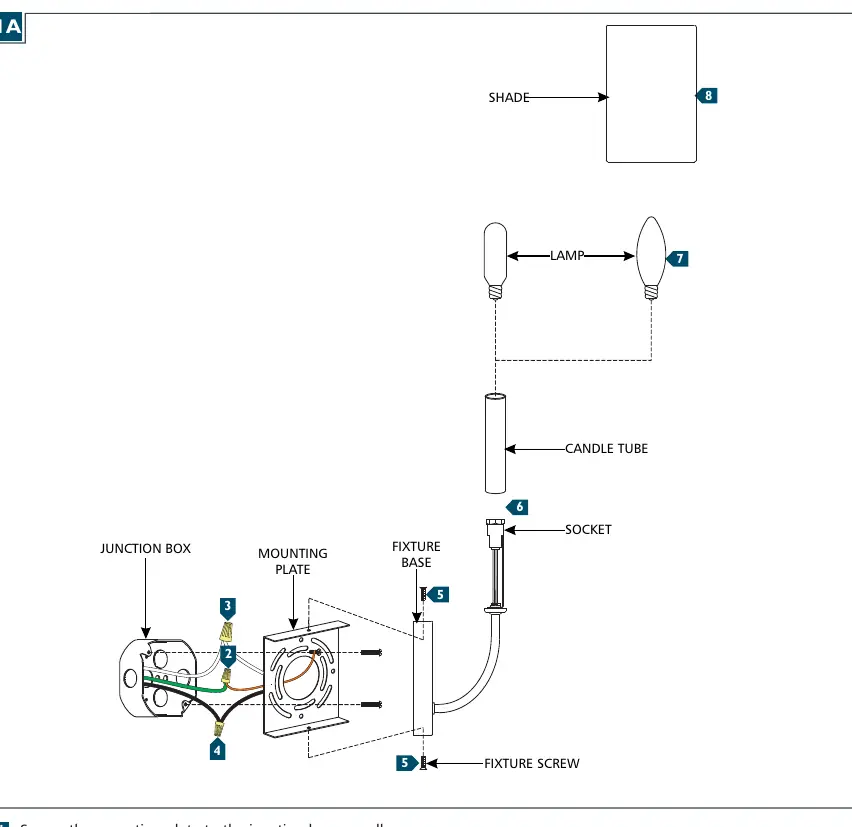
- Secure the mounting plate to the junction box or wall.
- Connect the fixture to a suitable ground in accordance with local electrical codes.
- Connect the white fixture wire to the neutral power line wire using a wire nut.
- Connect the black fixture wire to the hot power line wire using a wire nut.
- Neatly place the wires into the junction box, place the fixture onto the mounting plate, and secure it in place using the fixture screws.
- Install the candle tube by sliding it over the socket.
- Screw the lamp into the socket. Refer to the label on the socket for Max Wattage Information.
- Optional: If installing the shade, place it over the lamp.
Safety Warnings
Risk of Fire: This product must be installed in accordance with the applicable installation code. Use minimum 90°C supply conductors.
Practical help
Common problems
Fixture not working
Check wire connections and ensure the lamp is screwed in properly.
Risk of fire
Ensure installation is performed by a qualified person and use minimum 90°C supply conductors.
Before use
- Ensure the junction box is NEC compliant.
- Verify the location is suitable (damp locations are acceptable).
- Ensure you have wire nuts for connections.
- Check that supply conductors are rated for at least 90°C.
Specs in practice
- Damp locations
- The fixture is rated for use in areas with some moisture, such as bathrooms or covered porches.
Images and diagrams
- The diagram shows the mounting plate attached to the junction box.
- Wiring connections are illustrated with wire nuts connecting the fixture wires to the power line wires.
Model compatibility
- Requires an NEC compliant junction box.
- Compatible with damp locations.

Manual page author
Michael Turner
Technical manual editor
Reviews PDF manuals for structure, safety notes, and practical product details so readers can find the right information quickly.