Industrial / Energy Monitoring
User Manual for Senva EMX and EMX-L Energy Meter
Quick guide for the Senva EMX and EMX-L True RMS Energy Meter. Includes installation instructions, wiring diagrams, configuration steps, and troubleshooting for BACnet/Modbus setups.
Table of contents
Manual images
Click an image to enlargeQuick Guide from the Manual
The Senva EMX and EMX-L are 3-channel True RMS energy meters designed for revenue-grade monitoring. The EMX includes a display, logging, and RTC, while the EMX-L is a streamlined version that relies on the SenvaSync app for configuration and data. Both units support BACnet MS/TP and Modbus RTU protocols.
Product Overview
The EMX series is suitable for T35 DIN rail mounting. The EMX features an OLED screen for local monitoring and configuration, whereas the EMX-L requires the SenvaSync app (available on Apple and Android stores) for all operations.
Installation and Mounting
The meter is designed for T35 DIN rail installation. Place the unit centered over the rail and press upward until it clicks into place. To remove, use a flat-nose screwdriver to pull the top tab and apply downward pressure until the unit is flush and the tab releases.
Wiring
Important: Connections labeled "Class 2" must be permanently separated from those labeled "Class 1" by a minimum of 6 mm. Always disconnect power from the distribution system before installing or servicing current transformers (CTs).
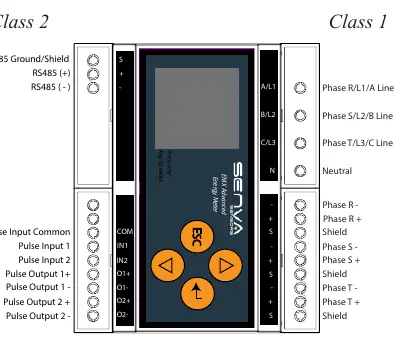
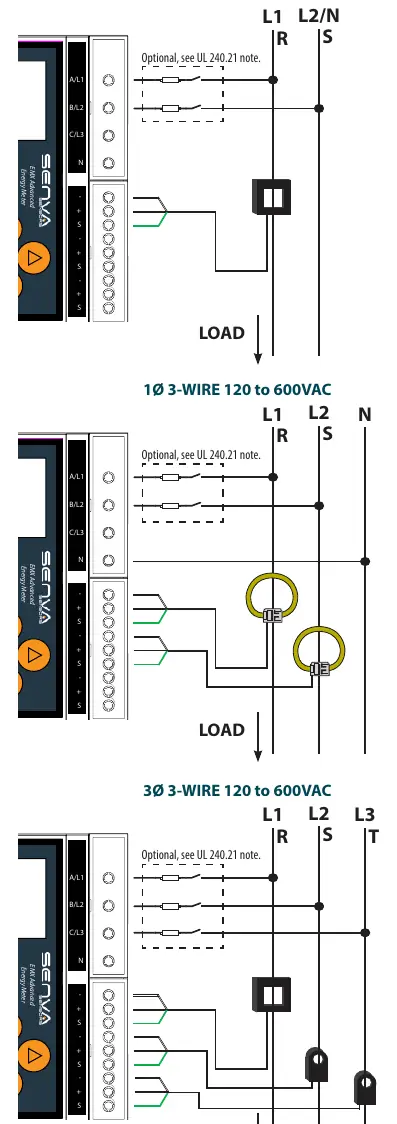
The EMX accepts 0.333V voltage output or di/dt signal CTs. Ensure the wiring method corresponds to the selected connection type (1-phase or 3-phase) as detailed in the wiring diagrams provided in the manual.
Operation and Configuration
Upon applying power, the OLED screen displays the summary page. Use the up and down arrows to cycle through system measurements.
Power Setup: Press the enter button to access the Metering Menu. You must select the connection type (e.g., 3-phase ABCN or 1-phase ABN) to match your wiring. Select the current element type (CT or Rogowski Coil) and set the current scale (Amps per 0.333 volt).
RS485 Setup: Access the Communication Menu to configure the network protocol (BACnet MS/TP or Modbus RTU), device address, baud rate, parity, and stop bits.
Troubleshooting
If a red exclamation mark appears on the OLED, check the alarm menu. Common issues include:
- Phase Loss: Check all phase voltages and current.
- Low Power Factor: Ensure voltage legs match with CTs (PF < 0.5).
- Frequency Range: Ensure frequency is between 45Hz and 65Hz.
- Voltage Range: Ensure system voltage does not exceed 600VAC.
- Current Range: Replace with a larger amperage rated CT.
- Pulse overrun: Increase Wh per pulse or decrease pulse duration.
If the issue persists, contact Senva technical support at [email protected] or (866) 660-8864.
Specifications
The EMX series operates on 90-600VLL power supply. It features 2 pulse inputs and 2 pulse outputs (solid state dry contact). The operating temperature range is -22 to 158°F (-30 to 70°C) with an IP20 environmental rating (front display IP40).
Practical help
Common problems
Phase Loss
Check all phase voltages and current.
Low Power Factor
Ensure voltage legs match with CTs (PF < 0.5).
Pulse overrun
Verify pulse settings, consider increasing the Wh per pulse, or decrease the pulse duration.
Voltage Range
Ensure system voltage does not exceed 600VAC.
Before use
- Ensure power is disconnected from the distribution system before installation.
- Verify that the CTs are either 0.333V voltage output or di/dt signal.
- Ensure Class 2 wiring is physically separated from Class 1 wiring by at least 6mm.
- Confirm the system voltage does not exceed 600VAC.
- For EMX-L, ensure the SenvaSync app is installed on your mobile device.
Specs in practice
- Class 2 Wiring
- Low voltage wiring that must be kept separate from high voltage (Class 1) wiring.
- Pulse Output
- Solid state dry contact output used for energy export, alarm status, or pulse input echo.
Images and diagrams
- Wiring diagrams illustrate connections for 1-phase 2-wire, 1-phase 3-wire, 3-phase 3-wire, and 3-phase 4-wire systems.
- Diagrams show the correct placement of CTs and voltage reference connections.
Model compatibility
- EMX-L does not have a display, logging, or RTC; it requires the SenvaSync app for configuration.
- The meter is suitable for T35 DIN rail mounting.

Manual page author
Emily Carter
User documentation editor
Prepares concise manual descriptions and highlights the most useful setup, operation, and maintenance information for readers.