Electronics / Special Effects
User Manual for Showven Sparkular Spin Rotating Cold Spark Effect Machine
Quick guide for the Showven Sparkular Spin. Learn how to install, operate, configure DMX settings, use the RFID card, and perform maintenance on your rotating cold spark effect machine.
Table of contents
Manual images
Click an image to enlargeQuick guide from the manual
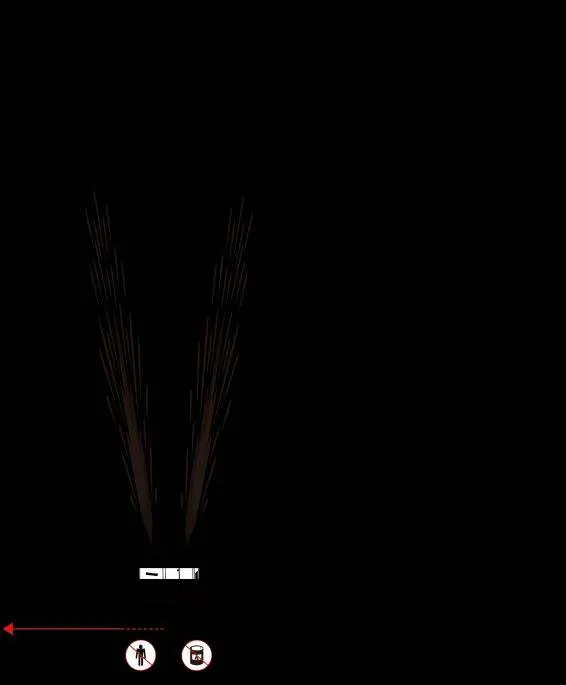
The Showven Sparkular Spin is a professional cold spark effect machine. Before operation, ensure the machine is installed horizontally and securely to prevent tipping. Maintain a safety distance of at least 3 meters from the audience and flammable materials. Always check the output nozzle for powder aggregate before and after use. The machine requires an RFID card for activation and uses HC8600 consumables. Never block the air intake or output nozzle, and allow the machine to cool down before cleaning.
Product Description and Specifications
The Sparkular Spin features two 20-degree angled nozzles and a bidirectional rotatable structure to create unique visual effects. Key specifications include:
- Model: BT81 (220V) / BT82 (110V)
- Work Power: 1000W
- Hopper Capacity: 200g x 2
- Control: DMX (2/4 channels) or Wireless Remote
- Interface: Neutrik powerCON TRUE1 IN/OUT, 3-pin & 5-pin XLR IN/OUT
- Operating Temperature: -20°C to 50°C
Structure of the Machine
The machine consists of an output nozzle, feeding hopper lid, cooling fan, LCD screen, and various connection ports. The bottom panel includes mounting points for secure installation. Ensure all power and DMX cables are connected correctly to the respective IN/OUT ports.
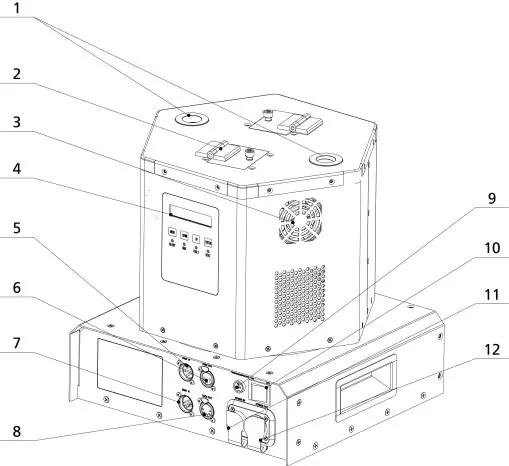
Operation Panel and Interface
The operation panel features an LED display area (READY, DMX, FAULT, HEAT indicators) and control buttons (MENU, DOWN, UP, ENTER). The RFID area is used to swipe cards to identify parameters and types of granules. The main interface displays nozzle temperatures, RPM, DMX address, and working time.
DMX Control
The machine supports 2-channel and 4-channel DMX modes. In 2-channel mode, the first channel controls fountain height and rotation, while the second channel handles material clearing, emergency stop, and pre-heat. In 4-channel mode, individual control for Nozzle 1 and Nozzle 2 is available, along with spinning control.
Operation Guide
- Installation: Install horizontally and securely.
- Filling: Fill the hopper with HC8600 consumable (max 200g per hopper). Ensure the lid is locked.
- Connection: Connect power and DMX cables. Maximum cascade is 2 units per standard power cable.
- Activation: Swipe the RFID card to activate the machine. The LCD will flash upon success.
- Firing: Allow 5 minutes for heating. Use DMX or remote to control firing. Maximum continuous firing time is 30 seconds.
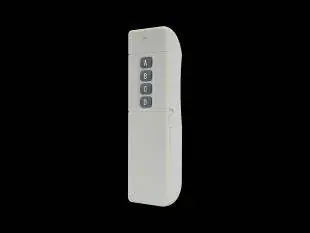
Wireless Control
To use the wireless remote, unplug DMX cables and set the machine to Wireless Control ON. The remote allows for High/Low effect, Firing OFF, and Material Clearing. Communication codes can be adjusted to prevent interference by changing the LED color on the remote.
Maintenance
Empty the feeding hopper before shipment or if the machine will not be used for a long time. Clear material both before and after the show to prevent nozzle clogging. Do not use high-power vacuum cleaners to empty the hopper; use a handheld vacuum cleaner only after the machine has cooled down.
Troubleshooting
The machine displays error codes for quick diagnosis:
- E0: Systematic error
- E2: Temperature sensor issue
- E3: Chassis over-temperature
- E4: Time remaining low (requires RFID card swipe)
- E5: Inner core over-temperature
- E6: Heating fail
Practical help
Common problems
Machine not firing or E4 error
Remaining time is low. Swipe a new RFID card to add working time.
Heating fail (E6)
Check power supply stability. If it does not self-recover, contact support.
Nozzle blockage
Clear material before and after each show. Ensure no powder aggregate is present.
Wireless remote not working
Ensure DMX cable is unplugged. Check for interference or re-match the remote.
Before use
- Ensure machine is installed horizontally.
- Check output nozzle for powder aggregate.
- Verify power supply voltage matches model (220V for BT81, 110V for BT82).
- Ensure safety zone of 3m is clear of flammable materials.
- Fill hopper with HC8600 consumable (max 200g*2).
- Swipe RFID card to activate.
Specs in practice
- Work Power: 1000W
- Power consumption during operation.
- Hopper Capacity: 200g*2
- Total consumable capacity for both hoppers.
- Max Cascade: 2 units
- Maximum number of units that can be daisy-chained on one power cable.
- Operating Temp: -20°C to 50°C
- Allowed ambient temperature range.
Images and diagrams
- Structure diagram identifies nozzle, hopper lid, cooling fan, and connection ports.
- Bottom panel diagram provides dimensions for mounting.
Model compatibility
- Use only HC8600 consumables.
- BT81 is 220V, BT82 is 110V.
- Wireless control requires DMX cables to be disconnected.

Manual page author
Michael Turner
Technical manual editor
Reviews PDF manuals for structure, safety notes, and practical product details so readers can find the right information quickly.