Electronics / Remote Controls
Robot Vacuum Cleaner with Mop Function Silvercrest SSWR C2 User Manual
Quick guide and user manual for the Silvercrest SSWR C2 Robot Vacuum Cleaner with Mop Function. Learn how to set up, operate, schedule cleaning, and maintain your device.
Table of contents
Manual images
Click an image to enlargeQuick Guide
This robot vacuum cleaner is designed for vacuuming loose, dry dirt on smooth floors and low-pile carpets, and includes a mop function for hard, smooth floors. Before first use, fully charge the device for 4-6 hours. Ensure the charging dock is placed against a wall with 1m clearance on the sides and 2m in front. Always keep the product in the charging dock when not in use to ensure it is ready for the next cleaning session.
Device Overview
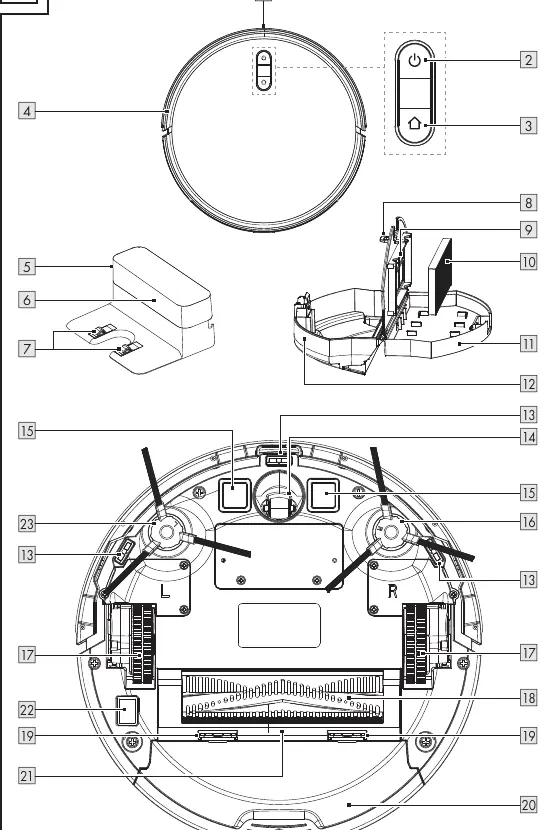
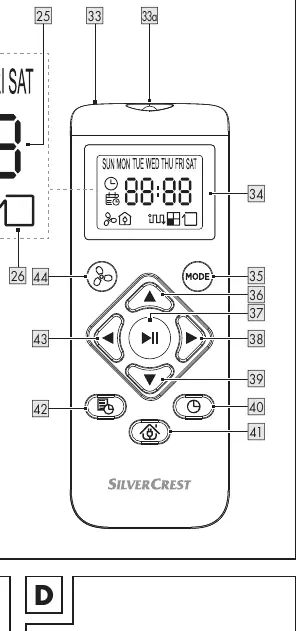
The device consists of the main robot unit, a charging dock, and a remote control. Key components include the bumper, dust collector, water tank, side brushes, roller brush, and various sensors (anti-drop). The remote control allows for scheduling, mode selection, and manual steering.
Initial Use
1. Connect the mains adapter to the charging dock and a wall socket. 2. Place the charging dock flush against a wall. 3. Set the on/off switch on the bottom of the robot to the 'I' position. 4. Press and hold the power button for 3 seconds to switch on. 5. Place the robot on the charging dock to begin charging. 6. Attach the side brushes, ensuring the 'L' and 'R' markings match the bottom of the robot.

Operation
The robot features three cleaning modes: Automatic mode (cleans surfaces and corners), Spot mode (focuses on a specific dirty area), and Corner mode (follows barriers like walls). You can adjust the suction power (3 levels) in any mode. To set the time or a cleaning schedule, use the remote control while the robot is in standby mode.
Using the Mop Function
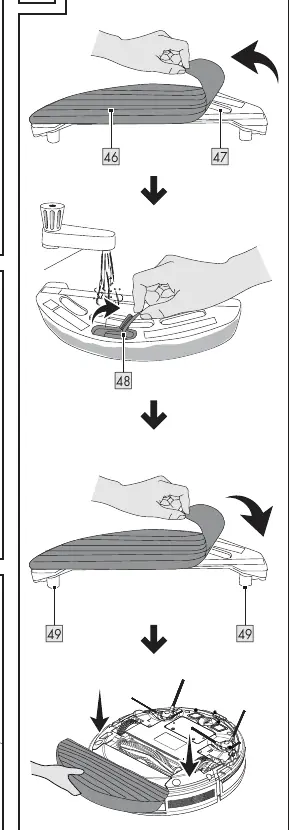
1. Remove the floor cloth from the water tank. 2. Open the rubber cover and fill the tank with water. 3. Close the cover and reattach the floor cloth. 4. Attach the water tank to the bottom of the robot, ensuring the pins fit into the holes. 5. After use, remove the tank and pour out remaining water.
Cleaning and Care
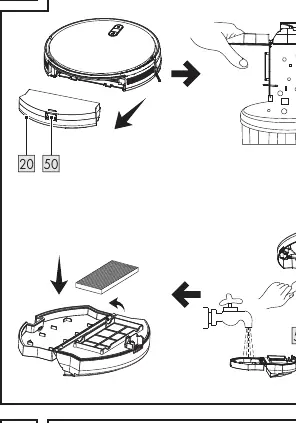
Regular maintenance is essential for performance. Empty the dust collector after each use. Clean the primary filter weekly and the HEPA filter every 4 weeks (or more often if very dirty). Clean the side brushes, roller brush, and anti-drop sensors every 4 weeks. Do not rinse the robot or HEPA filter with water.
Troubleshooting
If the robot crashes into objects, tap the bumper 10-20 times to release dirt. If run time is short, ensure the battery is fully charged. If the robot does not start at the scheduled time, check if the schedule was stored correctly and ensure the robot is not switched off.
Manufacturer information
Silvercrest
Practical help
Common problems
The product keeps crashing into objects.
The bumper is pushed in and cannot spring back. Tap the bumper 10-20 times to release any dirt under the bumper, or loosen the bumper.
The run time of the product is too short.
The battery is not fully charged. Recharge the battery.
The indicator lights do not light up white with a breathing effect while charging.
Check that the DC plug of the mains adapter is properly connected to the charging dock and the mains adapter is properly connected to the socket-outlet. Also, clean the charging contacts on the charging dock.
The suction power has decreased.
The HEPA filter is dirty or moist. Clean the HEPA filter or replace it with a new one.
The dust collector is spilling dirt.
The dust collector is overfilled. Empty the dust collector.
Before use
- Remove obstacles such as power cords, toys, and other objects.
- Tuck rug edges under the rug.
- Ensure curtains and tablecloths do not touch the floor.
- Verify the dust collector and filters are properly installed.
- Keep pets out of the room to be cleaned.
Specs in practice
- Suction power
- 0.4/0.8/2.0 kPa levels available.
- Charging time
- Approx. 4–6 hours.
- Dust collector volume
- 500 ml total (435 ml usable).
Images and diagrams
- Fig A: Overview of robot parts including sensors, brushes, and dust collector.
- Fig B: Remote control display and button functions.
- Fig C: Proper placement of the charging dock with required clearances.
- Fig I: Steps for emptying the dust collector and cleaning filters.
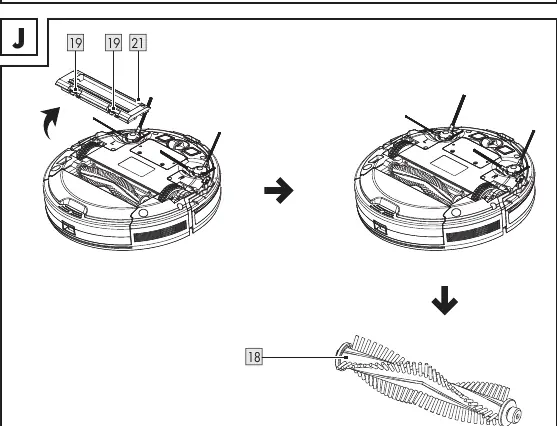
- Fig J: Steps for cleaning the roller brush.
Model compatibility
- Mop function is only intended for hard, smooth floors.
- Product is only intended for private, non-commercial use.
- Only use the provided mains adapter (model: SA12BH-190060V).

Manual page author
Emily Carter
User documentation editor
Prepares concise manual descriptions and highlights the most useful setup, operation, and maintenance information for readers.