Home Appliances / Washing Machines
SINGER 15-Class Sewing Machine Instruction Manual
Comprehensive guide for the Singer 15-Class sewing machine, covering setup, threading, operation, maintenance, and troubleshooting.
Table of contents
Product Overview
The Singer 15-Class is a classic, reliable sewing machine designed for precision and ease of use. This manual provides visual guidance for all essential operations, from initial setup to routine maintenance, ensuring optimal performance for various sewing projects.
Getting Started
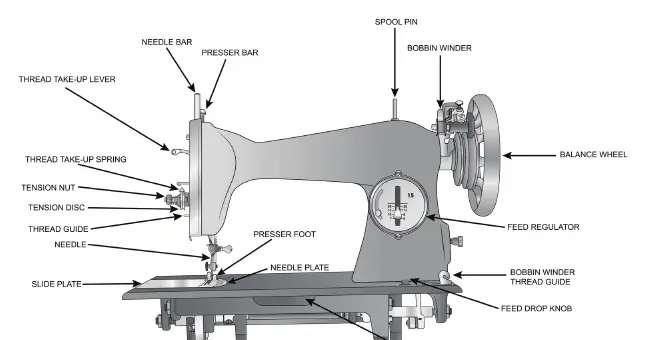
Before beginning, familiarize yourself with the machine components, including the needle bar, presser foot, tension discs, and balance wheel. Ensure the machine is placed on a stable surface. To install the needle, loosen the needle clamp screw, insert the needle with the flat side facing away from you, and tighten securely.
Threading and Operation
Proper threading is critical for consistent stitch quality. Follow the path from the spool pin through the thread guides, tension discs, and take-up lever. The bobbin must be wound evenly and inserted correctly into the bobbin case. Use the balance wheel to manually control the needle position. Adjust the feed regulator to set the desired stitch length according to your fabric requirements.
Maintenance and Care
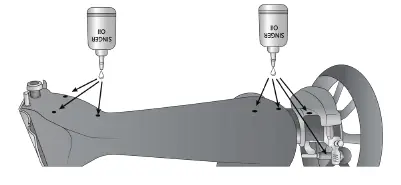
Regular maintenance is essential to keep your machine running smoothly. Keep the machine clean by removing lint from the feed dogs and bobbin area using a small brush. Lubricate the machine periodically at the designated oiling points indicated in the diagrams. Use only high-quality sewing machine oil. Ensure the slide plate is closed properly after bobbin installation.
Troubleshooting
If you encounter issues such as skipped stitches or thread breakage, check the following:
- Ensure the needle is not bent or dull.
- Verify that the machine is threaded correctly through all guides.
- Check the tension settings; incorrect tension can cause loops or puckering.
- Clean the bobbin case area to remove any trapped thread or debris.
- Ensure the bobbin is inserted correctly and rotates in the right direction.
If problems persist, consult the visual guides for proper tension adjustment and component alignment.
Related manuals
Related manuals from the same brand or category.
Home Appliances / Washing Machines
Singer 14SH644 & 14SH654 Overlock Machine Operator's Guide
SingerFurniture / Home Furnishing
Singer Sewing Machine Instructions: Models 144w204 & 144w304
SingerHome Appliances / Washing Machines
Singer 138w102 Sewing Machine Parts List
SingerHome Appliances / Washing Machines