Electronics / Audio
User Manual for Solight 1L45 Wireless Doorbell
Quick guide for the Solight 1L45 wireless doorbell. Learn how to install batteries, pair transmitters, adjust volume, select melodies, and reset the connection.
Quick answers from the manual
Quick answer
- The Solight 1L45 is a wireless doorbell operating at 433MHz with a 200m range. It supports pairing up to 6 buttons per receiver and 15 receivers per button using the 'Learning code' function. p. 1
Key actions
- Pairing a transmitter p. 1
- Resetting the connection p. 1
First start
- Install batteries in the receiver (3x AAA) and transmitter (12V LR23A), then test the connection before mounting. p. 1
Problems and fixes
Connection stops working
Reset the connection by holding the volume button for 10 seconds and re-pair the transmitters.
p. 1Maintenance and reset
- To reset, hold the volume button for 10 seconds until the receiver sounds again. p. 1
Technical specifications
| Parameter | Value | Meaning | Pages |
|---|---|---|---|
| Frequency | 433MHz | Operating frequency | p. 1 |
| Range | 200m | Maximum range in open area | p. 1 |
| Receiver Battery | 3x AAA (LR03) | Power source for receiver | p. 1 |
| Transmitter Battery | 12V (LR23A) | Power source for transmitter | p. 1 |
Where to find it in the PDF
- Instructions and specifications p. 1
Table of contents
Quick guide from the manual
The Solight 1L45 is a wireless doorbell system operating at 433MHz with a range of up to 200m in open areas. It supports pairing multiple transmitters and receivers. Before mounting, ensure the system is working correctly by testing the pairing and range.
Description of the doorbell
The receiver unit features the following controls and components:
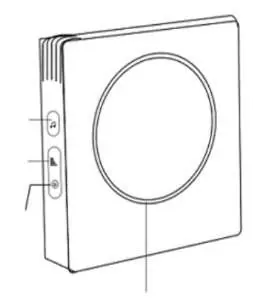
- Melody selection button: Used to cycle through 36 available tunes.
- Volume selection button: Adjusts volume across 4 levels (50dB - 90dB).
- LED indicator: Visual signal for pairing and operation.
- Speaker: Audio output.
- Battery tray: Located on the receiver (requires 3x AAA batteries).
- Transmitter: Includes a button, name badge cover, and battery compartment.
Installing batteries
Receiver: Open the battery tray cover and insert 3x AAA alkaline batteries, ensuring correct polarity.
Transmitter: Use a flat-head screwdriver to push into the hole at the bottom of the cover to open it. Insert a 12V (LR23A) alkaline battery according to the marked polarity. If a battery is pre-installed, remove the insulating tape. Ensure the gasket is not damaged when closing the cover.
Transmitter and receiver installation
The transmitter is waterproof and can be mounted outdoors. Use self-adhesive pads or mounting holes. If using mounting holes, open the battery cover to screw it into place. The receiver can also be mounted using the hanging holes on the back cover with screws and dowels.
Doorbell control
Melody selection: Press the melody button to change tunes. The selection is saved automatically.
Volume selection: Press the volume button to cycle through the 4 available volume levels.
Learning code function
This function allows you to pair multiple bells or buttons. A maximum of 6 buttons can be paired to one bell, and one button can be paired with up to 15 bells.
Pairing a new button or bell:
- Press and hold the volume button on the receiver for 5 seconds until the LED flashes and a melody sounds.
- Release the button and allow the LED to flash.
- Press the transmitter button. The melody will play, confirming the pairing. Keep the transmitter at least 50 cm away from the receiver during this process.
Unpairing and resetting:
- Press and hold the volume button on the receiver for 10 seconds.
- Ignore the sound after 3 seconds and continue holding until the receiver sounds again.
- Release the button; all transmitters are now cleared from memory.
Practical help
Common problems
Doorbell not working
Replace batteries in both the receiver and the transmitter.
Connection stops working
Perform a full reset by holding the volume button for 10 seconds and re-pair the transmitters.
Transmitter not pairing
Ensure the transmitter is at least 50 cm away from the receiver during the pairing process.
Before use
- Insert 3x AAA alkaline batteries into the receiver.
- Insert 1x 12V LR23A alkaline battery into the transmitter.
- Remove the insulating tape from the transmitter battery if present.
- Check the transmitter gasket for damage before closing the cover.
- Test the doorbell functionality before permanent mounting.
Specs in practice
- Pairing Capacity
- Up to 6 buttons per bell; up to 15 bells per button
Images and diagrams
- The receiver features a melody button, volume button, and LED indicator on the side.
- The transmitter has a battery compartment accessible via a hole at the bottom.
Model compatibility
- The transmitter is waterproof and suitable for outdoor use.
- Avoid locations that expose the transmitter to excessive heat or water.

Manual page author
Michael Turner
Technical manual editor
Reviews PDF manuals for structure, safety notes, and practical product details so readers can find the right information quickly.