Electronics / Audio
User Manual for Solight 1L68 Wireless Doorbell
Quick guide for the Solight 1L68 wireless doorbell. Learn how to install, pair transmitters, replace batteries, and troubleshoot connection issues.
Quick answers from the manual
Quick answer
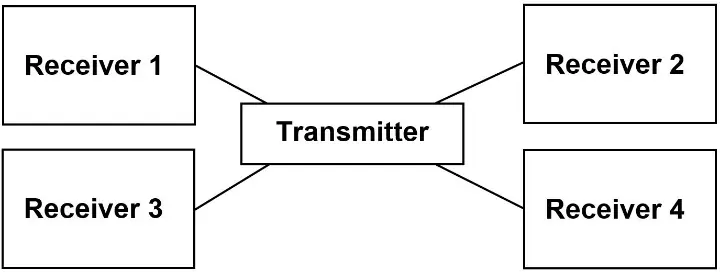
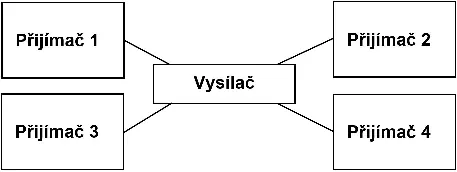
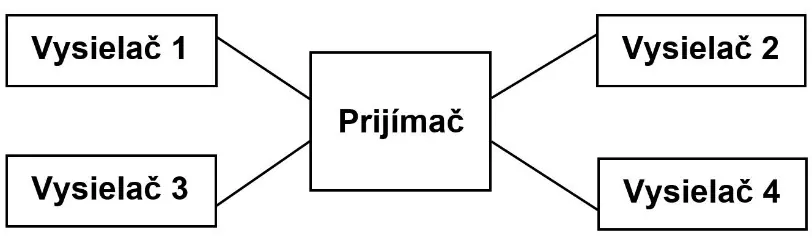
- The Solight 1L68 is a wireless doorbell system. It supports pairing up to 15 buttons to one receiver and up to 8 receivers to one button using the 'Learning code' function. p. 1
Key actions
- Pairing a transmitter to a receiver p. 1
- Resetting the connection p. 2
First start
- Insert batteries into both the receiver (3x AA) and the transmitter (1x CR2032). p. 1
Problems and fixes
Receiver does not ring
Check batteries, distance, and signal interference.
p. 2Maintenance and reset
- Reset the connection by removing a battery, holding the melody button, and reinserting the battery. p. 2
Technical specifications
| Parameter | Value | Meaning | Pages |
|---|---|---|---|
| Frequency | 433.92 ±1 MHz | Operating frequency | p. 2 |
| Range | max. 200m | Signal range in open area | p. 2 |
Where to find it in the PDF
- User Manual p. 1, 2, 3, 4
Table of contents
Manual images
Click an image to enlargeQuick guide from the manual
The Solight 1L68 is a wireless doorbell system consisting of a receiver and a transmitter. It features a "Learning code" function that allows for flexible pairing of multiple buttons and receivers. The system operates at a frequency of 433-433.92 MHz with a range of up to 200 meters in open areas.
Product Description
The receiver (doorbell) is powered by 3x AA alkaline 1.5V batteries. It features volume and melody control buttons. The transmitter (button) is powered by a 3V CR2032 battery and is waterproof (IP56), making it suitable for outdoor use.
Installation and Battery Replacement
Receiver: Open the battery cover and insert 3x AA alkaline 1.5V batteries, ensuring correct polarity. The receiver can be placed freely or hung using the mounting hole. Do not cover the speaker.

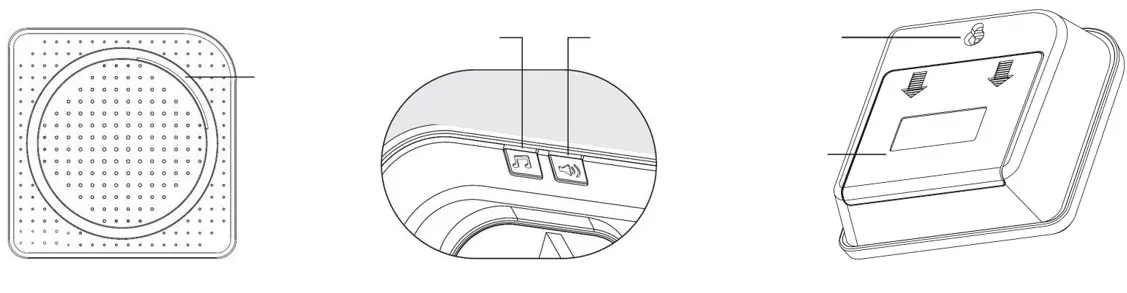
Transmitter: To replace the battery, use a flathead screwdriver to open the back cover, release the latch, and swing the inner cover to the side. Unclip the moisture seal, replace the 3V CR2032 battery, and carefully close the seal and covers. The transmitter can be mounted using double-sided adhesive pads or screws with dowels.
Pairing and Unpairing
The "Learning code" function allows you to pair multiple devices. A maximum of 15 buttons can be paired to one bell, and one button can be paired with up to 8 bells.
Assigning a new transmitter to a receiver:
- Plug the receiver into a power outlet.
- Press and hold the melody change button for 3-4 seconds until the LED flashes rapidly.
- Release the button and allow the LED to flash.
- Bring the transmitter close to the receiver and press the button once. The selected melody will play, confirming the pairing.
Unpairing/Reset:
- Remove one battery from the receiver.
- Press and hold the melody change button while reinserting the battery.
- Keep the button pressed until the LED flashes rapidly, then release. The memory is now cleared.
Troubleshooting
If the receiver does not ring, check the following:
- Ensure batteries are fresh and correctly installed.
- Verify the distance between the transmitter and receiver is within range.
- Check for signal interference from radio/wireless networks, large metal objects, or reinforced concrete walls.
Technical Specifications
The system operates at 433.92 MHz. The receiver has an IP20 protection class and operates between -10°C and +45°C. The transmitter has an IP56 protection class and operates between -15°C and +50°C. The volume range is 25 - 110 dB(A).
Practical help
Common problems
Receiver does not ring
Check batteries, ensure the distance is not too great, and remove sources of signal interference like metal objects or concrete walls.
Before use
- Insert 3x AA batteries into the receiver
- Insert 1x CR2032 battery into the transmitter
- Test the wireless connection before final mounting
- Ensure the transmitter is protected from excessive water and heat if possible
Specs in practice
- Receiver Protection
- IP20 (Indoor use)
- Transmitter Protection
- IP56 (Waterproof, outdoor use)
Images and diagrams
- Figure 1: One receiver can be paired with up to 15 transmitters.
- Figure 2: One transmitter can be paired with up to 8 receivers.
Model compatibility
- Supports up to 15 buttons per bell
- Supports up to 8 bells per button

Manual page author
David Miller
Documentation analyst
Organizes user manual content into clear summaries, with attention to model details, product context, and everyday usability.