Electronics / Audio
User Manual for Solight 1L82B Wireless Doorbell
Quick guide for the Solight 1L82B wireless doorbell. Learn how to pair the transmitter, adjust volume and melodies, install the button, and replace the battery.
Quick answers from the manual
Quick answer
- The Solight 1L82B is a wireless doorbell with a 180m range. To pair, plug the receiver into a 230V socket, wait for the melody, and press the transmitter button within 120 seconds. p. 1
Key actions
- Pairing the button p. 1
- Replacing the battery p. 1
First start
- Plug the receiver into a 230V socket, wait for the melody, and press the transmitter button within 120 seconds. p. 1
Problems and fixes
Receiver does not ring
Check distance and signal interference (metal objects, concrete walls).
p. 1Maintenance and reset
- To clear pairing, press and hold the melody selection button (button 2) for 20 seconds until you hear a 'Ding Dong' sound. p. 1
Technical specifications
| Parameter | Value | Meaning | Pages |
|---|---|---|---|
| Range | 180 m | In open space | p. 1 |
| Battery | CR2032 | Button power supply | p. 1 |
Where to find it in the PDF
- User Manual p. 1
Table of contents
Manual images
Click an image to enlargeQuick Guide
The Solight 1L82B is a wireless doorbell system consisting of a transmitter (button) and a receiver (doorbell). It operates on a 433.92 MHz frequency with a range of up to 180 meters in open space. The system supports pairing multiple buttons (up to 8) with one receiver, and one button with up to 15 receivers.
Device Description
The receiver features an LED indicator, melody selection/pairing button, volume control, mode button, and speaker. The transmitter includes a ringing button, name tag holder, and base.
Pairing the Button
- Plug the doorbell receiver into a 230V electrical socket.
- Wait for the "Ding Dong" melody to sound, indicating the device is in pairing mode.
- Within 120 seconds, press the button on the transmitter.
- A successful pairing is confirmed by the "Ding Dong" melody. If not heard, repeat the process.
Deleting paired buttons: Press and hold the melody selection button (button 2) for approximately 20 seconds until you hear a "Ding Dong" sound to clear the memory.
Settings
Use button 2 on the receiver to select the ringtone. Use button 3 to adjust the desired volume level.
Installation
Before permanent installation, test the range and reliability of the device in your chosen location. The button is weather-resistant, but it is recommended to place it in a protected area, such as a wall recess. Avoid placing the button directly on metal objects or materials containing metal (e.g., steel posts, metal door frames), as this may interfere with the signal. Attach the installation pad using double-sided adhesive tape or screws (use wall plugs if screwing).

Battery Replacement
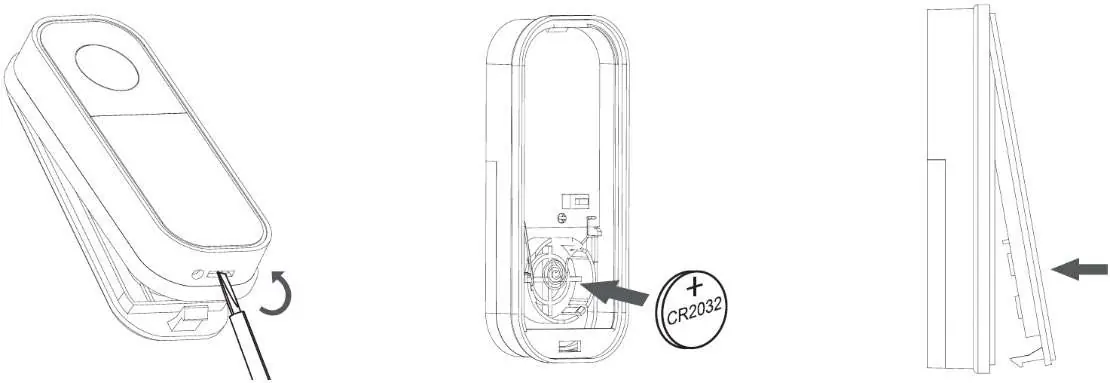
- Use a flat screwdriver to open the transmitter cover.
- Insert a new CR2032 battery, ensuring correct polarity as shown inside the device.
- Replace the cover.
Troubleshooting
If the receiver does not ring when the button is pressed, check the following:
- Ensure the distance between the transmitter and receiver is not too great.
- Check for strong sources of signal interference, such as radio/wireless networks, large metal objects, or reinforced concrete walls.
Specifications
- Range: 180 m in open space
- Frequency: 433.92 MHz
- Ringing Volume: 4 levels (0 - 90dB)
- Melodies: 36 selectable
- Power Supply (Receiver): AC 230V
- Power Supply (Button): 1 x 3V CR2032 battery
- Protection: IP44 (button)
- Operating Temperature: 0 °C to +35 °C (receiver), -10 °C to +50 °C (button)
Practical help
Common problems
Receiver does not ring when button is pressed
Check the distance between the transmitter and receiver. Ensure there are no metal objects or strong signal interference sources (like wireless networks or concrete walls) between them.
Before use
- Plug the receiver into a 230V socket.
- Ensure the CR2032 battery is installed in the transmitter.
- Test the range and signal reliability before permanent installation.
- Avoid mounting the button on metal surfaces.
Images and diagrams
- The transmitter requires a CR2032 battery.
- The receiver plugs directly into a standard wall outlet.
- Pairing requires plugging in the receiver and pressing the transmitter button within 120 seconds.
Model compatibility
- Solight 1L74T can be used as a replacement button.
- Receiver is intended for indoor use only.

Manual page author
David Miller
Documentation analyst
Organizes user manual content into clear summaries, with attention to model details, product context, and everyday usability.