Smart Home / Smart Doorbells
Wireless Doorbell User Manual Solight 1L67 Series
Quick guide for the Solight 1L67 series wireless doorbell. Learn how to install the battery, mount the transmitter, pair buttons, and adjust settings.
Quick answers from the manual
Quick answer
- To pair a new transmitter, plug in the receiver, hold the melody button for 3-4 seconds until the LED flashes, then press the transmitter button. p. 4
Key actions
- Pairing a new transmitter p. 4
- Resetting connection p. 4
First start
- Insert the CR2032 battery into the transmitter and plug the receiver into an AC 230V socket. p. 4
Problems and fixes
Receiver fails to ring
Check distance and signal interference (metal objects, concrete walls).
p. 5Maintenance and reset
- Unplug receiver, hold melody button, plug in, wait for LED flash. p. 4
Technical specifications
| Parameter | Value | Meaning | Pages |
|---|---|---|---|
| Frequency | 433-433.92MHz | Operating frequency | p. 4 |
| Range | 200m | Max operating range in open area | p. 4 |
Where to find it in the PDF
- Battery installation and controls p. 4
- Pairing and Troubleshooting p. 5
Table of contents
Manual images
Click an image to enlargeQuick guide from the manual
This guide covers the operation and installation of the Solight 1L67 series wireless doorbell. The system operates on a 433-433.92MHz frequency with a maximum range of 200m in open areas. The receiver is powered by a standard AC 230V socket, while the transmitter uses a 3V CR2032 battery.
Description
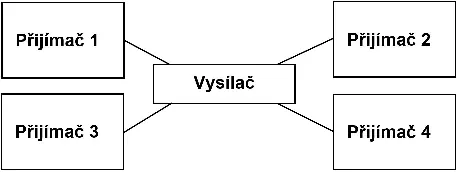
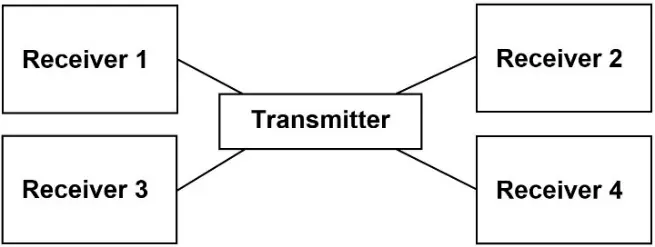
The doorbell system consists of a receiver (plug-in) and a transmitter (push button). The transmitter is waterproof and suitable for outdoor use, though protected locations are preferred. The system supports pairing multiple transmitters to one receiver or one transmitter to multiple receivers.
Battery installation
To install or replace the battery in the transmitter:
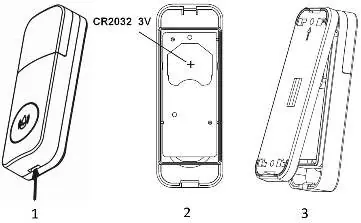
- Use a flat-blade screwdriver to push in the latch and open the cover.
- Insert a 3V CR2032 battery, ensuring correct polarity.
- Close the cover securely.
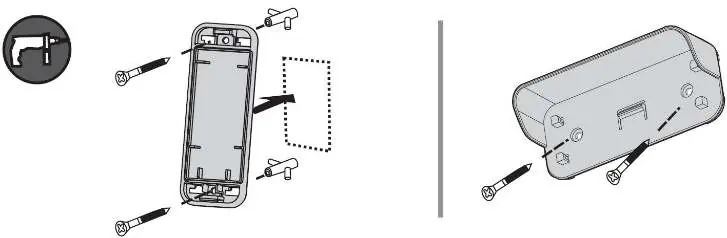
Mounting
Before permanent mounting, test the range by plugging the receiver into the desired socket and pressing the transmitter button at the intended location. The transmitter can be mounted using the provided double-sided adhesive pad or screws with dowels. It can be installed with or without the protective canopy.
Doorbell control
Melody selection: Press the melody button to play and cycle through available melodies. The selection is saved automatically.
Volume control: Press the volume button to cycle through volume levels from lowest to highest and back. A beep confirms the change.
Pairing and Learning Code
The "Learning code" function allows you to pair multiple devices. A maximum of 15 buttons can be paired with one bell, and one button can be paired with up to 8 bells.
Assigning a new transmitter:
- Plug the receiver into a power socket.
- Press and hold the melody button for 3-4 seconds until the LED flashes quickly. Release the button.
- Press the transmitter button once. The selected melody will play, confirming the pairing.
Unpairing/Reset:
- Unplug the receiver.
- Press and hold the melody button while plugging the receiver back into the socket.
- Keep the button pressed until the LED flashes quickly, then release. The memory is now cleared.
Troubleshooting
If the receiver fails to ring:
- Check if the distance between the transmitter and receiver is within the 200m range.
- Ensure there are no strong signal interference sources (radio/wireless networks, large metal objects, reinforced concrete walls) between the devices.
Practical help
Common problems
Receiver does not ring
Check the distance between the transmitter and receiver. Ensure there are no large metal objects, reinforced concrete walls, or strong signal interference sources between them.
Before use
- Test the range by plugging the receiver into the desired socket before permanent mounting.
- Ensure the 3V CR2032 battery is inserted with correct polarity.
- Verify the receiver is plugged into a standard AC 230V socket.
Specs in practice
- Operating Frequency
- 433-433.92MHz
Images and diagrams
- The pairing diagram shows that one receiver can be paired with up to 15 transmitters.
- The diagram also shows that one transmitter can be paired with up to 8 receivers.
Model compatibility
- Maximum 15 buttons can be paired with one bell.
- One button can be paired with up to 8 bells.

Manual page author
Emily Carter
User documentation editor
Prepares concise manual descriptions and highlights the most useful setup, operation, and maintenance information for readers.