Lighting / Fixtures
Installation Guide for Sunco Lighting LED Linear High Bay
Quick installation and setup guide for the Sunco Lighting LED Linear High Bay. Includes wiring diagrams, safety precautions, and configuration steps for wattage and CCT settings.
Table of contents
Manual images
Click an image to enlargeQuick guide from the manual
This document provides installation and configuration instructions for the Sunco Lighting LED Linear High Bay. Before beginning, inspect the fixture for any freight damage. Ensure the power is disconnected before installation or servicing. The fixture is designed for chain mounting and requires a qualified licensed electrician for commercial installations.
Safety instructions
- Electric Shock: Disconnect power before installation. Verify supply voltage matches the luminaire label. All wiring must be capped with UL-approved connectors.
- Fire/Burn Risk: Keep combustible materials away from the lens. Do not exceed the maximum wattage marked on the label.
- Product Damage: Do not connect to dimmer packs, occupancy sensors, or timing devices unless specified. Ensure proper polarity. Wear grounding equipment to prevent Electrostatic Discharge (ESD).
Installation
The fixture is designed for chain mounting. Follow these steps:
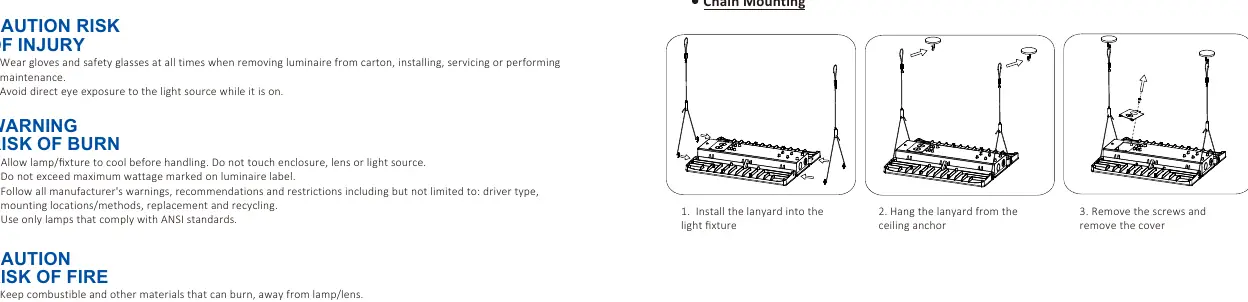
- Install the lanyard into the light fixture.
- Hang the lanyard from the ceiling anchor.
- Remove the screws and remove the cover.
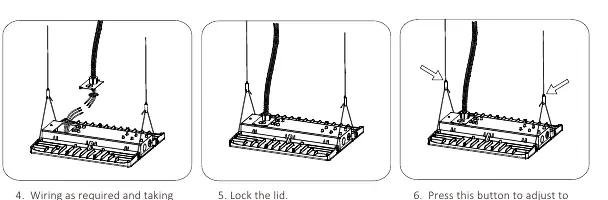
- Perform wiring as required, taking necessary safety precautions.
- Lock the lid.
- Press the adjustment button to set the required length and complete the installation.
Wiring
The fixture operates on 120-277Vac, 50/60Hz. Connect the wires as follows:
- Live: Black wire
- Neutral: White wire
- Ground: Green wire
- Dimming: Purple (Dim+) and Pink (Dim-)
Wattage and CCT selection
The fixture allows for field-selectable settings:
- Wattage Selectable: 240W, 270W, or 310W.
- CCT Selectable: 4000K or 5000K.
Adjust these settings using the switches located on the fixture housing.
Troubleshooting
- If the light does not turn on, verify that the line voltage at the fixture is correct and refer to the wiring diagram.
- Ensure the fixture is properly grounded.
Practical help
Common problems
Fixture does not turn on
Check that the line voltage at the fixture is correct and verify that the fixture is properly grounded.
Wiring concerns
Ensure all electrical connections are made in accordance with the National Electrical Code (NEC) and capped with UL-approved wire connectors.
Before use
- Inspect the fixture for freight damage upon receipt.
- Disconnect or turn off power before installation or servicing.
- Verify supply voltage matches the luminaire label.
- Wear gloves and safety glasses during installation.
- Ensure the fixture is connected to a properly installed and grounded UL-listed junction box.
Specs in practice
- Wattage Selectable
- Adjustable between 240W, 270W, and 310W.
- CCT Selectable
- Adjustable between 4000K and 5000K color temperatures.
Images and diagrams
- The wiring diagram illustrates the connection points for Live (Black), Neutral (White), Ground (Green), and Dimming wires (Purple/Pink).
- The Wattage & CCT Selectable diagram shows the switches used to configure the light output and color temperature.
Model compatibility
- Do not connect directly to dimmer packs, occupancy sensors, or timing devices unless specified in product documentation.
- Must be powered directly off a switched circuit.
- Do not restrict fixture ventilation; allow airspace around the fixture.

Manual page author
Michael Turner
Technical manual editor
Reviews PDF manuals for structure, safety notes, and practical product details so readers can find the right information quickly.