Furniture / Media Furniture
Sweeek NÉPAL 100cm Vintage Vinyl Record Cabinet User Manual
Quick guide for the Sweeek NÉPAL 100cm Vintage Vinyl Record Cabinet. Includes assembly instructions, safety warnings, maintenance tips, and warranty information.
Table of contents
Manual images
Click an image to enlargeQuick guide from the manual
This document provides assembly and maintenance instructions for the Sweeek NÉPAL 100cm Vintage Vinyl Record Cabinet. The assembly process is estimated to take approximately 30 minutes and requires two people. Important: This furniture must be permanently fixed to the wall to prevent tipping, which can cause serious or fatal injuries.
Safety Warnings
- Tipping Hazard: The product must be used with the provided wall-mounting devices.
- Wall Mounting: Screws and dowels for wall mounting are not included, as they depend on your specific wall material. Use appropriate hardware for your wall type.
- Usage: Do not sit on the product.
- Environment: Keep away from extreme temperature variations and direct sunlight to prevent cracking, warping, or discoloration.
Assembly Instructions
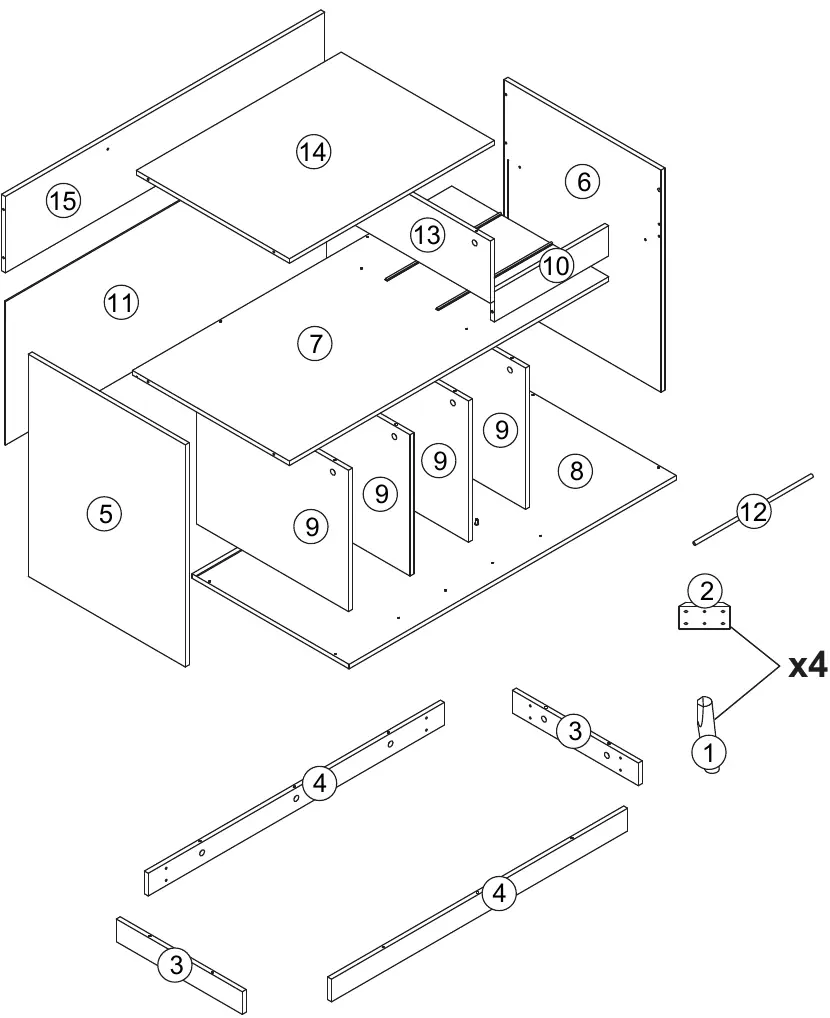
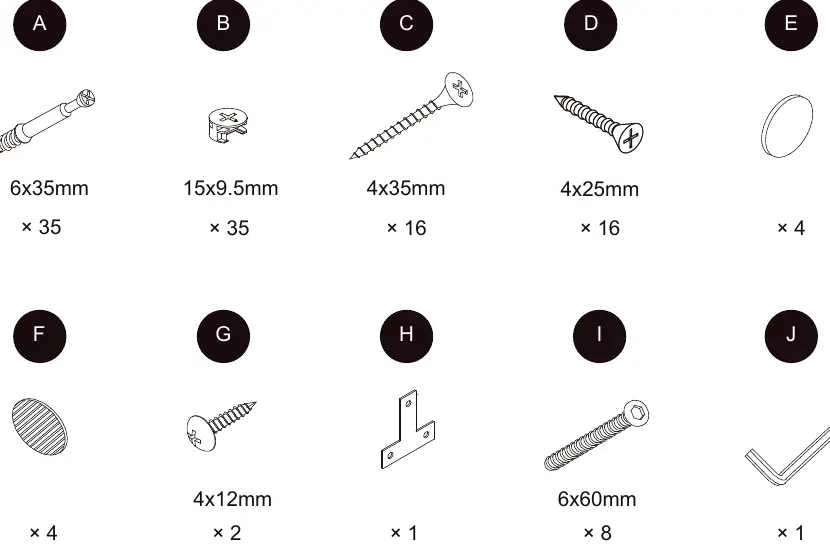
Before beginning, ensure all parts are present. Assemble and screw in each piece by hand first to ensure stability and prevent damage to screw threads. Tighten screws firmly only after the assembly is complete.
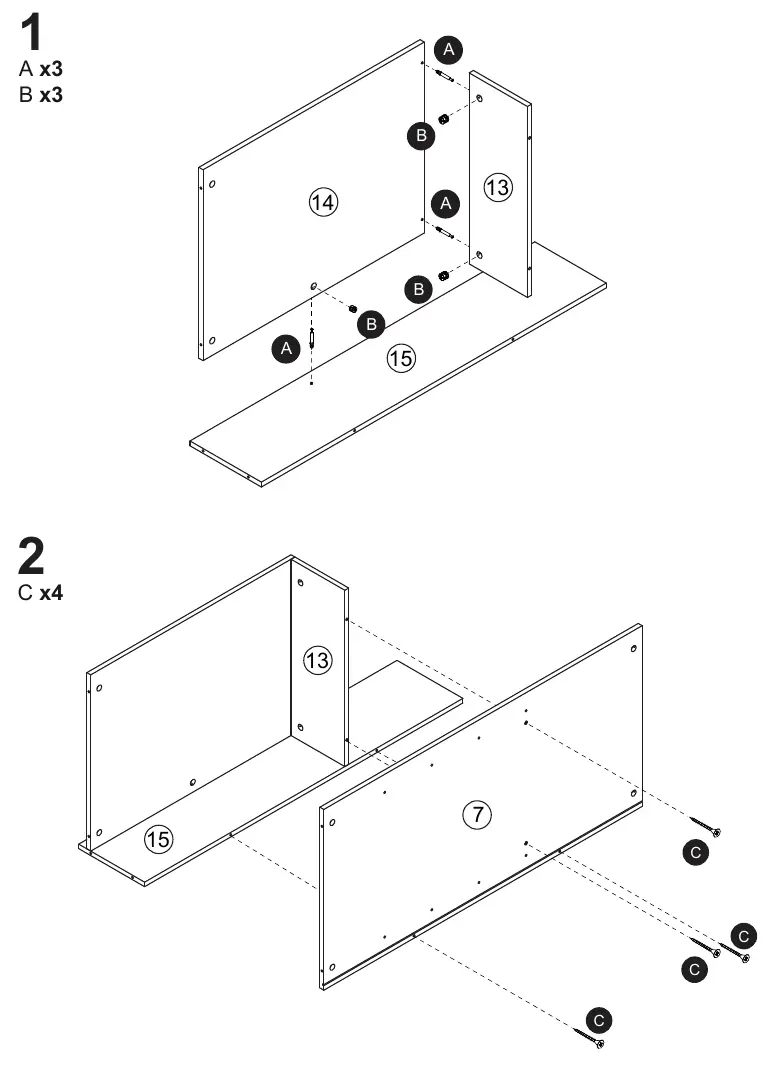

- Step 1-2: Connect panels 13, 14, and 15 using hardware A and B, then attach panel 7 using hardware C.
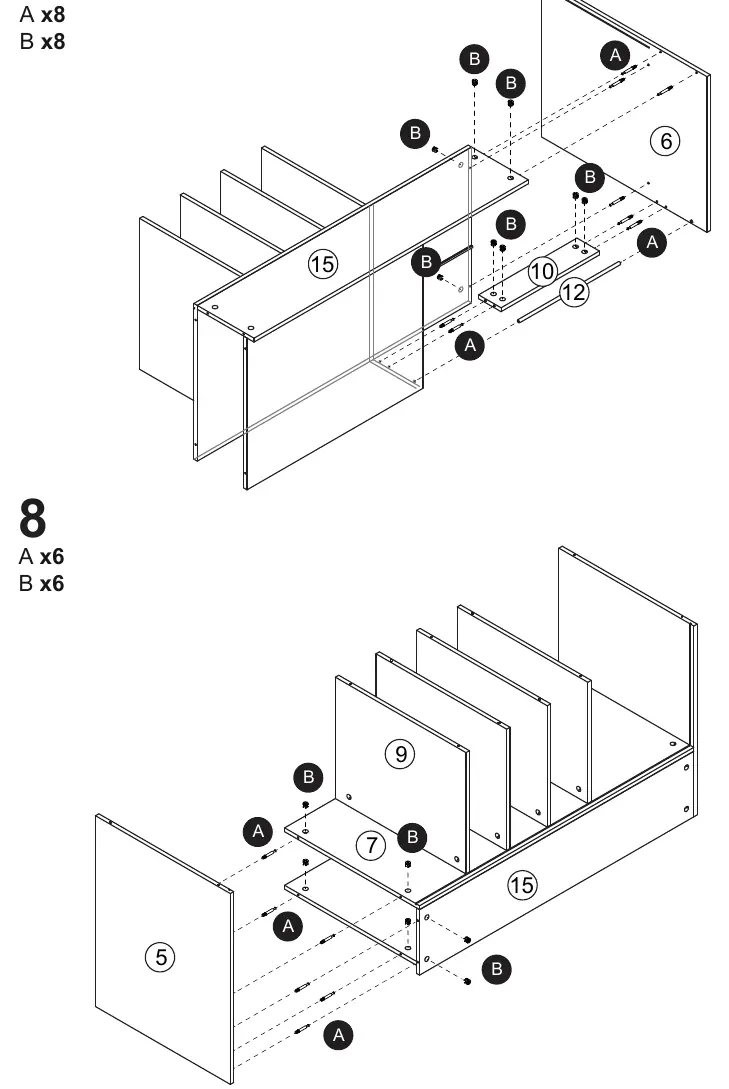
- Step 3-6: Continue attaching internal panels 9 to the main structure using hardware A and B.
- Step 7-8: Attach side panels 5 and 6, along with internal components 10 and 12, using hardware A and B.
- Step 9-10: Secure the back panel 11 and top panel 8 using hardware F and C.
- Step 11-12: Attach the base structure (panels 3 and 4) using hardware A, B, and D.
- Step 13-14: Install legs using hardware E, I, and J, and secure the unit to the wall using hardware G and H.
Care and Maintenance
- Wood: Dust regularly with a clean, soft, and dry cloth.
- Solid Wood: For damage or to revive appearance, lightly sand (180-240 grain) and varnish.
- Rattan: Keep away from radiators or heat sources to prevent drying and cracking.
- Metal: Wipe with a damp cloth. Do not use abrasive products, acidic cleaners, or solvents.
- Electrical Components: Only trained personnel should repair or replace height adjusters with energy-storing mechanisms.
Warranty
Sweeek provides a 2-year warranty against manufacturing and material defects from the date of receipt. The warranty covers repair or replacement of defective parts. It does not cover damage from misuse, unauthorized repairs, professional use, or normal wear and tear. Contact customer service via www.sweeek.help for support.
Official resources from the manual
Practical help
Common problems
Furniture tipping over
Must be permanently fixed to the wall using the included fixing pieces.
Screw threads damaged during assembly
Assemble and screw in each piece by hand first; tighten firmly only after assembly is complete.
Wood discoloration
Avoid exposing the product to direct sunlight for long periods.
Before use
- Check wall material to select appropriate screws and dowels (not included).
- Ensure you have a clean, soft, and dry cloth for dusting.
- Verify all parts are present before starting assembly.
- Ensure two people are available for assembly.
Specs in practice
- Assembly time
- Approximately 30 minutes.
Images and diagrams
- Assembly diagrams show the step-by-step connection of panels 1-15 using hardware A-J.
Model compatibility
- For domestic use only.
- Not for professional use (rental, school activities, etc.).

Manual page author
Michael Turner
Technical manual editor
Reviews PDF manuals for structure, safety notes, and practical product details so readers can find the right information quickly.