Garden / Leaf Blowers
Assembly Instructions for The Home Depot MWM 9899 Tall Nightstand
A comprehensive assembly guide for the The Home Depot MWM 9899 Tall Nightstand. Includes step-by-step instructions, hardware lists, weight limits, and care recommendations.
Quick answers from the manual
Quick answer
- This manual provides step-by-step assembly instructions for the MWM 9899 Tall Nightstand, including hardware identification, assembly steps, weight limits, and care instructions. p. 1, 19
Key actions
- Assemble the cabinet on a flat, smooth surface. p. 2
- Secure the cabinet to the wall to prevent tipping. p. 17
First start
- Verify all panels and hardware are present before starting assembly. p. 3, 4
Maintenance and reset
- Clean metallic hardware with a dry cloth. Use a soft soap solution or damp cloth for the cabinet. Do not paint or drag the cabinet. p. 18
Technical specifications
| Parameter | Value | Meaning | Pages |
|---|---|---|---|
| Top Weight Limit | 33 lbs | Maximum load for the top surface | p. 17 |
| Drawer Weight Limit | 11 lbs | Maximum load for the drawer | p. 17 |
Where to find it in the PDF
- Assembly Steps p. 6, 16
- Hardware List p. 4
Table of contents
Manual images
Click an image to enlargeQuick Guide for Assembly
This manual provides instructions for assembling the MWM 9899 Tall Nightstand. Before beginning, ensure you have a flat, smooth surface to work on, such as the cardboard from the box or a rug. It is recommended to have another person assist with the assembly.
Tools and Preparation
You will need the following tools:
- Phillips head screwdriver
- Flat head screwdriver
- Hammer
Important: Before starting, verify that you have all the panels (A-K) and hardware listed in the manual. Check that all parts are in good condition, as the warranty may not cover defects once the unit is assembled.
Assembly System
The furniture uses a Minifix system and wood dowels. Follow these guidelines for all connections:
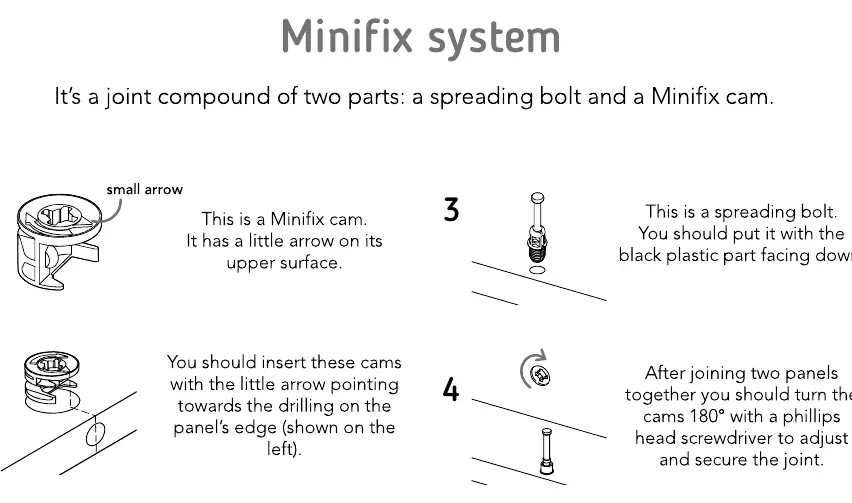
- Wood Dowels: Insert into the indicated hole and gently tap until fully inside. When joining panels, tap gently to adjust the joint.
- Minifix System: Consists of a spreading bolt and a Minifix cam. Insert the cam with the arrow pointing towards the panel edge. Insert the spreading bolt with the black plastic part facing down. After joining panels, turn the cam 180 degrees with a Phillips head screwdriver to secure the joint.
Assembly Steps
The assembly process involves 20 steps, starting with attaching the legs to the base panel (D) and building the frame using panels A, B, C, E, F, G, H, I, J, and K. Follow the diagrams carefully to ensure correct orientation of panels and hardware.
Weight Limits and Care
To ensure the longevity and safety of your nightstand, observe the following:
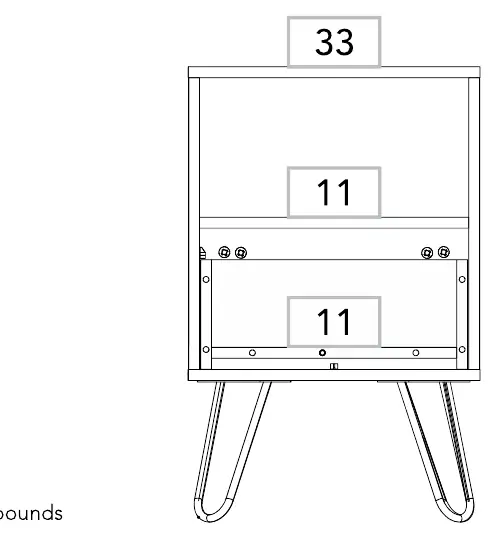
- Weight Limits: The top surface supports up to 33 lbs, and the drawer supports up to 11 lbs.
- Safety: It is strongly recommended to fix the cabinet to the wall to prevent tipping.
- Care Instructions: Do not paint the cabinet. Use only for indoor spaces and avoid direct sunlight. Clean metallic hardware with a dry cloth. Clean the cabinet with a soft soap solution or damp cloth. Do not drag the cabinet; lift it with help. Avoid contact with water, fire, or high heat.
Manufacturer information
The Home Depot
Practical help
Common problems
Drawer not sliding correctly
Ensure the drawer is fully inserted and the shelf support is correctly positioned.
Instability
Fix the cabinet to the wall to prevent tipping.
Before use
- Verify all panels (A-K) are present.
- Verify all hardware (dowels, bolts, cams, screws) are present.
- Prepare a flat, smooth surface (use the box cardboard).
- Have a Phillips head screwdriver and flat head screwdriver ready.
- Have a second person available to assist with assembly.
Specs in practice
- Top surface weight limit
- 33 lbs
- Drawer weight limit
- 11 lbs
Images and diagrams
- The manual uses a Minifix system (spreading bolt + cam).
- Rotate cams 180 degrees to lock joints.
- Panels are labeled A through K for easy identification.
Model compatibility
- Indoor use only.
- Do not expose to direct sunlight or high heat.

Manual page author
David Miller
Documentation analyst
Organizes user manual content into clear summaries, with attention to model details, product context, and everyday usability.