Home Appliances / Vacuum Cleaners
Owner's Manual for VOX POWER BURST Effect Pedal
Quick guide for the VOX POWER BURST effect pedal. Learn how to install the battery, connect your instrument, use the Nutube booster, and configure display modes.
Table of contents
Quick guide from the manual
The VOX POWER BURST is a tube booster pedal featuring the Nutube vacuum tube, which provides the saturation and compression characteristics of traditional vacuum tubes. The unit includes an oscilloscope display to visualize the waveform and a link function to connect multiple pedals.
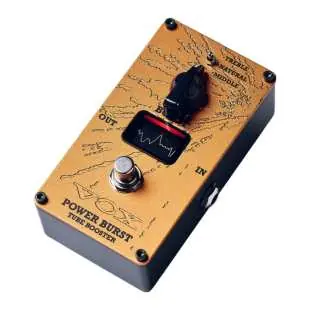
Part names and functions
- IN (INPUT) jack: Connects your guitar cable. This jack also acts as the power switch; unplug the cable when not in use.
- OUT (OUTPUT) jack: Connects to your guitar amp, other effect pedals, or equipment.
- Effect switch: Toggles between the effect sound (indicator lit) and bypass sound (indicator unlit).
- Display: Shows the waveform characteristics via an oscilloscope function.
- LINK jack: Allows connection to other VOX pedals with a LINK jack for simple switching.
- DC 9V jack: For connecting an optional AC adapter (9V, 600mA or greater).
- BOOST knob: Adjusts the amount of boost.
- Mode switch: Selects between TREBLE (upper frequency emphasis), NATURAL (natural tube sound), and MIDDLE (midrange emphasis).
Setup
- Set the BOOST knob to the minimum level.
- Connect your guitar or instrument to the INPUT jack.
- Connect the OUTPUT jack to your amplifier or other equipment.
- Turn on the externally connected equipment.
- Press the effect switch and adjust the tone using the BOOST knob and mode switch.
If using an optional AC adapter, connect a 9V, 600mA or greater adapter to the DC 9V jack. Turn off all equipment before making connections.
Installing the battery
- Open the battery cover on the bottom of the unit.
- Attach a 9V alkaline battery (6LF22/6LR61) to the battery clip, ensuring correct polarity.
- Install the battery and close the cover.
When the battery is low, the display shows LOW BATT. Replace it immediately. Remove the battery if the unit will not be used for an extended period.
Display modes
To enter SELECT DISPLAY mode, turn the unit off, insert a plug into the INPUT jack while holding down the effect switch, and turn the power on. Once the indicator lights up, release the switch. You can choose from:
- DISP OFF: Turns the display off.
- MODE1: Standard waveform display.
- MODE2: Waveform as a series of bars.
To save a mode, long-press the effect switch on the desired mode screen.
Specifications
- Input impedance: 1 MΩ
- Power supply: 9V alkaline battery or AC adapter (9V, 600mA or greater)
- Battery life: Approximately 4 hours (continuous use)
- Current consumption: Approximately 70 mA
- Dimensions: 72 x 120 x 55 mm
- Weight: 290 g (including battery)
Safety and maintenance
If the unit receives a strong impact, high-frequency noise may occur; this is due to the Nutube structure and is not a malfunction. Do not use cables with built-in resistors. When linking multiple pedals, do not connect more than five units and do not use a splitter cable that divides stereo into L and R channels.
Practical help
Common problems
High-frequency noise output
This is caused by the Nutube structure if the unit receives a strong impact; it is not a malfunction.
Display shows LOW BATT
The battery is running low. Replace it with a new 9V alkaline battery as soon as possible.
No sound output
Check if the battery is completely depleted or if the power is off. Ensure the input cable is connected.
Before use
- Ensure you have a 9V alkaline battery (6LF22/6LR61) or a compatible 9V AC adapter (600mA or greater).
- Set the BOOST knob to the minimum level before connecting.
- Turn off all connected equipment before making connections.
- Do not use cables with built-in resistors.
- Do not use a splitter cable that divides stereo into L and R channels.
Specs in practice
- Input impedance
- 1 MΩ, affects signal clarity and interaction with guitar pickups.
- Current consumption
- Approximately 70 mA; requires a power supply capable of at least 600 mA.
- Battery life
- Approximately 4 hours of continuous use with a 9V alkaline battery.
Images and diagrams
- The pedal features an IN jack (also acts as power switch), OUT jack, LINK jack for daisy-chaining, and a DC 9V input.
- The display shows an oscilloscope waveform of the signal passing through the Nutube circuit.
Model compatibility
- Can connect up to five units using the LINK jack.
- Use only 9V AC adapters with 600mA or greater current capacity.

Manual page author
Michael Turner
Technical manual editor
Reviews PDF manuals for structure, safety notes, and practical product details so readers can find the right information quickly.