Electronics / IP Phones
User Guide for VTech Analog Next Gen Series Cordless 1-line Hotel Telephone
Quick start and user guide for VTech Analog Next Gen Series hotel telephones. Includes installation, setup, programming, and troubleshooting steps for models NG-A3412 and NG-C3411HC.
Table of contents
Manual images
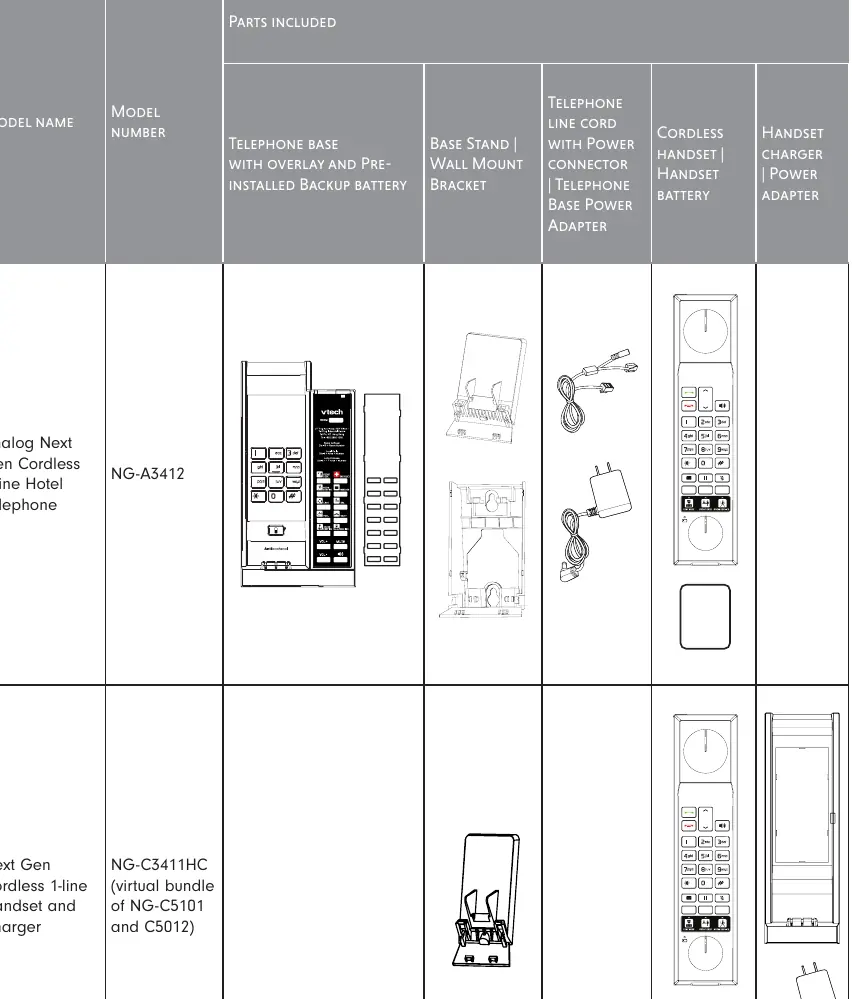
Click an image to enlargeQuick guide from the manual
This guide covers the installation and operation of the VTech Analog Next Gen Series cordless hotel telephones. Before first use, ensure the telephone base is connected to a power outlet not controlled by a wall switch and that the telephone line cord is connected to the wall jack. The handset battery must be charged for 11 hours before initial use. To turn on the telephone base, use a paperclip to press the button in the Base battery ON pinhole.
Important safety instructions
Always follow basic safety precautions to reduce the risk of fire, electric shock, and injury. Do not use the product near water, on unstable surfaces, or in environments with flammable gases. Only use the supplied power adapters and batteries. Do not disassemble the product; refer servicing to an authorized facility.
Installation
Desktop Position: Connect the telephone line cord to the base and wall jack. Align the base stand grooves with the telephone base and slide it up to secure. Plug the power adapter into a wall outlet.
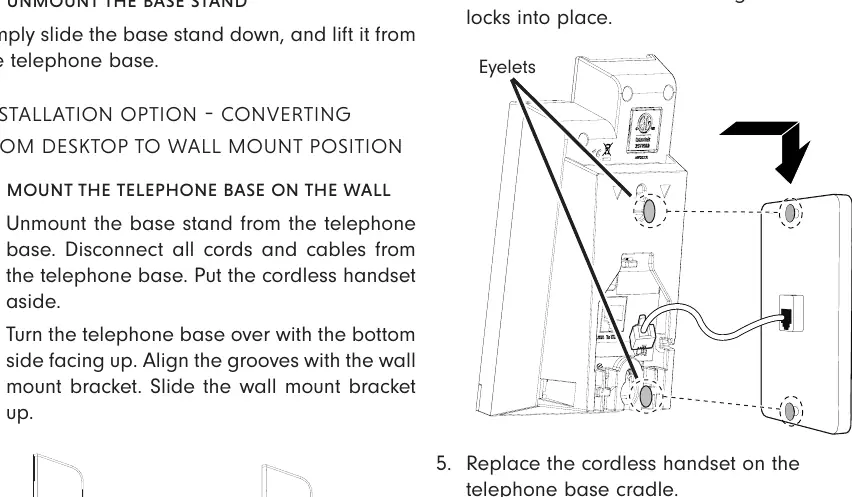
Wall Mount Position: Unmount the base stand. Align the grooves with the wall mount bracket and slide it up. Position the eyelets on the telephone base against the mounting studs on the wall plate and slide the base down until it locks into place.
Handset registration
Handset registration occurs automatically the first time a cordless handset is placed on the telephone base. You will hear 3 beeps upon successful registration. Each base can accommodate up to five handsets.
Setup and programming
To program settings like ringer tone, flash duration, or RF transmission power, remove the faceplate and overlay to access the recessed PROGRAM key. Follow the specific key sequences provided in the manual to adjust these settings. Speed dial keys can be programmed by pressing the recessed PROGRAM key, selecting the desired speed dial key, and entering the phone number (up to 30 digits).
Operation
Placing/Receiving Calls: Use the TALK/FLASH key or SPEAKER key on the handset or base. Calls can be switched between the handset and base speakerphone.
Hold: During a call, press the HOLD key on the handset to place a call on hold.
Mute: Press the MUTE key to silence the microphone. The key will illuminate when mute is active.
Maintenance
Clean the telephone with a soft, slightly dampened cloth. Avoid using liquid or aerosol cleaners. Keep the charging contacts clean by wiping them with a pencil eraser or dry non-abrasive fabric monthly.
Troubleshooting
If the telephone does not work, ensure the power adapter is securely plugged into a non-switched outlet and the line cord is connected. If the battery does not charge, ensure the handset is placed correctly on the base and clean the charging contacts. For persistent issues, try resetting the base by unplugging the power for 15 seconds.
Technical specifications
The system operates on a crystal-controlled PLL synthesizer with 5 channels. Operating temperature is 5°C to 45°C, and operating humidity is 45% to 85%. The handset uses a 3.7V 1000mAH Li-ion battery, while the base uses a 2.4V/550mA Ni-MH backup battery.
Practical help
Common problems
Telephone does not work at all
Check that the power adapter is plugged into a non-switched outlet, the line cord is connected, and the battery is installed and charged.
No dial tone
Ensure the line cord is connected. If the handset is new, wait a few seconds for it to synchronize with the base.
Battery does not charge
Ensure the handset is placed correctly on the base/charger. Clean the charging contacts with a pencil eraser.
Interference during conversation
Move the handset closer to the base. Avoid placing the base near other electronic devices like TVs or other cordless phones.
Before use
- Ensure power adapter is plugged into a non-switched outlet.
- Connect telephone line cord to the wall jack.
- Turn on the base battery using a paperclip in the pinhole.
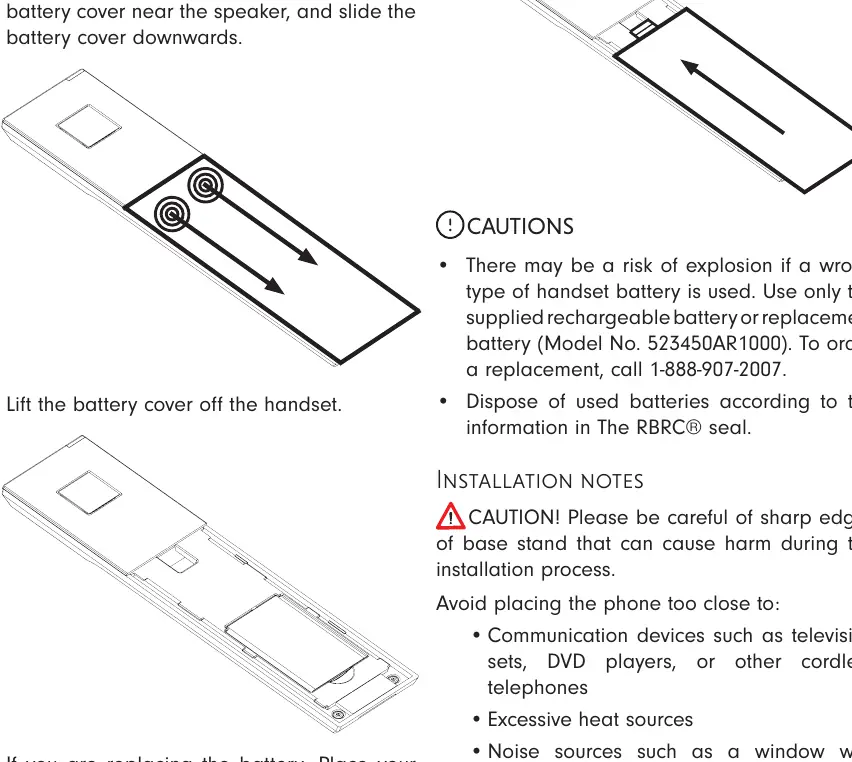
- Install the handset battery.
- Charge the handset for 11 hours before first use.
Specs in practice
- Operating Temperature
- 5°C - 45°C
- Operating Humidity
- 45% - 85%
- Handset Battery
- 3.7V 1000mAH Li-ion
- Base Backup Battery
- 2.4V/550mA Ni-MH
Images and diagrams
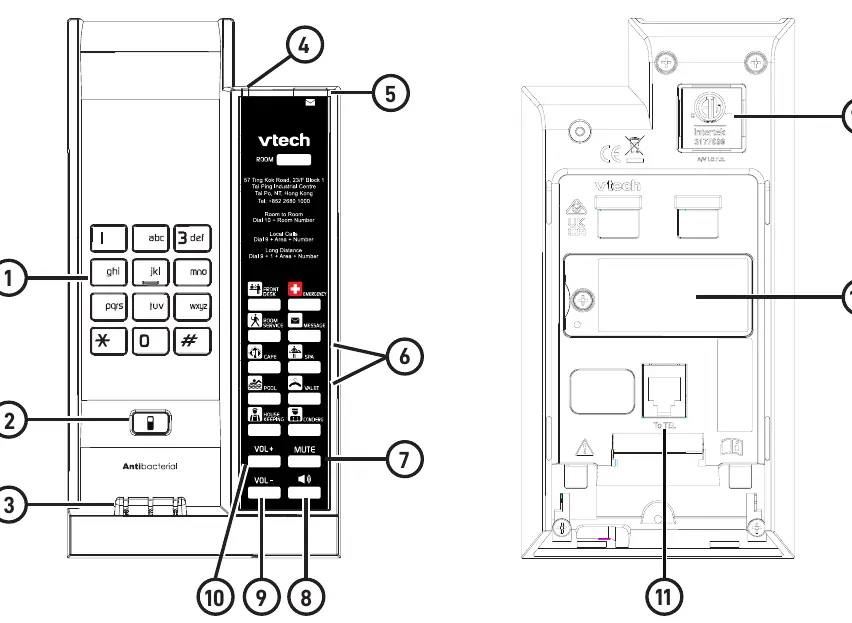
- Base layout: Includes dial keys, Find Handset button, charging poles, and speed dial keys.
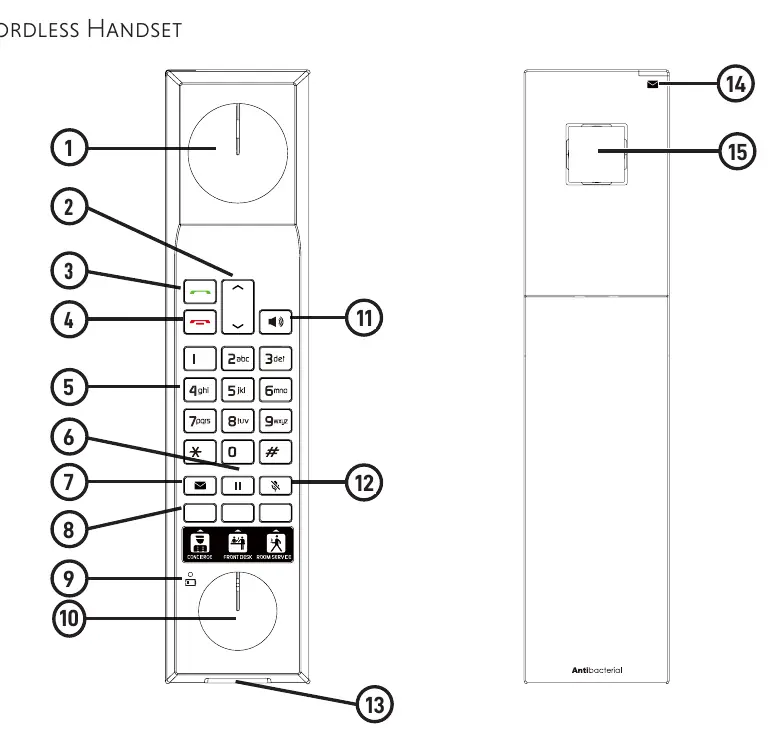
- Handset layout: Includes volume keys, TALK/FLASH, HOLD, and message keys.
Model compatibility
- Compatible with local telephone exchange systems.
- Hearing aid compatible.

Manual page author
David Miller
Documentation analyst
Organizes user manual content into clear summaries, with attention to model details, product context, and everyday usability.