Tools / Glue Guns
User Manual for Ferrex 13W Engraving Tool
Quick guide for the Ferrex 13W Engraving Tool. Learn how to set stroke depth, replace the engraving tip, operate the tool safely, and troubleshoot common issues.
Table of contents
Manual images
Click an image to enlargeQuick guide from the manual
This engraving tool is designed for private domestic DIY use only. It is not suitable for commercial or trade use. Before operating, ensure all parts are present and undamaged. Always wear safety glasses during use. The tool has a periodic duty cycle of 30 seconds on and 90 seconds off to prevent overheating. Always disconnect the power supply before performing any maintenance or adjustments.
Product description and parts
The engraving tool consists of the following main components:
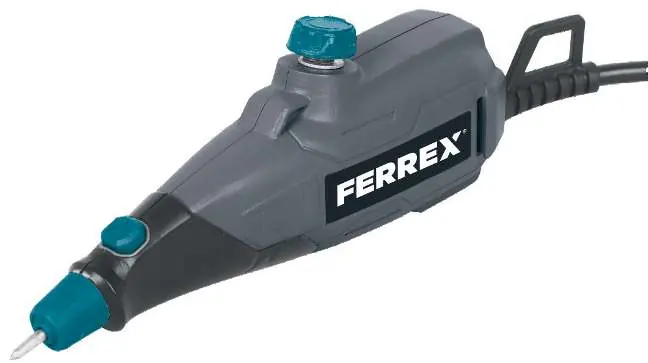
- Engraving tip
- Tip release cap
- On/off switch
- Stroke adjustment dial
- Carrying loop
- Power cord
- Templates (4 included)
Operation
Starting and stopping: Connect the power plug to the mains. Remove the protection cap from the engraving tip. Press the on/off switch to start and release it to stop.

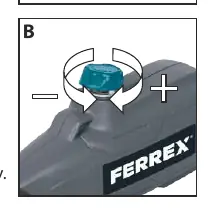
Setting the stroke depth: The stroke adjustment dial on top of the tool controls the engraving depth. Turn the dial clockwise for a fine mark and anti-clockwise for a deeper, thicker mark. It is recommended to practice on scrap material first.
Engraving technique: Hold the machine in a vertical position (almost 90 degrees to the workpiece). Use light pressure and guide the point over the work. Do not press down hard. The tool is not suitable for engraving electronic media like CDs or DVDs.
Maintenance
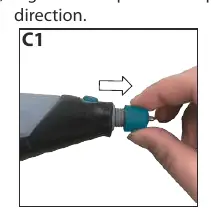
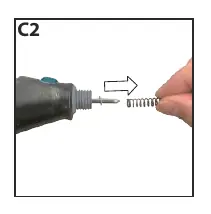
Replacing the engraving tip: Disconnect the tool from the power supply. Remove the protection cap. Loosen the tip release cap by turning it anti-clockwise and remove it. Remove the spring and washer from the old tip, then remove the tip. Slide the washer and spring onto a new tip, insert it into the housing, and tighten the tip release cap clockwise.
Cleaning: Use a soft brush to remove accumulated dust. If the body needs cleaning, use a soft damp cloth with mild detergent. Never use alcohol, petrol, or caustic agents. Keep motor ventilation slots clean. Water must never come into contact with the tool.
Troubleshooting
If the engraving is too deep or too shallow, adjust the stroke adjustment dial to a proper position. If the engraving tip is loose or detached, ensure the tip release cap is tightened securely.
Technical specifications
The tool operates on 230-240V~50Hz with a rated power of 13W. It features a no-load speed of 6000/min and a 1.8m cord. The tool weighs 0.37 kg and is classified as Class II protection.
Practical help
Common problems
Engraving is too deep or too shallow
Adjust the stroke adjustment dial to a proper position.
Engraving tip is loose or detached
Tighten the tip release cap securely.
Before use
- Check that all parts are present and undamaged.
- Ensure the engraving tip is installed correctly.
- Wear safety glasses.
- Ensure the tip release cap is correctly tightened.
- Practice on scrap material before starting your project.
Specs in practice
- Periodic duty
- 30 seconds on, 90 seconds off (to allow cooling).
- No load speed
- 6000 strokes per minute.
- Protection degree
- Class II (double insulated).
- Power supply
- 230-240V~50Hz.
Images and diagrams
- The parts diagram identifies the engraving tip, release cap, on/off switch, stroke adjustment dial, and carrying loop.
- Maintenance diagrams illustrate the step-by-step process for removing and replacing the engraving tip, including the spring and washer assembly.
Model compatibility
- Not suitable for commercial or trade use.
- Not suitable for engraving electronic media such as CDs or DVDs.

Manual page author
Emily Carter
User documentation editor
Prepares concise manual descriptions and highlights the most useful setup, operation, and maintenance information for readers.