Home Appliances / Refrigerators
User Manual for FERREX 1010W Belt Sander
Quick guide for the FERREX 1010W Belt Sander (PBS101.A). Includes assembly, operation, belt adjustment, maintenance, and troubleshooting steps.
Table of contents
Manual images
Click an image to enlargeQuick guide from the manual
The FERREX 1010W Belt Sander is designed for private domestic DIY use, specifically for dry sanding wood, plastic, metal, filler, and varnished surfaces. It is not suitable for commercial or trade use. Always wear appropriate eye, ear, and breathing protection during operation.
Parts list
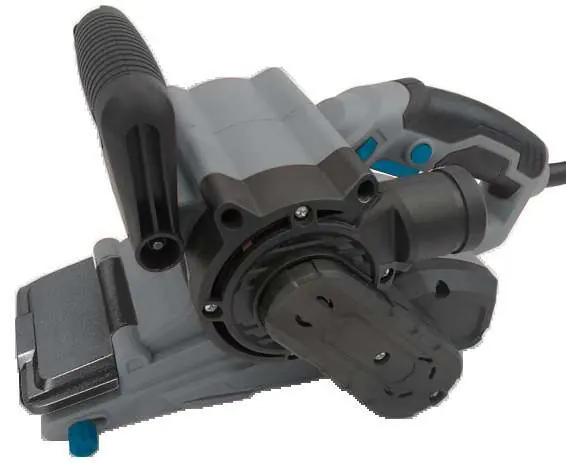
- Auxiliary handle
- Variable speed control dial
- Lock-on button
- On/off trigger
- Dust extraction outlet
- Belt adjustment control knob
- Sanding belt
- Dust collection bag
- Front plate
Assembly
Ensure the product is disconnected from the mains power supply before attempting any assembly.

- Attaching the dust collection bag: Open the dust collection bag bracket and slide it onto the dust extraction outlet. Empty the bag every 5-10 minutes for efficient operation.
Operation
Always hold the belt sander firmly with both hands during operation.
- Adjusting the auxiliary handle: Release the auxiliary handle locking lever, rotate the handle to the desired position, and lock it back in place.
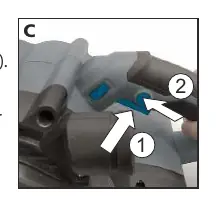
- On/off trigger: Depress the trigger to start the sander; release to stop.
- Switch lock-on button: For continuous use, depress the trigger and then press the lock-on button. To switch off, depress and release the trigger.
- Variable speed control: Adjust the dial to match the material (e.g., 5-6 for solid wood/steel, 1-2 for acrylic). Avoid prolonged use at very low speeds to prevent motor damage.
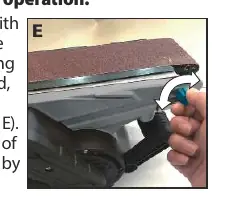
- Belt adjustment control: If the belt runs outward, turn the adjustment knob anti-clockwise; if it runs inward, turn it clockwise.
- Front plate: Can be lifted to the locked position for sanding tight corners.
Maintenance
Ensure the product is disconnected from the mains power supply before maintenance.

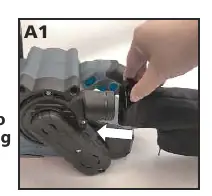
- Replacing the drive belt: Remove the screws from the belt cover. Cut the old belt if necessary. Fit the new belt around the large pulley first, then install onto the small pulley by rotating clockwise. Replace the cover.
- Carbon brushes: If the sander sparks or stops, the carbon brushes may be worn. Take the tool to a service agent for replacement. Always replace both brushes at the same time.
- Cleaning: Wipe with a dry cloth. Never use water or chemical cleaners. Keep ventilation slots clean.
Troubleshooting
- Product does not start: Check power supply, ensure the switch is on, and check the lock-on button.
- Product does not reach full power: Ensure the extension cord is suitable and the power source voltage is sufficient.
- Belt not centered: Use the belt adjustment control knob. If the belt is deformed, replace it.
Technical specifications
- Voltage: 230-240V~50Hz
- Power input: 1010 W
- No load speed: 120-400 m/min
- Belt size: 76 x 533 mm
- Machine weight: 3.55 kg
Practical help
Common problems
Product does not start
Check power supply connection, ensure the switch is on, and verify the lock-on button is not engaged.
Product does not reach full power
Check if the extension cord is suitable for the tool and ensure the power source voltage is not too low.
Sanding belt is not centered
Use the belt adjustment control knob to track the belt. If the belt is deformed, replace it.
Before use
- Check for damaged or missing parts.
- Ensure the dust collection bag is properly installed.
- Wear eye, ear, and breathing protection.
- Ensure the work-piece is firmly clamped.
- Verify the sanding belt is fitted correctly.
Specs in practice
- No load speed
- 120-400 m/min
- Machine weight
- 3.55 kg
Images and diagrams
- The belt adjustment control knob (8) is used to center the sanding belt on the base plate.
- The front plate (13) can be lifted to allow sanding in tight corners.
- The drive belt replacement requires removing the belt cover (7) and manipulating the pulleys.
Model compatibility
- For private domestic DIY use only.
- Not suitable for commercial or trade use.

Manual page author
Emily Carter
User documentation editor
Prepares concise manual descriptions and highlights the most useful setup, operation, and maintenance information for readers.