Computers / Keyboards Input
User Manual for RGB 20S / R36S Video Game Handheld
Quick guide for the RGB 20S / R36S handheld game console. Learn how to set up your system and game cards, use button shortcuts, charge the device, and troubleshoot common power issues.
Quick answers from the manual
Quick answer
- To start the RGB 20S / R36S, insert the system card into the TF1-OS slot and the game card into the TF2-GAME slot, then press the power key. p. 1
Key actions
- Exit Game: SELECT + START p. 1
- Save/Read Game: SELECT + L1/R1 p. 1
First start
- Insert system card into TF1-OS, then press power key. p. 1
Problems and fixes
Device shows yellow light without picture
Insert system card into TF1-OS and press reset key.
p. 1Maintenance and reset
- Press power key for 12 seconds if the device fails to charge. p. 1
Technical specifications
| Parameter | Value | Meaning | Pages |
|---|---|---|---|
| Screen | 3.5 inches | Display size | p. 1 |
| Charging | 5V 2A | Power input | p. 1 |
Where to find it in the PDF
- Manual and Instructions p. 1
Table of contents
Manual images
Click an image to enlargeQuick guide from the manual
The RGB 20S / R36S is a handheld game console that requires two separate microSD cards for operation: one for the system (TF1-OS) and one for game data (TF2-GAME). Ensure both cards are inserted correctly before powering on the device. If the device fails to display an image or shows a yellow light, verify the system card is properly inserted in the TF1-OS slot.
Device Overview
The console features a standard layout for retro gaming:
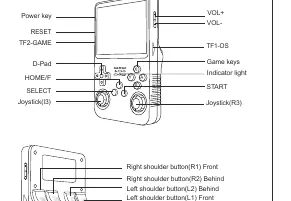
- Front: D-Pad, A/B/X/Y buttons, SELECT, START, FN, and dual joysticks.
- Top: Power key, RESET button, TF1-OS slot, TF2-GAME slot, Volume +/- keys.
- Sides/Back: L1/L2 and R1/R2 shoulder buttons.
- Bottom: DC charging port and OTG port.
Combination Key Shortcuts
Use these button combinations to control game functions:
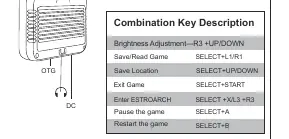
- Brightness Adjustment: R3 + UP/DOWN
- Save/Read Game: SELECT + L1/R1
- Save Location: SELECT + UP/DOWN
- Exit Game: SELECT + START
- Enter ESTROARCH: SELECT + X / L3 + R3
- Pause Game: SELECT + A
- Restart Game: SELECT + B
Charging Instructions
The device uses a 5V 2A power supply. When the red light flashes, the device requires charging. Connect the DC cable; the indicator will show a static red light while charging. If the device does not charge and the red light flashes, the system may power off automatically. In this case, press the power key for 12 seconds to reset, then recharge.
System Setup
To access your game library, insert the game data card into the TF2-GAME slot. After booting the system, navigate to the options menu and select OPTIONS - ADVANCED - SWITCH TO SD2 FOR ROMS to display the content of the game card.
Practical help
Common problems
Device turns on with a yellow light but no picture
The system card is missing or not detected. Insert the system card into the TF1-OS slot and press the reset key.
Red light is flashing
The battery is low. Connect the device to a 5V 2A power source immediately.
Game card content is not visible
Ensure the game card is in the TF2-GAME slot and select 'SWITCH TO SD2 FOR ROMS' in the Advanced options menu.
Before use
- Insert system card into the TF1-OS slot
- Insert game data card into the TF2-GAME slot
- Charge the device if the red indicator light is flashing
- Ensure power supply is 5V 2A
Images and diagrams
- The top edge contains the Power, Reset, and dual microSD slots.
- The front face contains the primary gaming controls and joysticks.
- The shoulder buttons (L1/L2, R1/R2) are located on the top and back edges.

Manual page author
David Miller
Documentation analyst
Organizes user manual content into clear summaries, with attention to model details, product context, and everyday usability.