Electronics / Monitors
Apple iPad 10th Generation Quick Start Guide
Essential setup and operation guide for the 10th Generation iPad, covering hardware controls, basic gestures, charging, and protective case requirements.
Table of contents
Device Overview
The 10th Generation iPad features a streamlined design with a top button that integrates Touch ID for security. Key hardware components include volume buttons on the side, a front and rear camera, dual microphones, a Smart Connector for accessories, and a USB-C connector for charging and data transfer.
Power and Security
To turn the iPad on, press and hold the top button until the Apple logo appears. To turn it off, hold the top button until the red slider appears on the screen, then drag it. Locking the device puts the display to sleep, which saves battery life and prevents accidental screen touches. You can configure auto-lock times and set a passcode for enhanced security via the Settings menu.
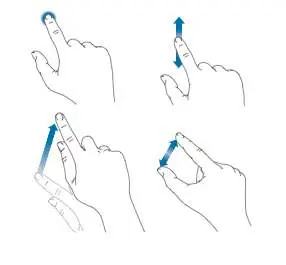
Navigation and Gestures
The iPad is controlled primarily through a Multi-Touch screen. Basic navigation relies on simple gestures such as tapping, dragging, swiping, and pinching. To return to the Home screen, swipe up from the bottom edge of the display. To view recently opened apps, swipe up from the bottom and pause in the center of the screen.
Volume and Notifications
Volume buttons allow for quick adjustments to media and alerts. You can mute sound by pressing and holding the Volume Down button. For uninterrupted time, use the Do Not Disturb feature, which can be accessed via the Control Center by swiping down from the upper right corner of the screen. This feature silences alerts and notifications while the screen is locked.
Accessories and Protection
The device comes with a USB-C power adapter and charging cable. A stylus is also included. Important: The device must be kept inside the provided Otterbox Protective Case at all times to ensure its safety. The iPad also comes pre-loaded with specialized communication apps designed for the deaf community.
Manufacturer information
Apple Inc.
Practical help
Common problems
Device screen is locked and unresponsive
Press the top Sleep/Wake button to wake the device or unlock it using your passcode/Touch ID.
Notifications are making sounds while the device is locked
Enable 'Do Not Disturb' via the Control Center (swipe down from the top right corner) to silence alerts.
Device will not turn on
Ensure the device is charged using the provided USB-C cable and power adapter.
Before use
- Ensure the iPad is installed in the mandatory Otterbox Protective Case.
- Charge the device using the included USB-C power adapter.
- Set up a passcode in Settings for device security.
- Configure your preferred auto-lock time in Settings > General.
Specs in practice
- Top button/Touch ID
- Used for locking/unlocking the device, powering on/off, and biometric authentication.
- USB-C connector
- The standard port for charging the battery and connecting to a computer.
- Smart Connector
- Interface for connecting compatible external accessories.
Images and diagrams
- The top button is located on the upper right edge.
- Volume buttons are positioned on the right side below the top button.
- The USB-C port is located at the bottom center of the device.
Model compatibility
- The device is designed to be used with the included Otterbox Protective Case at all times.
- Siri functionality is available on iPad 3rd Generation or later.

Manual page author
Michael Turner
Technical manual editor
Reviews PDF manuals for structure, safety notes, and practical product details so readers can find the right information quickly.