Electronics / Cameras
Arenti W1 1080P Outdoor Rechargeable Battery WIFI Camera User Guide
Comprehensive user guide for the Arenti W1 outdoor battery-powered security camera, covering installation, app setup, status indicators, and troubleshooting.
Table of contents
Product Overview
The Arenti W1 is a high-definition outdoor battery camera designed for smart home security. It features a rechargeable battery, PIR motion detection, and full-duplex audio, allowing you to see and hear visitors through the dedicated mobile application. The device is designed for easy installation and wireless operation, making it a versatile solution for monitoring your property.
Getting Started
Before beginning the installation, ensure you have all the components included in the box: the camera, a power adapter, a USB cable, a mounting bracket, a pin for resetting, and the necessary screws. The camera is equipped with a status light, microphone, speaker, power button, and a micro USB port for charging. It also features an internal SD card slot for local storage, supporting cards up to 128GB.
Installation
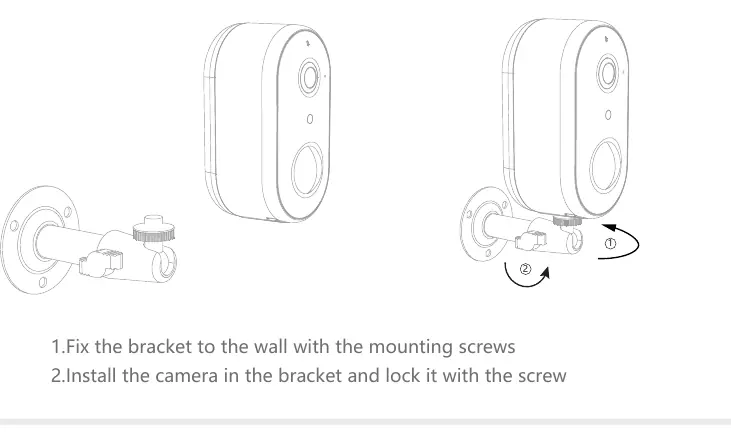
The camera is designed for simple wall mounting. Use the provided bracket to secure the device to your desired location. Once the bracket is fixed to the wall with the mounting screws, attach the camera to the bracket and lock it securely in place. Ensure the camera is positioned to provide the best field of view for your security needs.
Connecting to the App
To configure the camera, download the CloudEdge app from the App Store or Google Play Store. Log in to the app and select Add Device. Follow the on-screen instructions to connect the camera to your local WiFi network. For the best results, keep the camera close to your router during the initial configuration process. If you need to change the WiFi network, press and hold the reset button for 5 seconds to restart the device and initiate the pairing mode again.
Status Indicators and Maintenance
The status light provides essential information about the camera's state. A solid red light indicates a network error, while a blinking red light means the camera is awaiting or currently connecting to WiFi. A solid blue light confirms the camera is operating correctly. When charging, a red indicator light shows the battery is charging, and it turns blue once the process is complete. Regularly check the camera's battery level via the app to ensure continuous operation. The device supports remote wake-up to save power, entering sleep mode when not in use.
Manufacturer information
Arenti
Practical help
Common problems
Device cannot be previewed properly
Check network stability, move the camera closer to the router, or reset the device and add it again.
Device still appears in the app after reset
The reset only clears network configuration; you must manually delete the device from the app.
SD card not identified
Ensure the card is formatted as FAT32 and insert it after powering off the camera.
Not receiving notifications
Ensure the app is running in the background and that notification permissions are enabled in your phone settings.
Before use
- Verify all parts are present (Camera, Bracket, Power Adapter, USB Cable, Screws, Pin)
- Charge the camera fully before first use
- Download the CloudEdge app
- Ensure a 2.4GHz WiFi network is available
- Check that the SD card is formatted to FAT32 (if using local storage)
Specs in practice
- Battery Capacity
- 6700mAh (Two 18650 lithium-ion batteries)
- SD Card Support
- Local storage up to 128GB
Images and diagrams
- Status light: Red (network error), Blinking Red (connecting), Blue (normal operation)
- Reset button: Hold for 5 seconds to factory reset
- Charging indicator: Red (charging), Blue (fully charged)
- Power button: Hold for 3 seconds to turn on/off
Model compatibility
- Compatible with iOS and Android devices via CloudEdge app
- Requires 2.4GHz WiFi network for connectivity

Manual page author
Michael Turner
Technical manual editor
Reviews PDF manuals for structure, safety notes, and practical product details so readers can find the right information quickly.