Tools / Power Tools
User Manual for Bauer 1631E-B Demolition Hammer
Quick guide for the Bauer 1631E-B Demolition Hammer. Includes setup instructions, operation steps, maintenance procedures, troubleshooting, and safety guidelines.
Table of contents
Manual images
Click an image to enlargeQuick Guide
This manual provides essential safety, operation, and maintenance instructions for the Bauer 1631E-B Demolition Hammer. Always read the safety warnings before use. The tool is designed for demolition tasks and requires proper handling to avoid injury. Key maintenance tasks include checking carbon brushes every 100-120 hours and lubricating the tool every three months of continuous use.
Safety Information
General Power Tool Safety: Keep the work area clean and well-lit. Do not operate in explosive atmospheres. Keep children and bystanders away.
Electrical Safety: Ensure the plug matches the outlet. Do not modify the plug. Use a GFCI-protected supply in damp locations. Use an extension cord suitable for outdoor use if working outside.
Personal Safety: Always wear eye protection, hearing protection, and a dust mask. Ensure the switch is in the OFF position before connecting to power. Maintain a firm grip with both hands.
Vibration Safety: This tool vibrates during use. If you experience tingling, numbness, or white/blue fingers, seek medical advice. Do not smoke during use as nicotine reduces blood supply to hands.
Setup and Functions
Tool Setup: Ensure the switch is in the OFF position and the tool is unplugged before performing any setup.
- Chisel Installation: Pull the chuck back to open. Grease the chisel shank. Insert the shank into the chuck as far as it will go and release the chuck. Pull on the chisel to verify it is secure.
- Side Handle Adjustment: Turn the function knob counterclockwise to loosen, slide the handle to the desired position, and turn the knob clockwise to lock.
Operating Instructions
General Operation:
- Plug in the tool.
- Set the tip of the chisel against the work area.
- Place one hand on the side handle and the other on the main handle.
- Press the switch to activate.
- Do not force the tool; let its own weight supply the needed force.
Warm-up: If the tool has not been used for a long period or is being used in low temperatures, run it for about five minutes to warm up.
Maintenance and Servicing
Cleaning and Lubrication:

- Before Each Use: Inspect for loose hardware, damaged cords, or dull/cracked chisels.
- After Use: Wipe external surfaces with a clean cloth.
- Lubrication: The tool has air-tight construction, requiring lubrication every three months of continuous use. Open the oil tank cover, fill with 1/8 ounce of lubricating grease, and replace the cover.
Carbon Brushes: The tool will cease operation once carbon brushes are worn. If the red indicator light on the side of the tool is lit, have a qualified technician replace the carbon brushes.
Troubleshooting
If the tool will not start, check the power source, cord connection, and circuit breaker. If performance decreases or the tool overheats, check for dull accessories or blocked motor vents. If the red indicator light is on, the carbon brushes are worn and require professional replacement.
Practical help
Common problems
Tool will not start
Check if the cord is plugged in, verify power at the outlet, or check the circuit breaker. If the issue persists, internal damage or worn carbon brushes may be the cause.
Performance decreases over time
Check if the accessory is dull or damaged. If so, replace it. Also, have a qualified technician check if carbon brushes are worn.
Overheating
Ensure you are not forcing the tool to work too fast. Check for dull accessories and ensure motor housing vents are not blocked.
Before use
- Inspect the tool for loose hardware.
- Check for damaged cord or electrical wiring.
- Ensure the chisel is sharp and not cracked.
- Verify the work area is clean and well-lit.
- Ensure the switch is in the OFF position before plugging in.
Specs in practice
- Electrical Input
- 120 VAC / 60 Hz / 12.5 A
- Blows Per Minute
- 1900 BPM
Images and diagrams
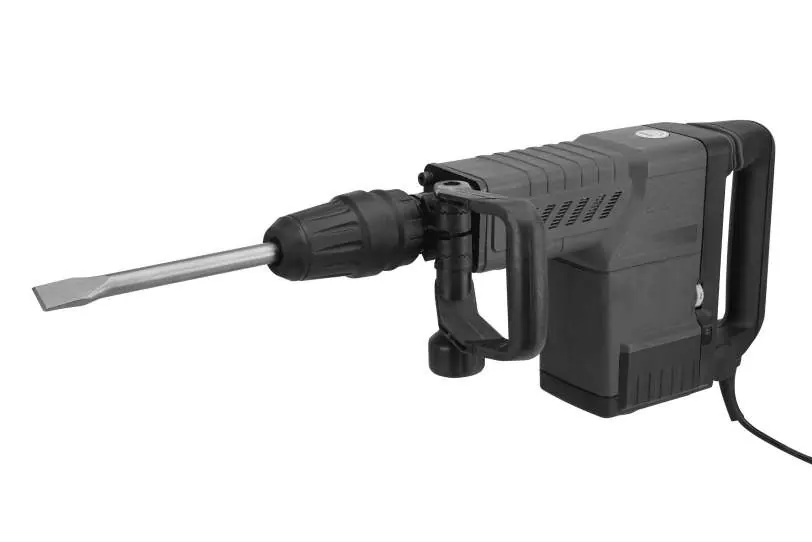
- Figure A/B: Identifies the switch, main handle, side handle, chuck, variable speed dial, and brush indicator light.
- Figure C: Shows the location of the oil tank cover for lubrication.
Model compatibility
- Uses SDS MAX type chisels.

Manual page author
Michael Turner
Technical manual editor
Reviews PDF manuals for structure, safety notes, and practical product details so readers can find the right information quickly.