Tools / Drills
Bauer 1678E-B Variable Speed Deep Cut Bandsaw Kit User Manual
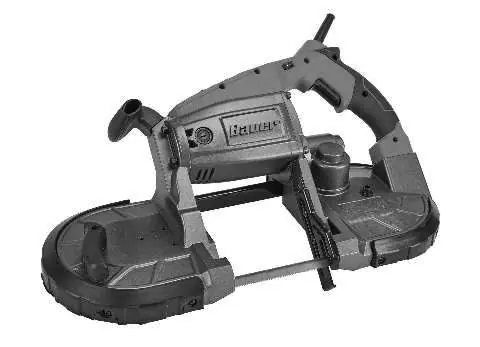
Get the most out of your Bauer 1678E-B Variable Speed Deep Cut Bandsaw Kit with this comprehensive user guide. Includes setup, blade installation, operation, maintenance, and troubleshooting tips.
Quick answers from the manual
Quick answer
- The Bauer 1678E-B is a variable speed deep cut bandsaw. To operate, ensure the blade is properly tensioned, the workpiece is secured, and allow the tool to reach full speed before cutting. Do not force the tool; let its weight provide the cutting force. p. 8, 10, 11
Key actions
- Install Guide Bar p. 8
- Install/Replace Blade p. 10
- Tension Blade p. 11
First start
- Ensure the trigger is in the off-position, plug in the tool, secure the workpiece, set the Guide Bar, and allow the tool to reach full speed before cutting. p. 11
Problems and fixes
Tool will not start
Check cord connection, power outlet, and thermal reset breaker.
p. 13
Overheating
Allow tool to work at its own rate, replace dull blades, clear vents, or check extension cord.
p. 13Maintenance and reset
- If the thermal reset breaker trips, turn off the tool, allow it to cool, and press the reset button. p. 13
Technical specifications
| Parameter | Value | Meaning | Pages |
|---|---|---|---|
| Electrical Rating | 120VAC / 60Hz / 10A | Power requirements | p. 8 |
| No Load Speed | 0-420 FPM | Speed range | p. 8 |
Where to find it in the PDF
- Safety Information p. 2, 3, 4, 5
- Specifications p. 8
- Operation p. 10, 11
- Maintenance p. 12
- Troubleshooting p. 13
- Parts List p. 14, 15
Table of contents
Manual images
Click an image to enlargeQuick guide from the manual
This manual provides essential safety, setup, and operating instructions for the Bauer 1678E-B Variable Speed Deep Cut Bandsaw Kit. Before using the tool, ensure you have read all safety warnings, particularly regarding electrical safety and vibration. Always wear ANSI-approved eye protection and heavy-duty gloves when handling the blade.
Setup and Assembly
Before operation, the Guide Bar must be assembled to the bandsaw:
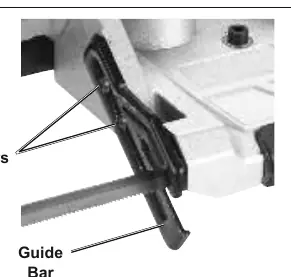
- Remove the Screws (51) on the Frame (27).
- Install the Guide Bar around the blade as shown in the manual using the Screws (51).
Blade Installation and Replacement
To install or replace the blade:


- Ensure the tool is unplugged.
- Set the Frame so the edge of the used blade points away from you.
- Turn the Tension Handle away from the body to release blade tension.
- Slide the old blade off the Gear Wheels.
- Install the new blade with teeth pointing upward, facing you.
- Set the blade into both Guide Bearings and center it.
- Tension the blade by turning the Tension Handle toward the body until the blade is taut and the handle is tight.
General Operating Instructions
- Workpiece Setup: Secure loose workpieces using a vise or clamps. Ensure the work area is clean and well-lit.
- Starting the Cut: Set the Guide Bar against the workpiece at a 90° angle. Turn on the bandsaw and allow it to reach full speed before starting the cut.
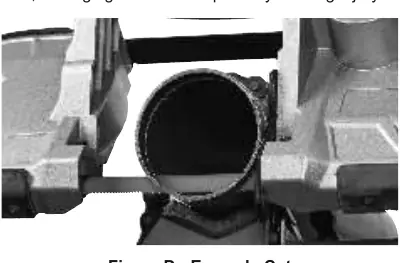
- Cutting: Tilt the unit so the blade is vertical. Use minimal force to start a groove, then allow the blade to cut into the workpiece. Do not force the tool; the weight of the tool provides sufficient force.
- Finishing: As you reach the end of the workpiece, finish the cut by slightly raising the unit slowly.
Maintenance and Cleaning
- Before Each Use: Inspect for loose hardware, misalignment, binding of moving parts, damaged cords, or cracked parts.
- After Use: Wipe external surfaces with a clean cloth.
- Storage: If not using the tool for long periods, remove the blade. Store indoors, out of reach of children.
Practical help
Common problems
Tool will not start
Check if the cord is connected and there is power at the outlet. If the thermal reset breaker is tripped, turn off the tool, allow it to cool, and press the reset button.
Tool operates slowly
Do not force the tool to work too fast. If using an extension cord, ensure it is not too long or of too small a diameter.
Overheating
Allow the tool to work at its own rate. Ensure blades are sharp and replace if dull. Clear blocked motor housing vents using compressed air (wear safety gear).
Before use
- Check for loose hardware or cracked parts.
- Inspect the power cord and wiring for damage.
- Ensure the blade is sharp and properly tensioned.
- Wear ANSI-approved safety goggles and heavy-duty gloves.
- Ensure the trigger is in the off-position before plugging in.
Specs in practice
- Electrical Rating
- 120VAC / 60Hz / 10A
- No Load Speed
- 0-420 FPM (Feet Per Minute)
Images and diagrams
- Figure A: Guide Bar assembly instructions.
- Figure B: Blade installation showing Gear Wheels.
- Figure C: Guide Bearing alignment.
- Figure D: Example cut showing vertical blade orientation.
Model compatibility
- 14 TPI blade: Use for soft/thick material (aluminum, lead, rubber-like material, wood).
- 24 TPI blade: Use for hard/thin material (cast iron, soft steel, hard steel).

Manual page author
David Miller
Documentation analyst
Organizes user manual content into clear summaries, with attention to model details, product context, and everyday usability.