Tools / Power Tools
User Manual for Bauer 1632E-B 35 LB Pro Demolition Hammer Kit
Quick guide for the Bauer 1632E-B 35 LB Pro Demolition Hammer Kit. Includes setup, chisel installation, operation, maintenance, and troubleshooting tips.
Table of contents
Manual images
Click an image to enlargeQuick Guide from the Manual
This manual provides essential instructions for the safe operation and maintenance of the Bauer 35 LB Pro Demolition Hammer Kit. Before using the tool, ensure you have read all safety warnings. Key procedures include proper chisel installation, lubricating the tool before first use or after storage, and maintaining the tool to prevent overheating and performance loss.
Safety Warnings
General Power Tool Safety: Keep the work area clean and well-lit. Do not operate in explosive atmospheres. Keep children and bystanders away. Always wear eye protection, hearing protection, and steel-toed boots.
Electrical Safety: Ensure the power plug matches the outlet. Do not modify the plug. Use a GFCI-protected supply in damp locations. Use an extension cord suitable for outdoor use if operating outdoors.
Vibration Safety: This tool vibrates during use. If you experience tingling, numbness, or white/blue fingers, seek medical advice. Wear suitable gloves to reduce vibration effects.
Setup
Adjusting Side Handle: Loosen the Side Handle Knob, twist the handle to the desired position, and tighten the knob.
Installing Chisel:
- Clean the chisel shank with a cloth and lubricate it using the included Chisel Grease.
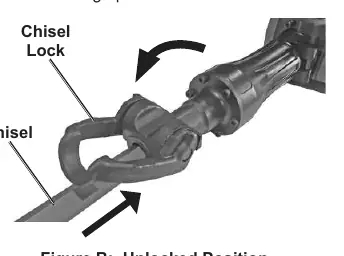
- Move the Chisel Lock to the unlocked position.
- Slide the chisel in as far as it will go with the notch facing up.
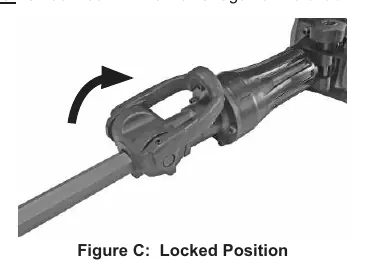
- Move the Chisel Lock to the locked position. The chisel will have some play but should not come out when pulled.
Operation
Before First Use/Storage: Distribute internal lubricant by running the tool without a chisel for several minutes on a vibration-resistant surface.
General Instructions:
- Plug the tool into a dedicated 120V outlet.
- Set the end of the chisel against the work surface.
- Hold the tool firmly with both hands.
- Press the Power Switch to ON.
- Do not press forcibly; let the tool's own weight supply the force.
- When finished, turn off and unplug the tool.
- Use heavy-duty gloves when removing the chisel, as it may be hot.
Maintenance
Cleaning: Before each use, inspect for loose hardware, damaged cords, or dull chisels. After use, wipe external surfaces with a clean cloth; do not use solvents.
Carbon Brush Replacement: If the Carbon Brush Light illuminates and the tool stops, have a qualified technician replace the carbon brushes and refill internal lubricants.
Troubleshooting
If the tool fails to start, check the power source and thermal reset button. If performance decreases, check for dull chisels or cold lubrication. If the tool overheats, ensure you are not forcing it and that motor vents are not blocked.
Practical help
Common problems
Tool will not start
Check power connection, outlet, and thermal reset button. If the issue persists, have a technician service the tool.
Tool operates slowly
Eliminate the use of an extension cord or use a shorter/heavier gauge cord.
Performance decreases over time
Sharpen or replace dull chisels, allow tool to run with no load for 2 minutes to warm lubrication, or have brushes replaced.
Overheating
Allow the tool to work at its own rate, clear blocked motor vents, and ensure the extension cord is the correct gauge.
Before use
- Inspect for loose hardware.
- Check for damaged cord or electrical wiring.
- Ensure chisel is sharp and not damaged.
- Clean and lubricate the chisel shank.
- Verify the power outlet is grounded and has the correct capacity.
- Ensure the work area is clear of utility lines.
Specs in practice
- 120VAC / 60Hz / 15A
- Electrical power requirements for the tool.
- 1-1/8" Hex Shank
- The required size and shape for compatible chisels.
Images and diagrams
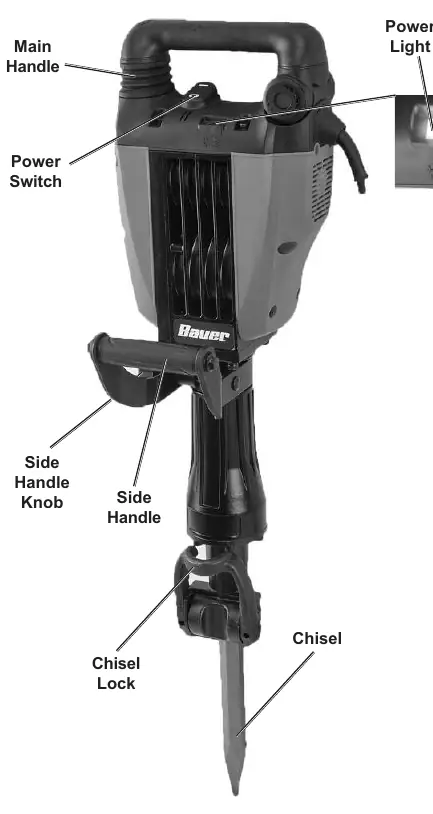
- Figure A: Identifies the Main Handle, Power Switch, Side Handle, Chisel Lock, and indicator lights.
- Figure B/C: Shows the Chisel Lock in unlocked and locked positions for installation.
- Table A: Provides recommended wire gauge for extension cords based on length and amperage.
Model compatibility
- Use only 1-1/8" hex shank chisels.
- Store the tool in an environment where the temperature is no lower than 50°F.
- Do not use extension cords that are too long or have inadequate wire gauge.

Manual page author
David Miller
Documentation analyst
Organizes user manual content into clear summaries, with attention to model details, product context, and everyday usability.