Tools / Saws
User Manual for Bauer 1641E-B Rotary Hammer
Get started with your Bauer 1641E-B Rotary Hammer. This guide covers setup, operation, bit changing, maintenance, and troubleshooting to ensure safe and efficient use.
Table of contents
Manual images
Click an image to enlargeQuick Start Guide
The Bauer 1641E-B is a variable speed rotary hammer designed for drilling and chiseling. Before use, ensure the work area is clean, well-lit, and free of bystanders. Always wear appropriate personal protective equipment, including eye and ear protection. Ensure the tool is unplugged before making any adjustments or changing bits.
Safety Information
- Electrical Safety: This is a double-insulated tool and does not require grounding. Use only appropriate extension cords if necessary.
- Personal Safety: Keep hands and clothing away from moving parts. Do not operate if tired or under the influence.
- Vibration Safety: Prolonged use can cause vibration-related injuries. Take breaks, wear gloves, and grip the tool lightly.
- Pacemaker Warning: Electromagnetic fields may interfere with pacemakers. Consult a physician before use.
Specifications
- Electrical Rating: 120VAC / 60Hz / 11A
- Rotational Speed: 0-800 RPM
- Impact Rate: 0-3900 BPM
- Shank Style: SDS
- Capacities: Wood 1-1/2" (40mm), Concrete 1-1/4" (32mm), Steel 1/2" (13mm)
Setup and Adjustments
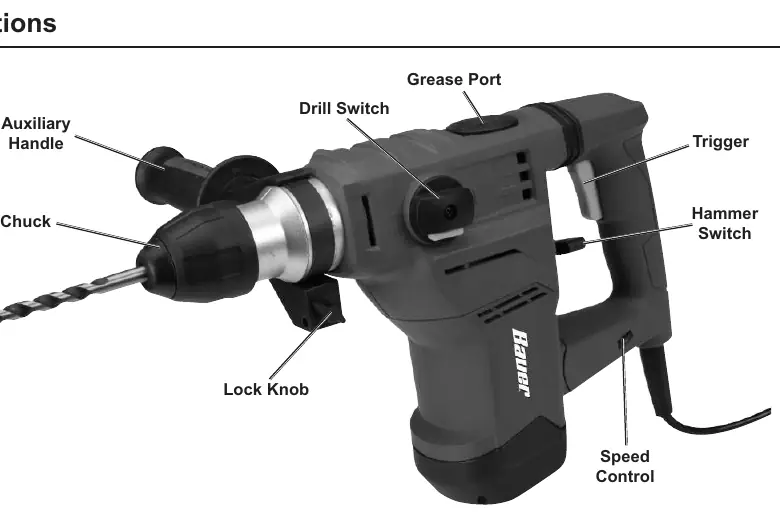
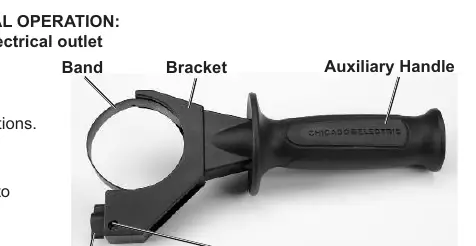
Auxiliary Handle
Turn the handle counterclockwise to loosen the band, slide to the desired position, and turn clockwise to secure.
Depth Gauge
Turn the lock knob to open the slot, insert the depth gauge, and tighten the knob to secure. The drilling depth is measured from the tip of the drill bit to the tip of the depth gauge.
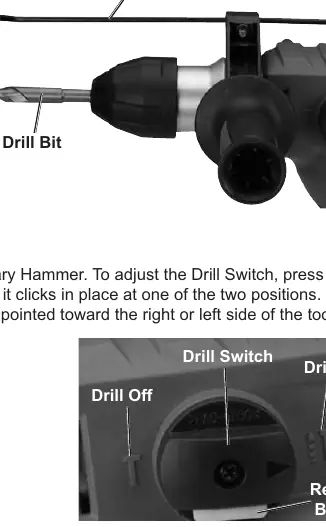
Function Switching
Adjust switches only when the motor is stopped. Ensure they click into position.
- Drill: Drill Switch to "Drill ON", Hammer Switch to "Hammer OFF".
- Hammer/Drill: Drill Switch to "Drill ON", Hammer Switch to "Hammer ON".
- Chisel: Drill Switch to "Drill OFF", Hammer Switch to "Hammer ON".
Operating Instructions
- Install the drill bit by pulling back on the chuck and inserting the bit until it slides into the opening. Release the chuck and verify the bit is secure.
- Adjust the auxiliary handle and depth gauge as needed.
- Set the desired function using the drill and hammer switches.
- Set the speed using the speed control dial.
- Plug in the power cord.
- Squeeze and hold the trigger to start. Allow the tool to reach full speed before contacting the work surface.
Maintenance and Servicing
Procedures not explained in this manual must be performed by a qualified technician.
- Before Each Use: Inspect for loose hardware, damaged wiring, or binding parts.
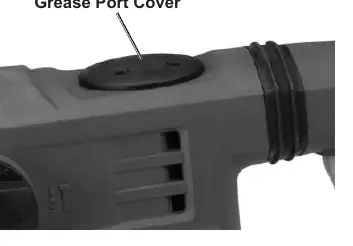
- Monthly: Open the grease port, clean out old grease, and replace with new grease. Failure to do so voids the warranty.
- After Use: Wipe external surfaces with a clean cloth.
Troubleshooting
If the tool will not start, check the power connection, circuit breaker, and the tool's thermal reset button. If the tool operates slowly, avoid using long or thin extension cords. If the tool overheats, ensure vents are not blocked and the tool is not being forced.
Practical help
Common problems
Tool will not start
Check power connection, circuit breaker, and thermal reset button on the tool.
Tool operates slowly
Eliminate or shorten extension cords; ensure the cord gauge is sufficient.
Overheating
Ensure motor vents are not blocked, allow the tool to work at its own rate, and check for accessory misalignment.
Before use
- Inspect tool for damage, loose hardware, or cracked parts.
- Ensure work area is clean and well-lit.
- Wear ANSI-approved eye protection and hearing protection.
- Ensure the auxiliary handle is securely tightened.
- Verify the switch is in the OFF position before plugging in.
Specs in practice
- Electrical Rating
- 120VAC / 60Hz / 11A
- Rotational Speed
- 0-800 RPM (no load)
Images and diagrams
- The Functions diagram identifies the chuck, auxiliary handle, drill switch, hammer switch, and grease port.
- The switch settings diagram illustrates how to toggle between Drill, Hammer/Drill, and Chisel modes.
Model compatibility
- Uses SDS shank bits.
- Double insulated tool; does not require grounding.
- Requires 120V outlet.

Manual page author
David Miller
Documentation analyst
Organizes user manual content into clear summaries, with attention to model details, product context, and everyday usability.