Electronics / Routers
User Guide for BN-LINK 198799BB Dual Outlet Digital Timer
Quick setup and programming guide for the BN-LINK 198799BB digital timer. Includes instructions for setting the clock, configuring up to 8 programs, using random security mode, and troubleshooting common issues.
Table of contents
Quick guide from the manual
This document provides instructions for the BN-LINK 198799BB Dual Outlet Digital Timer. Before first use, the internal battery must be charged by plugging the unit into an outlet for 30 minutes. Always ensure the timer is set to AUTO mode for programmed schedules to function. The device is intended for indoor use only and must not exceed its rated electrical capacity.
Initial setup
To prepare the timer for use:
- Charge the internal battery by plugging the unit into an outlet for 30 minutes.
- Use a small non-metallic tool (e.g., a toothpick) to press the RESET button to clear the display.
- If the screen goes blank, press any button to wake it up.
Setting current day and time
- Press and hold the CLOCK button.
- While holding CLOCK, press WEEK until the correct day is displayed.
- While holding CLOCK, press HOUR until the correct hour is set (ensure AM/PM is correct).
- While holding CLOCK, press MIN until the correct minute is set.
Setting programs
The timer supports up to 8 ON/OFF programs. To set a program:
- Press PROG to enter program settings.
- Press WEEK to select the desired day combination (e.g., MO to SU, individual days).
- Press HOUR and MIN to set the desired ON time.
- Press PROG again to set the OFF time for that program.
- Repeat steps to set additional programs if needed.
- Ensure the timer is in AUTO mode to run the programs.
Modes and special functions
Manual/Auto Mode: Press and hold the MANUAL button for 4 seconds to switch between AUTO and MANUAL modes. Pressing MANUAL once while in AUTO mode will override the current program state.
Random Security Mode: Press WEEK and HOUR simultaneously to activate. RND will appear on the display. This function randomly postpones programmed ON/OFF times by 2-32 minutes. Programs must be at least 33 minutes long for this to work correctly.
Daylight Saving Time (DST): Press HOUR and MIN simultaneously to toggle DST. A +1h symbol appears when active.
Safety and maintenance
- Use only with grounded outlets.
- For indoor use only; do not use in wet locations.
- Unplug the timer before cleaning.
- Do not exceed 15A/1875W (Resistive) or 10A/1250W (Tungsten).
Troubleshooting
- If the timer does not turn on/off: Verify AM/PM settings, ensure the mode is set to AUTO, and confirm both ON and OFF times are specified.
- If the unit turns on/off randomly: Check if the Random function is active or if extra programs (2-8) contain unintended data.
- If the screen is blank: Charge the battery for 30 minutes and press RESET.
Contact information
For support, contact [email protected] or call 1.909.592.1881. Business hours are 9AM - 5PM PST, Mon - Fri.
Practical help
Common problems
Timer does not turn on or off as scheduled.
Ensure the timer is in AUTO mode, verify AM/PM settings, and check that both ON and OFF times are correctly programmed.
Unit turns on/off randomly throughout the day.
Check if the Random (RND) function is active or if unintended data was entered into programs 2 through 8.
Screen is blank or numbers are unclear.
Plug the timer into an outlet for 30 minutes to charge the internal battery, then press the Reset button.
Before use
- Charge the internal battery for 30 minutes.
- Press the Reset button with a non-metallic tool.
- Set the current day and time.
- Ensure the device is used indoors only.
- Verify the load does not exceed 15A/1875W (Resistive).
Specs in practice
- Rated Voltage
- 125V, 60Hz standard US power supply.
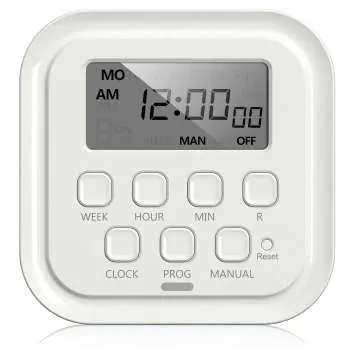
Images and diagrams
- The LCD display shows the current time, day, mode (AUTO/MAN), and active functions like RND or +1h.
- The Reset button is recessed and requires a small tool to press.
- The MANUAL button toggles the output state and switches between modes when held for 4 seconds.
Model compatibility
- Suitable for lighting, heating systems, humidifiers, nebulizers, cooling systems, indoor sprinklers, aquariums, and ventilators.
- Not for use in wet locations.

Manual page author
Emily Carter
User documentation editor
Prepares concise manual descriptions and highlights the most useful setup, operation, and maintenance information for readers.