Tools / Nailing Tools
User Manual for Bosch GNB 18V-38 Professional Cordless Nailer
Comprehensive user guide for the Bosch GNB 18V-38 Professional cordless nailer. Includes setup, operation, maintenance, and troubleshooting instructions.
Quick answers from the manual
Quick answer
- The Bosch GNB 18V-38 is a cordless nailer for hard materials like concrete and steel. It features a full sequential actuation mode and requires a battery >= 4Ah for full performance. p. 8, 18
Key actions
- Loading the magazine p. 10, 20
- Adjusting depth stop p. 12, 22
First start
- Insert charged battery, switch on, unlock trigger, press contact element, press trigger. p. 9, 10, 19, 20
Problems and fixes
Nail not deep enough
Adjust depth stop switch to the left.
p. 13, 23Maintenance and reset
- Clear jams if status indicator lights up red/orange. p. 12, 22
Technical specifications
| Parameter | Value | Meaning | Pages |
|---|---|---|---|
| Nail length | 13-38 mm | Compatible nail length | p. 8, 18 |
Where to find it in the PDF
- Overview p. 3
- Technical Data p. 8, 18
Table of contents
Manual images
Click an image to enlargeQuick guide from the manual
The Bosch GNB 18V-38 Professional is a cordless nailer designed for driving nails into hard materials such as concrete and steel. Before use, ensure the battery is charged and the tool is switched on. Always check the suitability of the substrate before fastening. The tool features a full sequential actuation mode for safety.
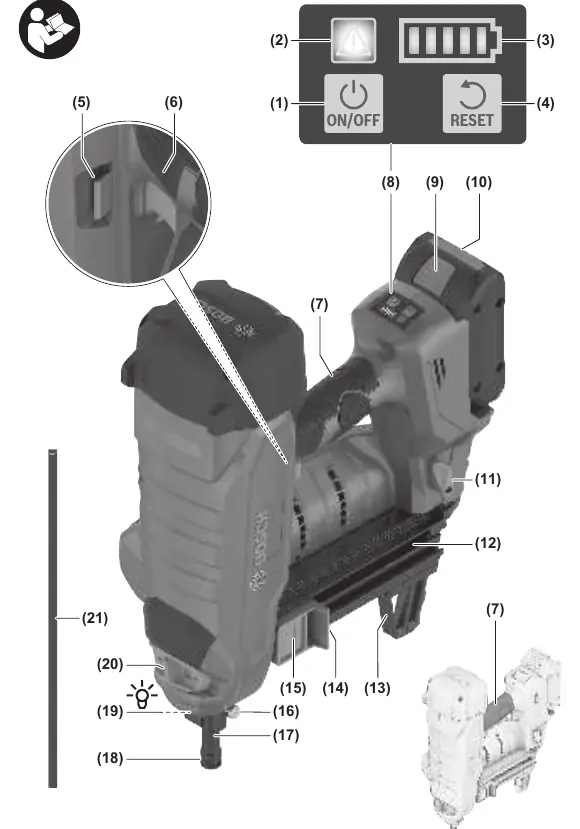
Product components
The tool includes an on/off button, status indicator, battery charge indicator, reset button, trigger, magazine, contact element, and worklight. Refer to the diagram on page 3 for a full list of numbered components.
Assembly
Magazine: Insert the magazine into the tool until it engages. To fill, press the button on the magazine slider and slide it to the opening. Insert a suitable nail strip and slide the slider forward until it engages.
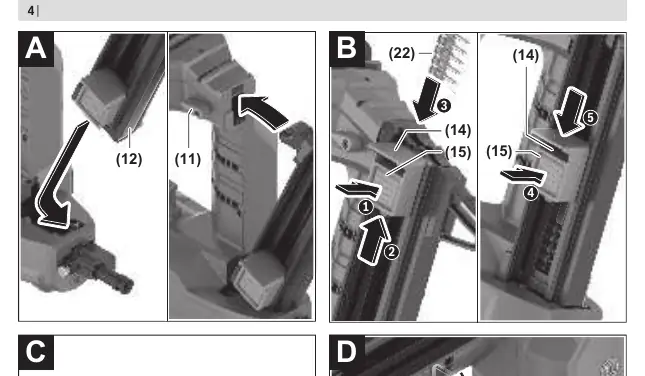
Contact Element: The contact element can be removed for cleaning or replacement by pulling the release button.
Operation
Switching On/Off: Press the on/off button on the user interface until it lights up. The tool switches off automatically after 30 minutes of inactivity.
Discharging Procedure: Ensure the tool is switched on and the trigger is unlocked. Press the contact element firmly against the substrate. The worklight will illuminate. Briefly press the trigger within 2 seconds of pressing the contact element to drive a nail.
Maintenance and Troubleshooting
Clearing Jams: If the status indicator lights up red or orange, or if nails are not driven correctly, remove the battery, empty the magazine, and remove the contact element. Clear any debris or jammed nails using the punch pin. Reassemble and press the reset button for 5 seconds.
Maintenance: Keep the tool and ventilation slots clean for safe operation. Always remove the battery before performing any maintenance or transport.
Manufacturer information
Bosch
Practical help
Common problems
Tool does not react
Check battery charge, ensure tool is switched on, and allow tool/battery to reach operating temperature.
No discharging procedure triggered
Ensure at least 2 nails are in the magazine, unlock the trigger, and follow the correct work sequence.
Nail not deep enough
Adjust the depth stop switch to the left, use shorter nails, or check substrate hardness.
Before use
- Check safety and actuation devices
- Ensure all screws and nuts are tight
- Check substrate suitability
- Ensure battery is charged
Specs in practice
- Max. insertion frequency
- Maximum nails per second (with battery >= 4Ah).
- Actuation mode
- Full sequential (safety sequence).
Images and diagrams
- Page 3: Overview of components
- Page 4: Magazine loading and contact element removal
- Page 11: Correct nail insertion angle and depth
Model compatibility
- Compatible with GBA 18V and ProCORE18V batteries.
- Recommended for ProCORE18V >= 4Ah for full performance.

Manual page author
Emily Carter
User documentation editor
Prepares concise manual descriptions and highlights the most useful setup, operation, and maintenance information for readers.