Electronics / Cameras
Instruction Manual for Bushnell Cellucore Live Dual SIM Trail Camera
Quick start guide and setup manual for the Bushnell Cellucore Live Dual SIM trail camera. Includes instructions for app setup, battery and SD card installation, mounting, and troubleshooting signal or connectivity issues.
Table of contents
Manual images
Jump to the sectionQuick guide from the manual
This document provides essential instructions for setting up and operating the Bushnell Cellucore Live Dual SIM trail camera. Key steps include downloading the Bushnell Trail Camera app, installing 12 AA batteries and a high-speed SD card (up to 256GB), and mounting the device securely. The camera automatically connects to the strongest available network (AT&T or Verizon) upon power-up. For optimal performance, ensure the camera is placed in an area with at least two bars of signal strength.
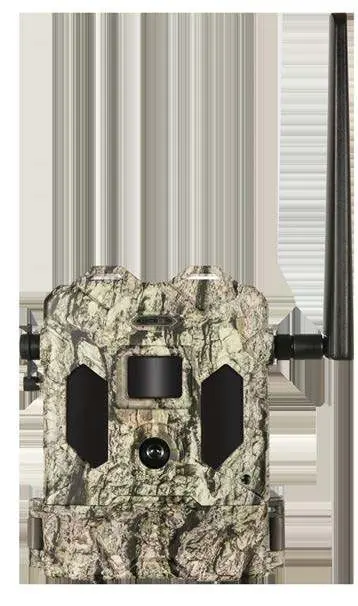
Camera Overview
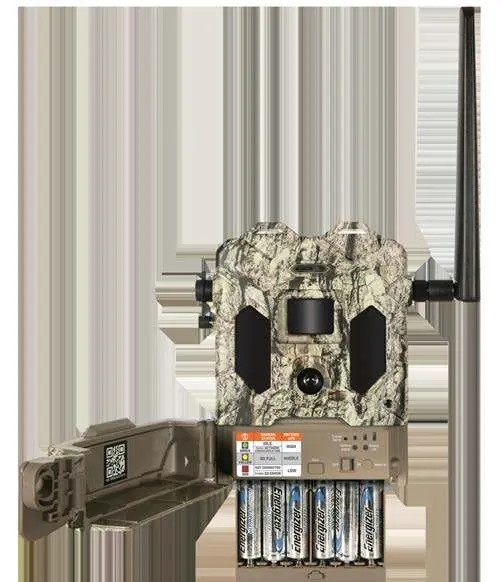
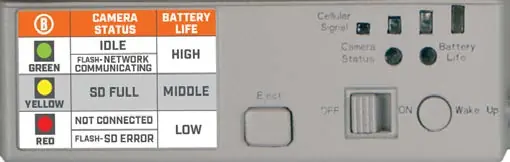
The camera features a PIR sensor, LED IR flash, lens, and a control panel accessible via a cover. The internal control panel includes the power switch, battery tray, SD card slot, and status indicator lights for cellular signal, camera status, and battery life.
Quick Start and Setup
- Download the Bushnell Trail Camera app and create an account.
- Add the camera by scanning the QR code inside the unit or entering the serial number.
- Install 12 AA batteries (lithium recommended) and a Class 10 SD card.
- Power the camera on and verify the cellular signal using the indicator lights.
- Mount the camera using the provided strap or the 1/4-20 tripod socket.
Settings and Modes
Settings are managed via the mobile app. Key options include:
- Camera Mode: Image, Movie, or Hybrid (image followed by video).
- Resolution: Adjustable for both photos and videos (up to 1080P for video).
- PIR Delay: Configurable interval to prevent redundant captures.
- Work Mode: Options for Day, Night, or 24-hour operation.
- Flash Mode: Short Range (fast shutter, battery efficient), Fast Motion (sharp images), or Long Range (maximum flash distance).
Live Streaming
The camera supports live streaming via the app. Note that streaming consumes significant battery and data. You can record the stream by selecting the Download button during the session.
Mounting and Positioning
For best results, mount the camera 3.5-5 feet high, approximately 16-17 feet from the target area. Avoid aiming at heat sources or moving branches to reduce false triggers. Use the provided adjustable belt or a standard tripod mount.
Troubleshooting
If the camera is not functioning correctly, check the status indicator lights. A red light may indicate a connection issue or SD card error. Ensure the camera is in a location with adequate cellular signal. For further assistance, contact Bushnell Customer Service at 800-423-3537 (USA) or 800-361-5702 (Canada).
Technical Specifications
- Lens: F=2.3, FOV=45 degrees.
- Power: 12x AA batteries.
- Operating Temperature: -10 to 50 degrees Celsius.
- Connectivity: Dual SIM modem (AT&T/Verizon).
- Storage: SD card up to 256GB.
Manufacturer information
Bushnell
Practical help
Common problems
Camera not connecting to network
Power the camera off and back on to force a re-scan for the strongest signal (AT&T or Verizon).
Low battery life
Use lithium batteries instead of alkaline; avoid rechargeable batteries. Ensure signal strength is at least two bars.
False triggers
Do not aim the camera at heat sources or nearby tree branches/brush, especially on windy days.
Video files not transmitting
Full HD video files are stored on the SD card and cannot be transmitted wirelessly due to file size/bandwidth limits.
Before use
- Download the Bushnell Trail Camera app.
- Install 12 fresh AA batteries (lithium recommended).
- Insert a high-speed Class 10 SD card (up to 256GB).
- Verify cellular signal strength (minimum 2 bars recommended).
- Ensure the camera is mounted 3.5-5 feet above the ground.
Specs in practice
- Flash Mode: Short Range
- Uses medium LED output and fast shutter speed; best for battery life and close-up animal shots.
- Flash Mode: Long Range
- Uses high LED output and slow shutter speed; provides maximum range but increases motion blur and battery consumption.
Images and diagrams
- The control panel contains the Power switch, Wake Up button, and indicator lights for Cellular Signal, Camera Status, and Battery Life.
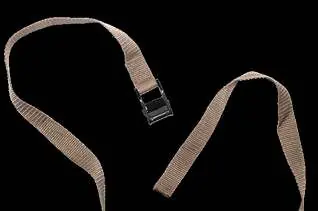
- The strap channel on the back of the camera is used to thread the provided adjustable belt for tree mounting.
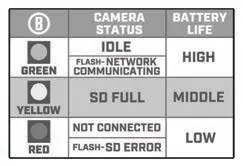
- The camera status indicator guide on the device helps identify operational status (Idle, Communicating, SD Full, or Error) via color-coded lights.
Model compatibility
- Designed for operation and sale only within North America.
- Requires an active data plan for each camera to transmit images.
- Accounts are tied to a single email address; multiple devices can log into one account.

Manual page author
David Miller
Documentation analyst
Organizes user manual content into clear summaries, with attention to model details, product context, and everyday usability.