Lighting / Fixtures
Installation Guide for C Cattleya Ceiling Fixture
A comprehensive installation and wiring guide for the C Cattleya ceiling fixture. This manual provides step-by-step instructions for mounting, electrical connections, and safety precautions.
Table of contents
Quick Installation Guide
This guide provides the necessary steps to install your C Cattleya ceiling fixture. Before beginning, ensure the main power is turned off at the circuit breaker. The installation involves mounting the plate to an existing outlet box, connecting the wires (black to black, white to white, ground to ground), and securing the fixture body and lampshade.
Safety Precautions
Warning: Failure to follow these instructions may result in electric shock or injury.
- Always turn off the main power at the circuit breaker before starting installation or servicing.
- All electrical connections must comply with local and National Electrical Code (N.E.C.) standards.
- If you are not familiar with electrical wiring, consult a qualified electrician.
Installation and Assembly
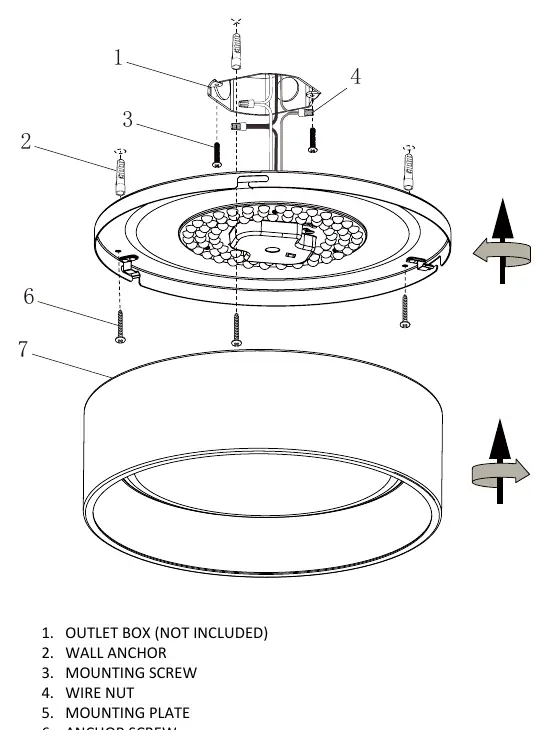
- Prepare the Mounting Plate: Center the mounting plate (5) over your outlet box (1) and mark the locations for the wall anchors (2).
- Install Anchors: Drill holes at the marked locations and insert the wall anchors (2).
- Wiring: Connect the supply wires to the fixture wires using the provided wire nuts (4):
- Black supply wire to black fixture wire.
- White supply wire to white fixture wire.
- Supply ground wire to fixture ground wire.
- Mount the Fixture: Align the mounting screw (3) with the lock hole on the fixture. Twist the fixture body until it is securely hung, then tighten the mounting screw through the plate using a screwdriver.
- Secure the Fixture: Insert an anchor screw (3) into each wall anchor (2) to finalize the mounting.
- Attach Lampshade: Align the slot on the glass with the stud on the ceiling and the jig body. Twist the lampshade (7) cover until it is securely locked in place.
- Finalize: Restore electrical power once installation is complete.
Practical help
Common problems
Fixture does not turn on
Verify that the main power is restored at the circuit breaker and check that all wire nut connections are secure and properly matched (black-to-black, white-to-white).
Fixture is loose or wobbling
Ensure the mounting screw is fully tightened through the plate and that the anchor screws are securely fastened into the wall anchors.
Before use
- Turn off the main power at the circuit breaker.
- Verify that you have an existing outlet box installed.
- Ensure you have a screwdriver available for installation.
- Confirm the electrical supply is 120VAC/60Hz.
- Check that all parts (mounting plate, wire nuts, anchors, screws) are present.
Images and diagrams
- The diagram illustrates the assembly sequence, showing the outlet box, mounting plate, and the order in which the fixture body and lampshade are attached.
- It highlights the use of wire nuts for secure electrical connections.
Model compatibility
- Requires an existing outlet box for installation.
- Must be installed in accordance with National Electrical Code (N.E.C.) standards.

Manual page author
David Miller
Documentation analyst
Organizes user manual content into clear summaries, with attention to model details, product context, and everyday usability.