Lighting / Fixtures
Installation Manual for C Cattleya LED Wall Sconce
Comprehensive installation guide for the C Cattleya LED Wall Sconce. This manual provides step-by-step instructions for both plug-in and hardwire installation methods, safety precautions, and mounting procedures.
Table of contents
Manual images
Click an image to enlargeQuick Guide from the Manual
This document provides installation instructions for the C Cattleya LED Wall Sconce. The product supports two installation methods: a standard plug-in installation and a permanent hardwire installation. Always ensure the main power is turned off at the circuit breaker before beginning any work.
Safety Precautions
- Electrical Safety: Turn off the main power at the circuit breaker before installing or servicing the fixture to prevent electric shock.
- Compliance: All electrical connections must comply with local and National Electrical Code (N.E.C.) standards. If you are unfamiliar with proper wiring, consult a qualified electrician.
- Preparation: Close or cover sink drains and vents near the installation site to prevent losing small hardware components.
Plug-in Installation

- Turn off power. Connect the rod (D) to the fixture body (C).
- Install the light bulb (B) and the light shade (A).
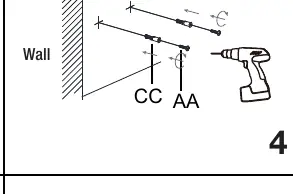
- Measure the distance between the two key holes on the crossbar assembly.
- Mark the location on the wall, ensuring the holes are horizontally aligned.
- Drill 6mm holes, insert plastic anchors (CC), and secure the wood screws (AA).
- Place the fixture body key holes onto the wood screws (AA) and ensure it is secure.
- Plug the power cord into an outlet and turn on the switch.
Hardwire Installation
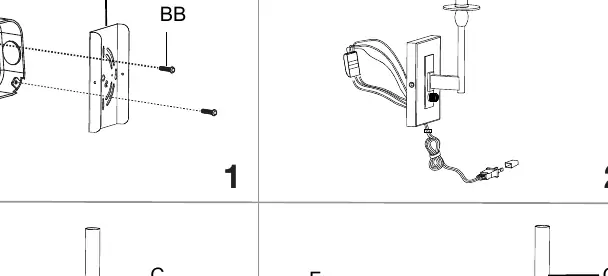
- Turn off power. Remove the mounting plate from the fixture body (C) and keep the mounting balls (D).
- Remove the iron sheets from the mounting plate (F) using a screwdriver. Secure the mounting plate (E) to the outlet box using screws (BB).
- Remove the plug wire and rubber plug from the wire terminal.
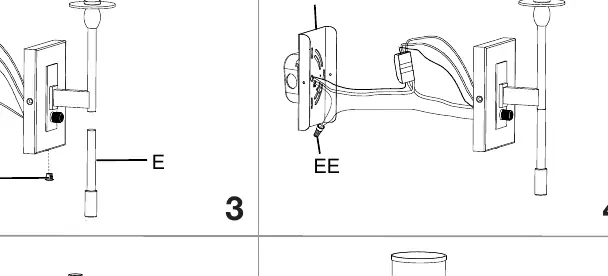
- Insert the bushing with rubber washer (DD) into the backplate hole and connect the rod (D) to the fixture body (C).
- Connect the supply ground wire to the green ground screw on the mounting plate (F). Connect the fixture ground wire to the supply ground wire using the wire connector (EE).
- Connect the Supply White Wire to the terminal hole marked N and the Supply Black Wire to the terminal hole marked L.
- Reattach the fixture body (C) to the mounting plate (F) and secure with the mounting balls (D).
- Install the bulb (B) and lampshade (A), then turn on the power.
Practical help
Common problems
Fixture feels loose on the wall
Ensure the key holes on the fixture body are fully seated and secure on the wood screws (AA) before letting go.
Unsure about wiring connections
If you are unfamiliar with proper electrical wiring connections, obtain the services of a qualified electrician to ensure compliance with N.E.C. standards.
Before use
- Turn off the main power at the circuit breaker.
- Verify you have a screwdriver (not provided).
- For plug-in: Ensure the wall outlet is accessible.
- For hardwire: Ensure an outlet box is installed.
- Check that all parts (A, B, C, D, E, F, AA, BB, CC, DD, EE) are present.
Images and diagrams
- Plug-in method: Uses key holes on the crossbar to hang the fixture on wall anchors.
- Hardwire method: Uses a mounting plate secured to an electrical outlet box.
Model compatibility
- Product supports two installation methods: Plug-in or Hardwire.
- Bulb is not included.

Manual page author
Emily Carter
User documentation editor
Prepares concise manual descriptions and highlights the most useful setup, operation, and maintenance information for readers.