Automotive / Motorcycle Communication
Installation Guide for Cardo PACKTALK EDGE
A comprehensive installation guide for the Cardo PACKTALK EDGE motorcycle communication system. This guide provides step-by-step instructions for mounting the unit, installing speakers, positioning the microphone, and securing the clamp on...
Table of contents
Manual images
Click an image to enlargeQuick guide from the manual
This document provides the necessary steps to install the Cardo PACKTALK EDGE communication system on your motorcycle helmet. Before beginning, ensure you have all the components listed in the contents section. The installation process varies depending on your helmet type (open face vs. full face) and the rim thickness of your helmet.
Parts list
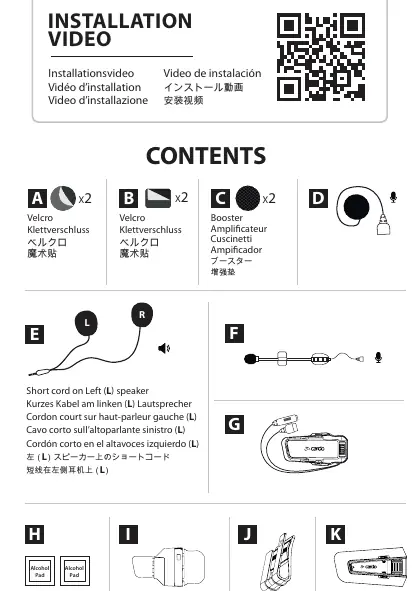
- A: Velcro pads (x2)
- B: Velcro pads (x2)
- C: Booster pads (x2)
- D: Microphone (for full face)
- E: Speakers (L/R)
- F: Microphone (for open face)
- G: PACKTALK EDGE unit
- H: Alcohol pads
- I: Clamp base
- J: Clamp clip
- K: Unit mount
Velcro installation
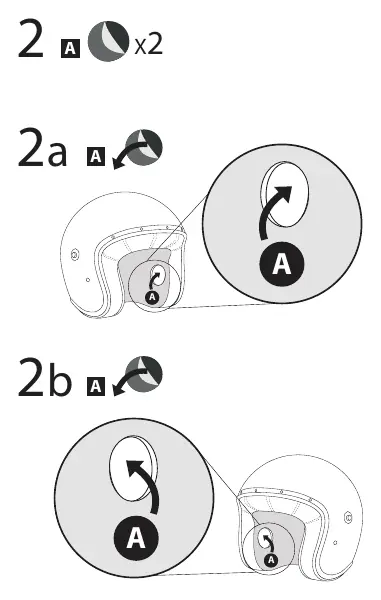
- Clean the interior surface of the helmet using the provided alcohol pads.
- Apply the adhesive Velcro pads (A) to the interior of the helmet where the speakers will be placed.
Speaker installation
- Identify the Left (L) and Right (R) speakers.
- Remove the helmet padding to access the interior shell.
- Place the speakers into the designated areas.
- If the speakers are too far from your ears, use the booster pads (C) to bring them closer.
- Return the helmet padding to its original position.
Microphone installation
Open face helmet
- Use the microphone (F) and Velcro pads (B).
- Position the microphone so the arrow on the mic faces your mouth.
- Secure the microphone using the Velcro pads.
Full face helmet
- Use the microphone (D) and Velcro pads (B).
- Attach the microphone to the interior of the chin bar using the Velcro pads.
Clamp installation
Narrow rim helmet (<5mm)
- Attach the clamp clip (J) to the unit mount (G).
- Slide the clamp onto the helmet shell edge.
Wide rim helmet (>5mm)
- Use the clamp base (I) and alcohol pads (H).
- Clean the helmet surface with the alcohol pad.
- Apply the clamp base to the helmet and allow it to set for 4 hours before attaching the unit.
Cable management
Once the speakers and microphone are installed, tuck all excess wires behind the helmet padding to ensure a clean and secure fit.
Removing the unit
- Press the release button on the unit mount.
- Slide the unit off the mount to remove it from the helmet.
Practical help
Common problems
Speakers are too far from ears
Use the included booster pads (C) to position the speakers closer to your ears.
Clamp does not fit the helmet edge
Determine if your helmet has a narrow (5mm) rim and use the appropriate mounting method (clip vs. adhesive base).
Microphone audio quality is poor
Ensure the arrow on the microphone is facing directly towards your mouth.
Before use
- Clean the helmet surface with the provided alcohol pads.
- Identify your helmet type (Open face vs. Full face).
- Measure the helmet rim thickness to choose the correct clamp method.
- Ensure all parts (Velcro, booster pads, clamp, unit) are present.
- Verify the Left (L) and Right (R) speaker orientation.
Specs in practice
- Booster pads
- Optional foam pads to adjust speaker depth for better audio.
Images and diagrams
- Velcro placement: Shows where to stick the adhesive pads inside the helmet.
- Clamp mounting: Illustrates sliding the clip onto the helmet shell.
- Cable routing: Demonstrates tucking wires behind the padding.
Model compatibility
- Half helmet kit is sold separately.

Manual page author
Michael Turner
Technical manual editor
Reviews PDF manuals for structure, safety notes, and practical product details so readers can find the right information quickly.