Furniture / Storage Shelving
User Manual for Casaria Polyrattan 2-Set Flower Box
Comprehensive user manual for the Casaria Polyrattan 2-Set Flower Box. Includes assembly instructions, maintenance tips, technical specifications, and safety guidelines for proper installation and care.
Quick answers from the manual
Quick answer
- The Casaria Polyrattan 2-Set Flower Box is designed for outdoor use on balconies. It features adjustable mounting brackets (5.2-15.2 cm) and requires assembly by 1-2 people. p. 1, 3, 6
Key actions
- Assemble the frame p. 26
- Adjust mounting brackets p. 27
First start
- Assemble the product fully before use and ensure all screws are tightened. p. 3, 6
Maintenance and reset
- Clean with a cloth and warm soapy water. Do not use solvent-based cleaners or bleach. p. 3, 6
Technical specifications
| Parameter | Value | Meaning | Pages |
|---|---|---|---|
| Overall Dimensions | 60 x 20 x 19 cm | Total size of the flower box. | p. 4, 6 |
| Planter Dimensions | 58 x 17 x 16 cm | Internal dimensions of the planter. | p. 4, 6 |
| Mounting Bracket Width | 5.2 – 15.2 cm | Adjustable range for mounting. | p. 4, 6 |
Where to find it in the PDF
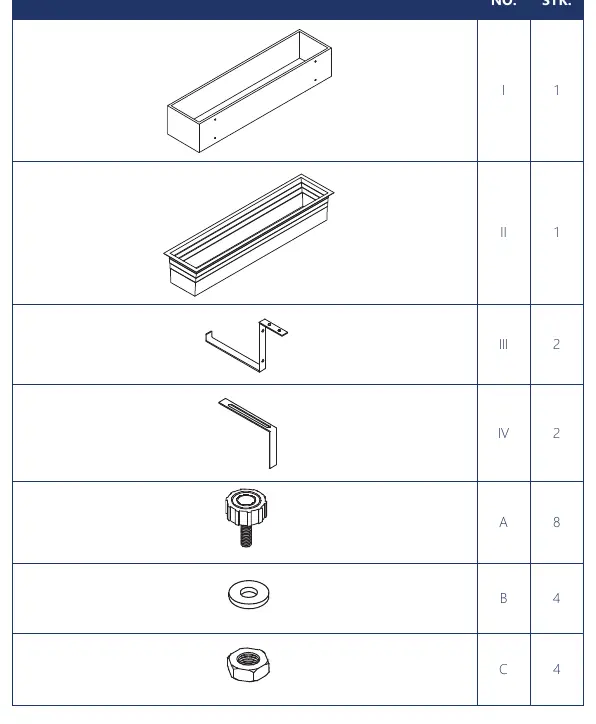
- Parts List p. 25
- Assembly Instructions p. 26, 27
Table of contents
Manual images
Click an image to enlargeImportant Information
This manual provides instructions for the Casaria Polyrattan 2-Set Flower Box. It is intended for domestic use on balconies or outdoors. Assembly is recommended for 1-2 people. Ensure the product is fully assembled and screws are tightened before use.
Assembly Instructions
Follow these steps to assemble your flower box:
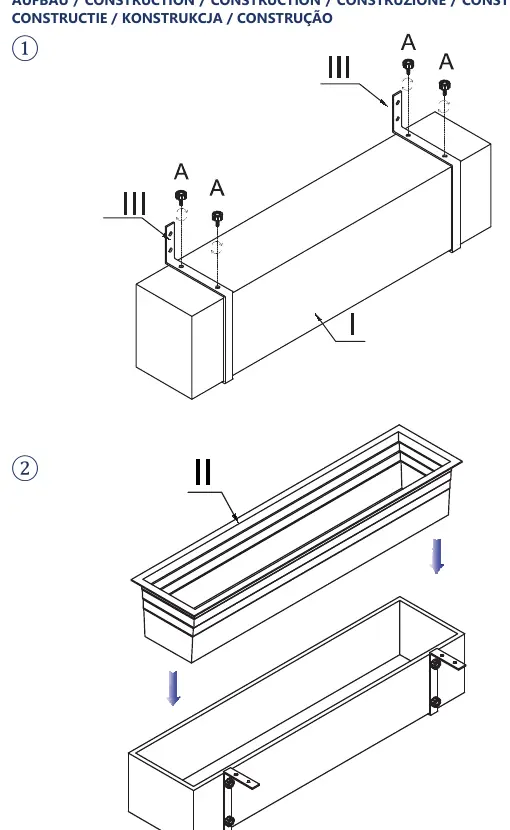
- Step 1: Connect the frame elements using the provided screws. Insert screws by hand first and tighten only slightly to allow for adjustments.
- Step 2: Once all elements are connected, tighten the screws fully. This allows for minor adjustments to drill holes or weld points common in hand-finished products.
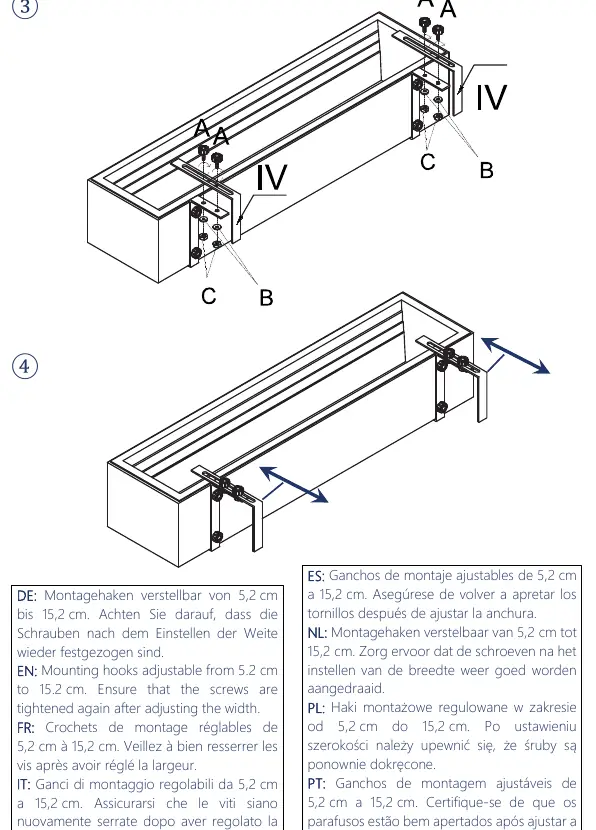
- Step 3: Attach the mounting brackets (IV) to the frame using screws (A), washers (B), and nuts (C).
- Step 4: Adjust the mounting hooks to the required width (5.2 cm to 15.2 cm) and ensure all screws are securely tightened after adjustment.
Maintenance and Care
Clean the product using a cloth and warm soapy water. Do not use solvent-based cleaners or bleach, as these can damage the material. Regular checks of screws and bolts are recommended to ensure safety and longevity.
Technical Data
- Overall Dimensions: 60 x 20 x 19 cm
- Planter Dimensions: 58 x 17 x 16 cm
- Mounting Bracket Width: 5.2 – 15.2 cm
Safety Warnings
- Keep small children away during assembly due to risk of injury.
- Secure the product in strong winds.
- Do not use the product if parts are missing, damaged, or worn.
- Keep away from open flames and flying sparks.
Practical help
Common problems
Screws do not fit or holes are misaligned
Insert screws by hand first and tighten only slightly. Tighten fully only after all elements are connected to allow for minor adjustments.
Mounting bracket does not fit the railing
Adjust the mounting bracket width between 5.2 cm and 15.2 cm to fit your specific railing.
Before use
- Check for all parts (I, II, III, IV, A, B, C) as listed in the parts list.
- Ensure you have a suitable tool for assembly.
- Verify the mounting bracket width matches your balcony railing.
- Ensure the product is fully assembled and all screws are tightened.
- Check for any damage or missing parts before starting.
Specs in practice
- Mounting bracket width
- Adjustable range from 5.2 cm to 15.2 cm to fit various balcony railings.
- Planter dimensions
- The internal space for plants is 58 x 17 x 16 cm.
- Overall dimensions
- The total size of the unit is 60 x 20 x 19 cm.
Images and diagrams
- Parts list (Page 25) identifies components I, II, III, IV and hardware A, B, C.
- Assembly steps 1-2 (Page 26) show the connection of the frame and planter.
- Assembly steps 3-4 (Page 27) show the attachment and adjustment of the mounting brackets.
Model compatibility
- Suitable for domestic use only.
- Not for commercial use.
- Designed for outdoor use on balconies or similar locations.

Manual page author
Michael Turner
Technical manual editor
Reviews PDF manuals for structure, safety notes, and practical product details so readers can find the right information quickly.