Electronics / Cameras
Celestron PowerSeeker 127EQ Telescope Quick Setup Guide
Quick setup guide for the Celestron PowerSeeker 127EQ telescope. Includes step-by-step assembly instructions for the tripod, equatorial mount, and telescope tube, as well as guidance on finderscope alignment and your first night of lunar...
Table of contents
Manual images
Click an image to enlargeQuick Guide from the Manual
Solar Warning: Never attempt to view the sun through any telescope without a proper solar filter. Doing so can cause permanent eye damage.
This guide provides the essential steps to assemble and align your Celestron PowerSeeker 127EQ telescope. It covers the initial tripod setup, mounting the telescope tube, installing accessories, and aligning the finderscope for your first observation.
Unpacking and Parts
Verify that all parts are present before beginning assembly:
- Telescope tube with two tube rings
- Tripod with center leg brace
- Equatorial mount
- Two eyepieces (20mm and 4mm)
- 3x Barlow lens
- Finderscope
- 6 lb. counterweight and counterweight bar
- Two slow-motion cables
- Eyepiece accessory tray
- Tripod multi-tool and Allen wrench
Tripod Setup
- Spread the tripod legs outward until fully extended.
- Push down the center leg brace.
- Extend the center portion of each leg 6 to 12 inches and secure with the tightening screws. Ensure all legs are the same height for a level platform.
- Place the accessory tray on the center leg brace and thread it into the center hole until seated. Rotate if necessary to clear the leg brace arms.
- Locate the equatorial mount and place its base through the hole in the center of the tripod mounting platform.
- From underneath, thread the mounting bolt into the bottom of the equatorial mount.
Mount and Telescope Tube Installation
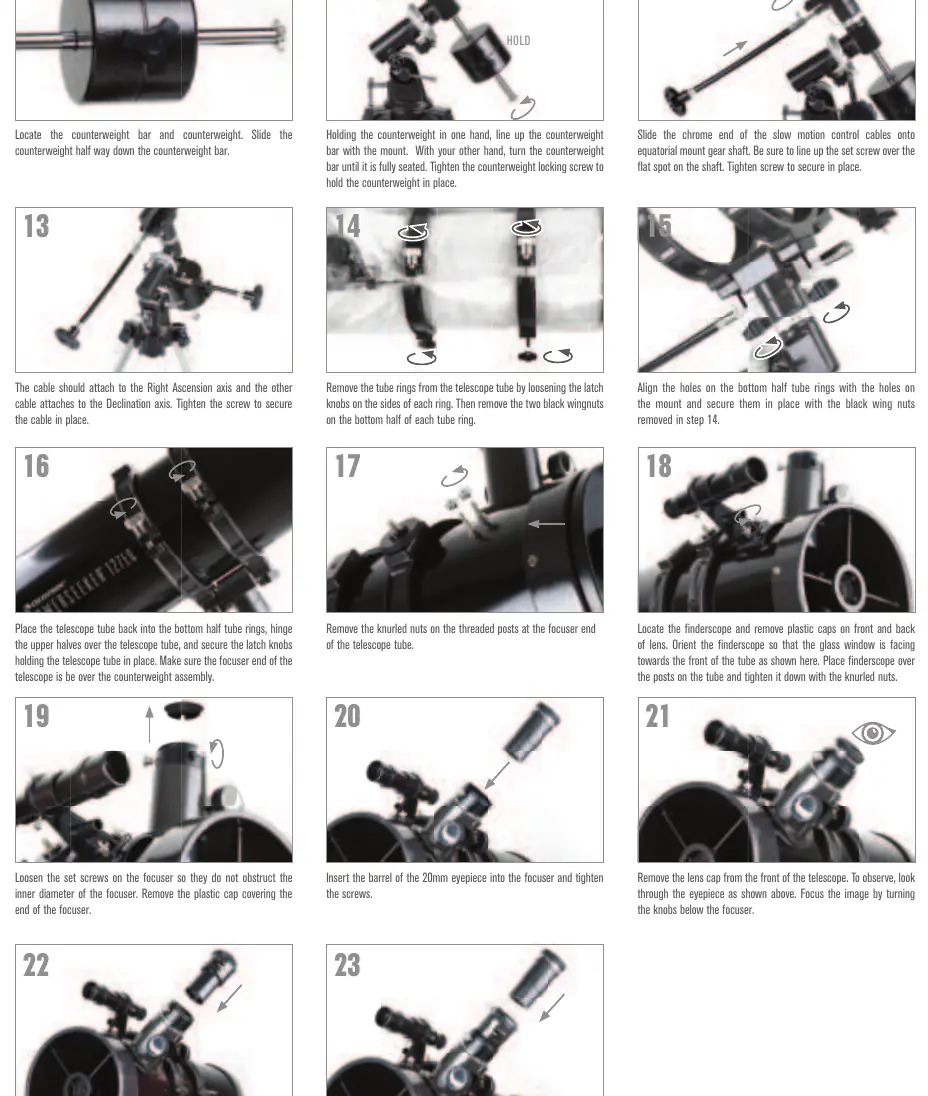
- Slide the counterweight halfway down the counterweight bar.
- Hold the counterweight in one hand, align the bar with the mount, and thread it in until seated. Tighten the locking screw.
- Attach the slow-motion control cables to the Right Ascension and Declination axes. Tighten the screws to secure.
- Remove the tube rings from the telescope tube by loosening the latch knobs and removing the black wingnuts.
- Align the bottom half of the tube rings with the mount and secure them using the black wingnuts.
- Place the telescope tube into the bottom ring halves, hinge the upper halves over the tube, and secure with the latch knobs. Ensure the focuser end is positioned over the counterweight assembly.
Focuser and Eyepiece Setup
- Loosen the set screws on the focuser and remove the plastic cap.
- Insert the 20mm eyepiece into the focuser and tighten the screws.
- Remove the lens cap from the front of the telescope.
- To use the 3x Barlow lens: Remove the eyepiece, insert the Barlow lens into the focuser, then insert the eyepiece into the Barlow lens and tighten the set screws.
Aligning the Finderscope
The finderscope helps locate objects. Align it during the day:
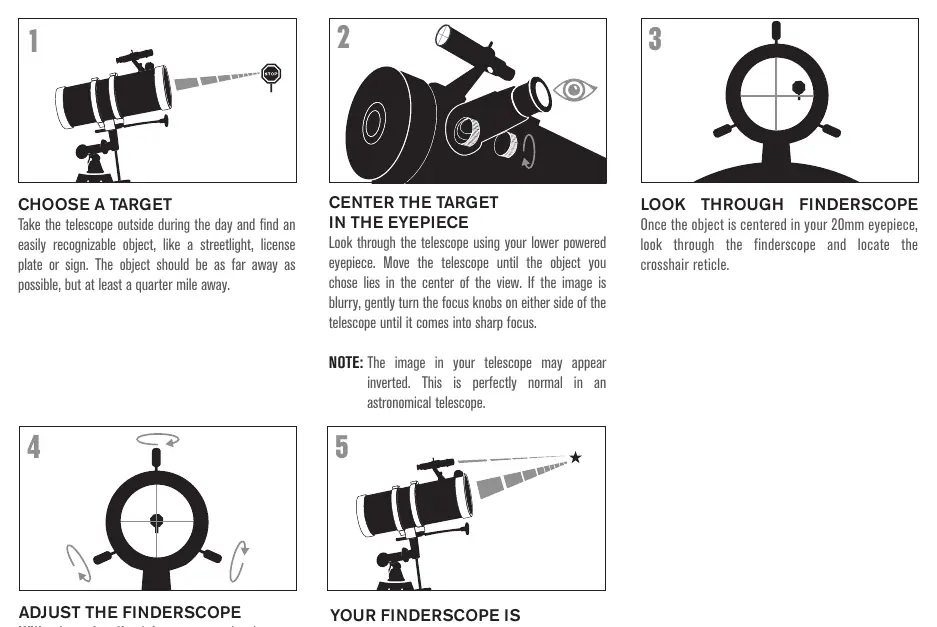
- Choose a recognizable, distant object (at least a quarter mile away).
- Center the object in the telescope's 20mm eyepiece.
- Look through the finderscope.
- Without moving the telescope, use the three set screws on the finderscope bracket to move the finder until the crosshair is centered on the same object.
- Adjust one screw at a time (loosen one, tighten another) to ensure the finder is held securely.
First Night Out: The Moon
- Set up the telescope with the 20mm eyepiece installed.
- Point the telescope toward the Moon.
- Look through the finderscope and center the Moon.
- Look through the 20mm eyepiece and turn the focus knobs to sharpen the image.
- For higher magnification, replace the 20mm eyepiece with the 4mm eyepiece.
Manufacturer information
Celestron
Practical help
Common problems
Image is blurry
Gently turn the focus knobs on either side of the telescope until the image comes into sharp focus.
Finderscope is not aligned
Follow the alignment procedure during the day using a distant, recognizable object like a streetlight or sign.
Image appears inverted
This is perfectly normal for an astronomical telescope.
Before use
- Verify all parts are present (tube, tripod, mount, eyepieces, Barlow lens, finderscope, counterweight, etc.).
- Ensure all three tripod legs are extended to the same height.
- Check that the finderscope glass window is facing the front of the telescope tube.
- Remove all plastic caps from the lenses and the focuser.
- Ensure the focuser end of the telescope is positioned over the counterweight assembly.
Specs in practice
- 20mm Eyepiece
- Lower power eyepiece, recommended for initial locating and viewing.
- 4mm Eyepiece
- Higher power eyepiece, provides significantly more magnification for closer views.
- 3x Barlow Lens
- Used to provide additional magnification when inserted into the focuser before the eyepiece.
Images and diagrams
- Steps 1-9: Tripod and equatorial mount assembly.
- Steps 10-23: Telescope tube, counterweight, and accessory installation.
- Finderscope Alignment: 5-step process to align the finder with the main optics.
- First Night Out: 5-step process for observing the Moon.
Model compatibility
- Solar Warning: Never attempt to view the sun through any telescope without a proper solar filter.

Manual page author
Emily Carter
User documentation editor
Prepares concise manual descriptions and highlights the most useful setup, operation, and maintenance information for readers.