Tools / Laser Engravers
Creality Box and HD 1080P Web Camera User Manual
Quick guide for setting up and using the Creality HD 1080P Web Camera and Creality Box. Includes assembly, network configuration, app setup, and status light indicators.
Table of contents
Manual images
Click an image to enlargeQuick Guide
This manual covers the setup and operation of the Creality HD 1080P Web Camera and the Creality Box. The system allows for remote monitoring of 3D printing status via the Creality Cloud app. Ensure your power adapter meets the 5V 2.4A (minimum 2A) specification for stable operation.
Parts List
- HD 1080P Web Camera
- Tripod
- Converter
- Creality Box
- TF Card
- USB Cable
Machine Introduction
The Creality Box features several ports and indicators:
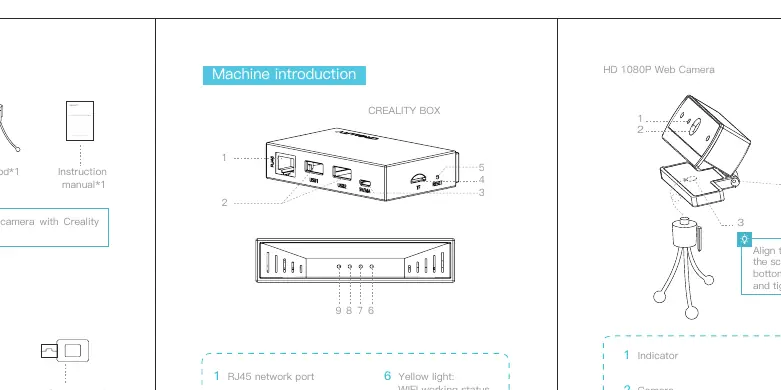
- Ports: RJ45 network port, Micro USB power interface, TF card connector, USB1/USB2 ports for printer/camera connection.
- Buttons: Reset button.
- Indicators: Yellow (WiFi status), Green (Cloud/network), Red (TF card), Blue (Ethernet).
Assembly and Setup
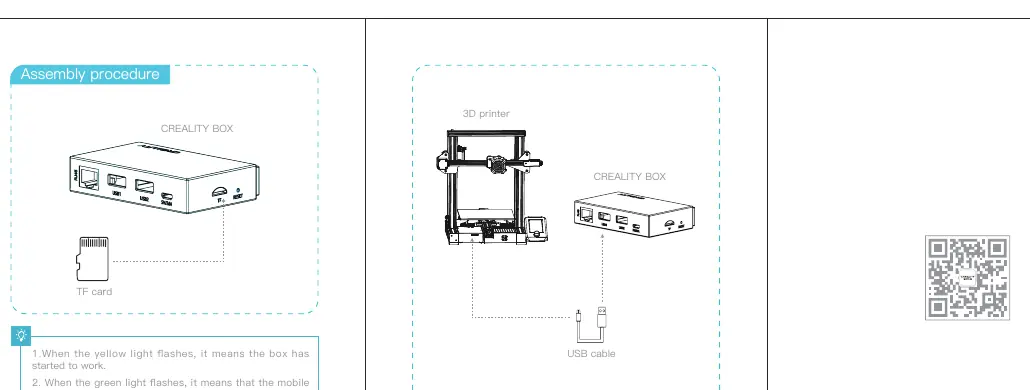
- TF Card: Insert a TF card (FAT32 or exFAT format) into the box connector.
- Printer Connection: Connect the printer's MINI/MicroUSB port to the box's USB1/USB2 port using the provided USB cable. Turn on the printer.
- Power: Connect the USB cable to the 5V/2.4A power adapter and the box.
- Camera Connection: Plug the camera USB connector into the USB1/USB2 port of the box.
App Configuration
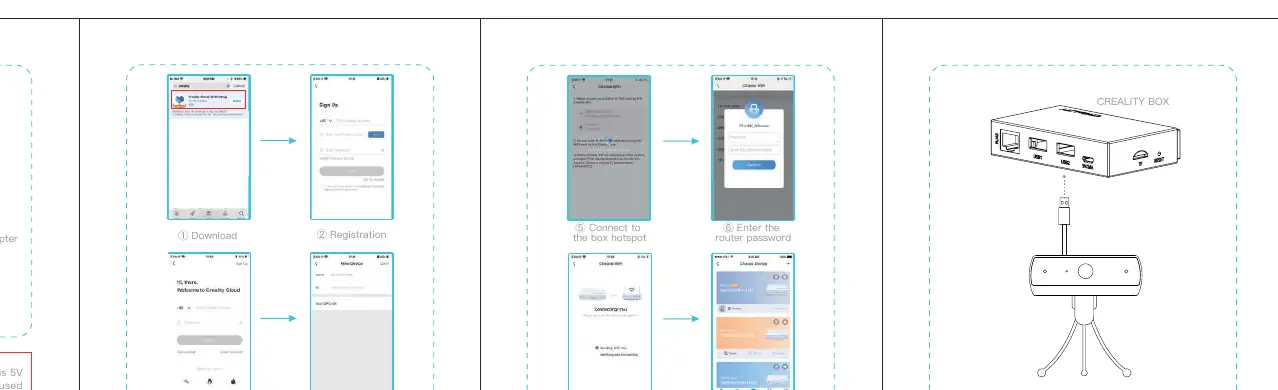
- Download the Creality Cloud app from your mobile app store or scan the QR code on the product box.
- Register and log in to your account.
- Click Device and then the + icon.
- Scan the QR code on the back of the box to add the device.
- Connect the box to WiFi to configure the network.
- Once the box shows as online, click the camera icon on the device page to monitor printing in real-time.
Troubleshooting and Status Lights
- Yellow Light Flashing: Box has started to work.
- Green Light Flashing: Received network configuration info.
- Green Light Steady: Not connected to the cloud.
- Red Light Always On: TF card is not inserted.
- Blue Light On: Camera has started to work.
Reset Procedure
If the box cannot be used normally due to incorrect configuration, press and hold the reset button for more than 5 seconds until factory settings are restored. Reconfigure the network through the Creality Cloud app.
Manufacturer information
Shenzhen Creality 3D Technology Co., Ltd.
Practical help
Common problems
Box not working after power on
Press and hold the reset button for more than 5 seconds to restore factory settings and reconfigure via the app.
TF card not detected
Ensure the red light is not always on; check that the card is formatted as FAT32 or exFAT.
Not connected to cloud
Check if the green light is steady; if so, reconfigure the network settings using the Creality Cloud app.
Before use
- Ensure power adapter is 5V 2.4A (minimum 2A).
- Insert a TF card (FAT32 or exFAT format).
- Download the Creality Cloud app.
- Have your WiFi router password ready.
- Ensure the camera is connected to the box USB port.
Specs in practice
- TF Card Format
- Must be FAT32 or exFAT.
Images and diagrams
- The machine introduction diagram identifies the RJ45 port, USB ports, power interface, and status lights.
- The assembly diagram illustrates the connection path from the printer to the box and the box to the power source.
Model compatibility
- Recommended for use with Creality Box.
- External devices need to be purchased separately.

Manual page author
Michael Turner
Technical manual editor
Reviews PDF manuals for structure, safety notes, and practical product details so readers can find the right information quickly.